
Tutorial 6 | The Populate Menu
All researchers accumulate data: spreadsheets, images, sounds, videos, and databases. If you have accumulated data on your computer or in another database, you can use Heurist’s Populate menu to upload it in bulk. This process can be complicated, if you data is complex or unstructured. In this tutorial, we show you a simple example. This tutorial is a bit longer than most others, because importing data can be a complex process. If you need additional help importing your data, please do contact us directly.
Create a Heurist database (free institutionally-supported services)
These free services are kindly supported by Intersect Australia, Huma-Num (France) and contributions from users.
To begin, watch the video. For more detailed instructions, you can consult the walkthrough. To learn something else, see our full list of tutorials.
The Importance of Structure
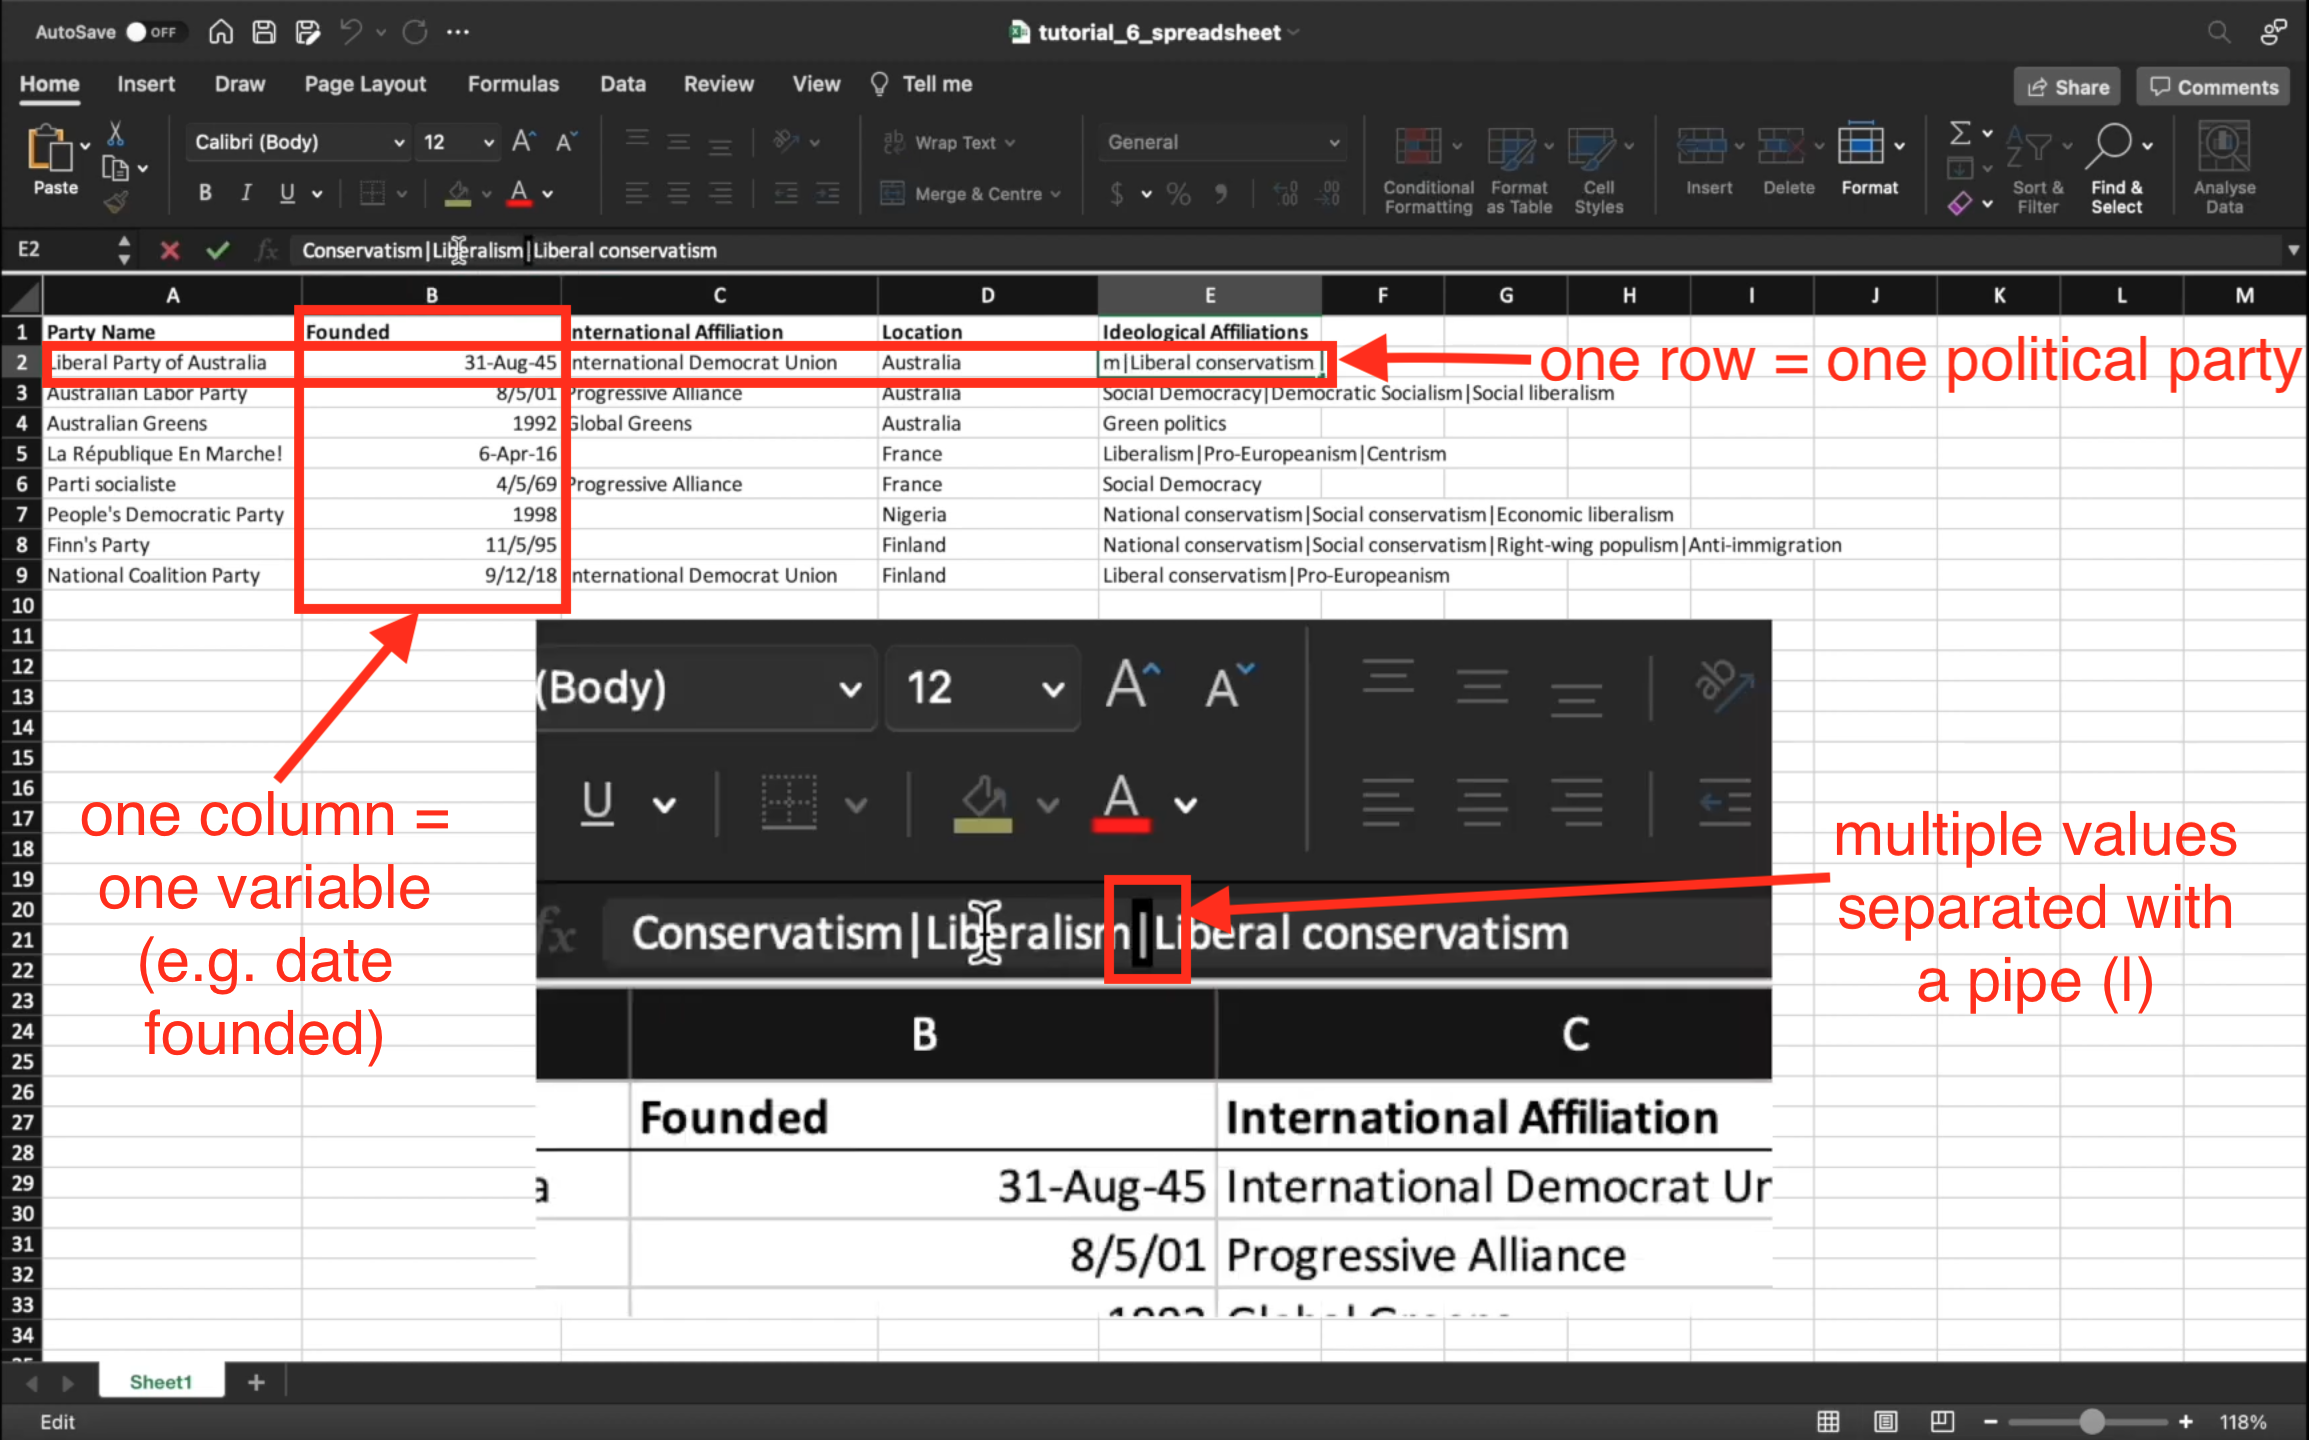
It is important to ensure that your spreadsheet is well structured before uploading it to Heurist. Heurist is a machine, and may not be able to interpret a spreadsheet that has been designed for a human user. Humans often use visual features of a spreadsheet, such as formatting, to convey information. Or they might insert unstructured data into a spreadsheet, such as notes or images. These can be very useful for a human user, but Heurist will be unable to interpret them correctly. To ensure that Heurist can interpret your spreadsheet effectively, you should follow the three principles illustrated below:
- One row, one entity: Each row of your spreadsheet should represent one individual thing, and every row should describe the same type of entity. In this example, each row of the spreadsheet contains data about a single political party, e.g. the Finn’s Party in row 8.
- One column, one variable: Each column of your spreadsheet should record a particular kind of data about each entity. In this case, for example, the second column records when each political party was ‘Founded’. You should label each column clearly. Sometimes you may need to store more than one value in a particular field. For instance, in this spreadsheet, each party may have more than one ‘Ideological Affiliation’. You may be tempted to create multiple columns, e.g. ‘Ideological Affiliation 1’, ‘Ideological Affiliation 2’ etc. But it is better to have a single column for the ‘Ideological Affiliation’ variable, and then follow the advice in principle 3…
- Choose a particular character to separate multiple values: If you need to record more than one value in a cell, you can separate each value with a chosen character. By default, Heurist expects you to use the ‘pipe’ character (|). This is what is displayed in the example. As you can see, the three Ideological Affiliations of the Liberal Party of Australia are written as ‘Conservatism|Liberalism|Liberal conservatism’. NB: When you have chosen which character to use as your ‘multiple value separator’, make sure that you only use it to separate multiple values, or Heurist may become confused.
Saving your Spreadsheet
Most spreadsheet programs save files in a proprietary format, for example .xlsx (Excel), .numbers (Numbers) or .ods (OpenOffice). These file types are complex and cannot be interpreted by Heurist. While Heurist does accept several different spreadsheet file types, the most straightforward type to use is ‘csv’ or ‘comma seperated values’. This is a very simple file type where columns are indicated by commas. Consider the following spreadsheet, for example:
| First Name | Second Name |
|---|---|
| Arushi | Sharma |
| Jean-Baptiste | Rivoire |
If you exported this as a csv file, it would become:
First Name,Second Name
Arushi,Sharma
Jean-Baptiste,Rivoire
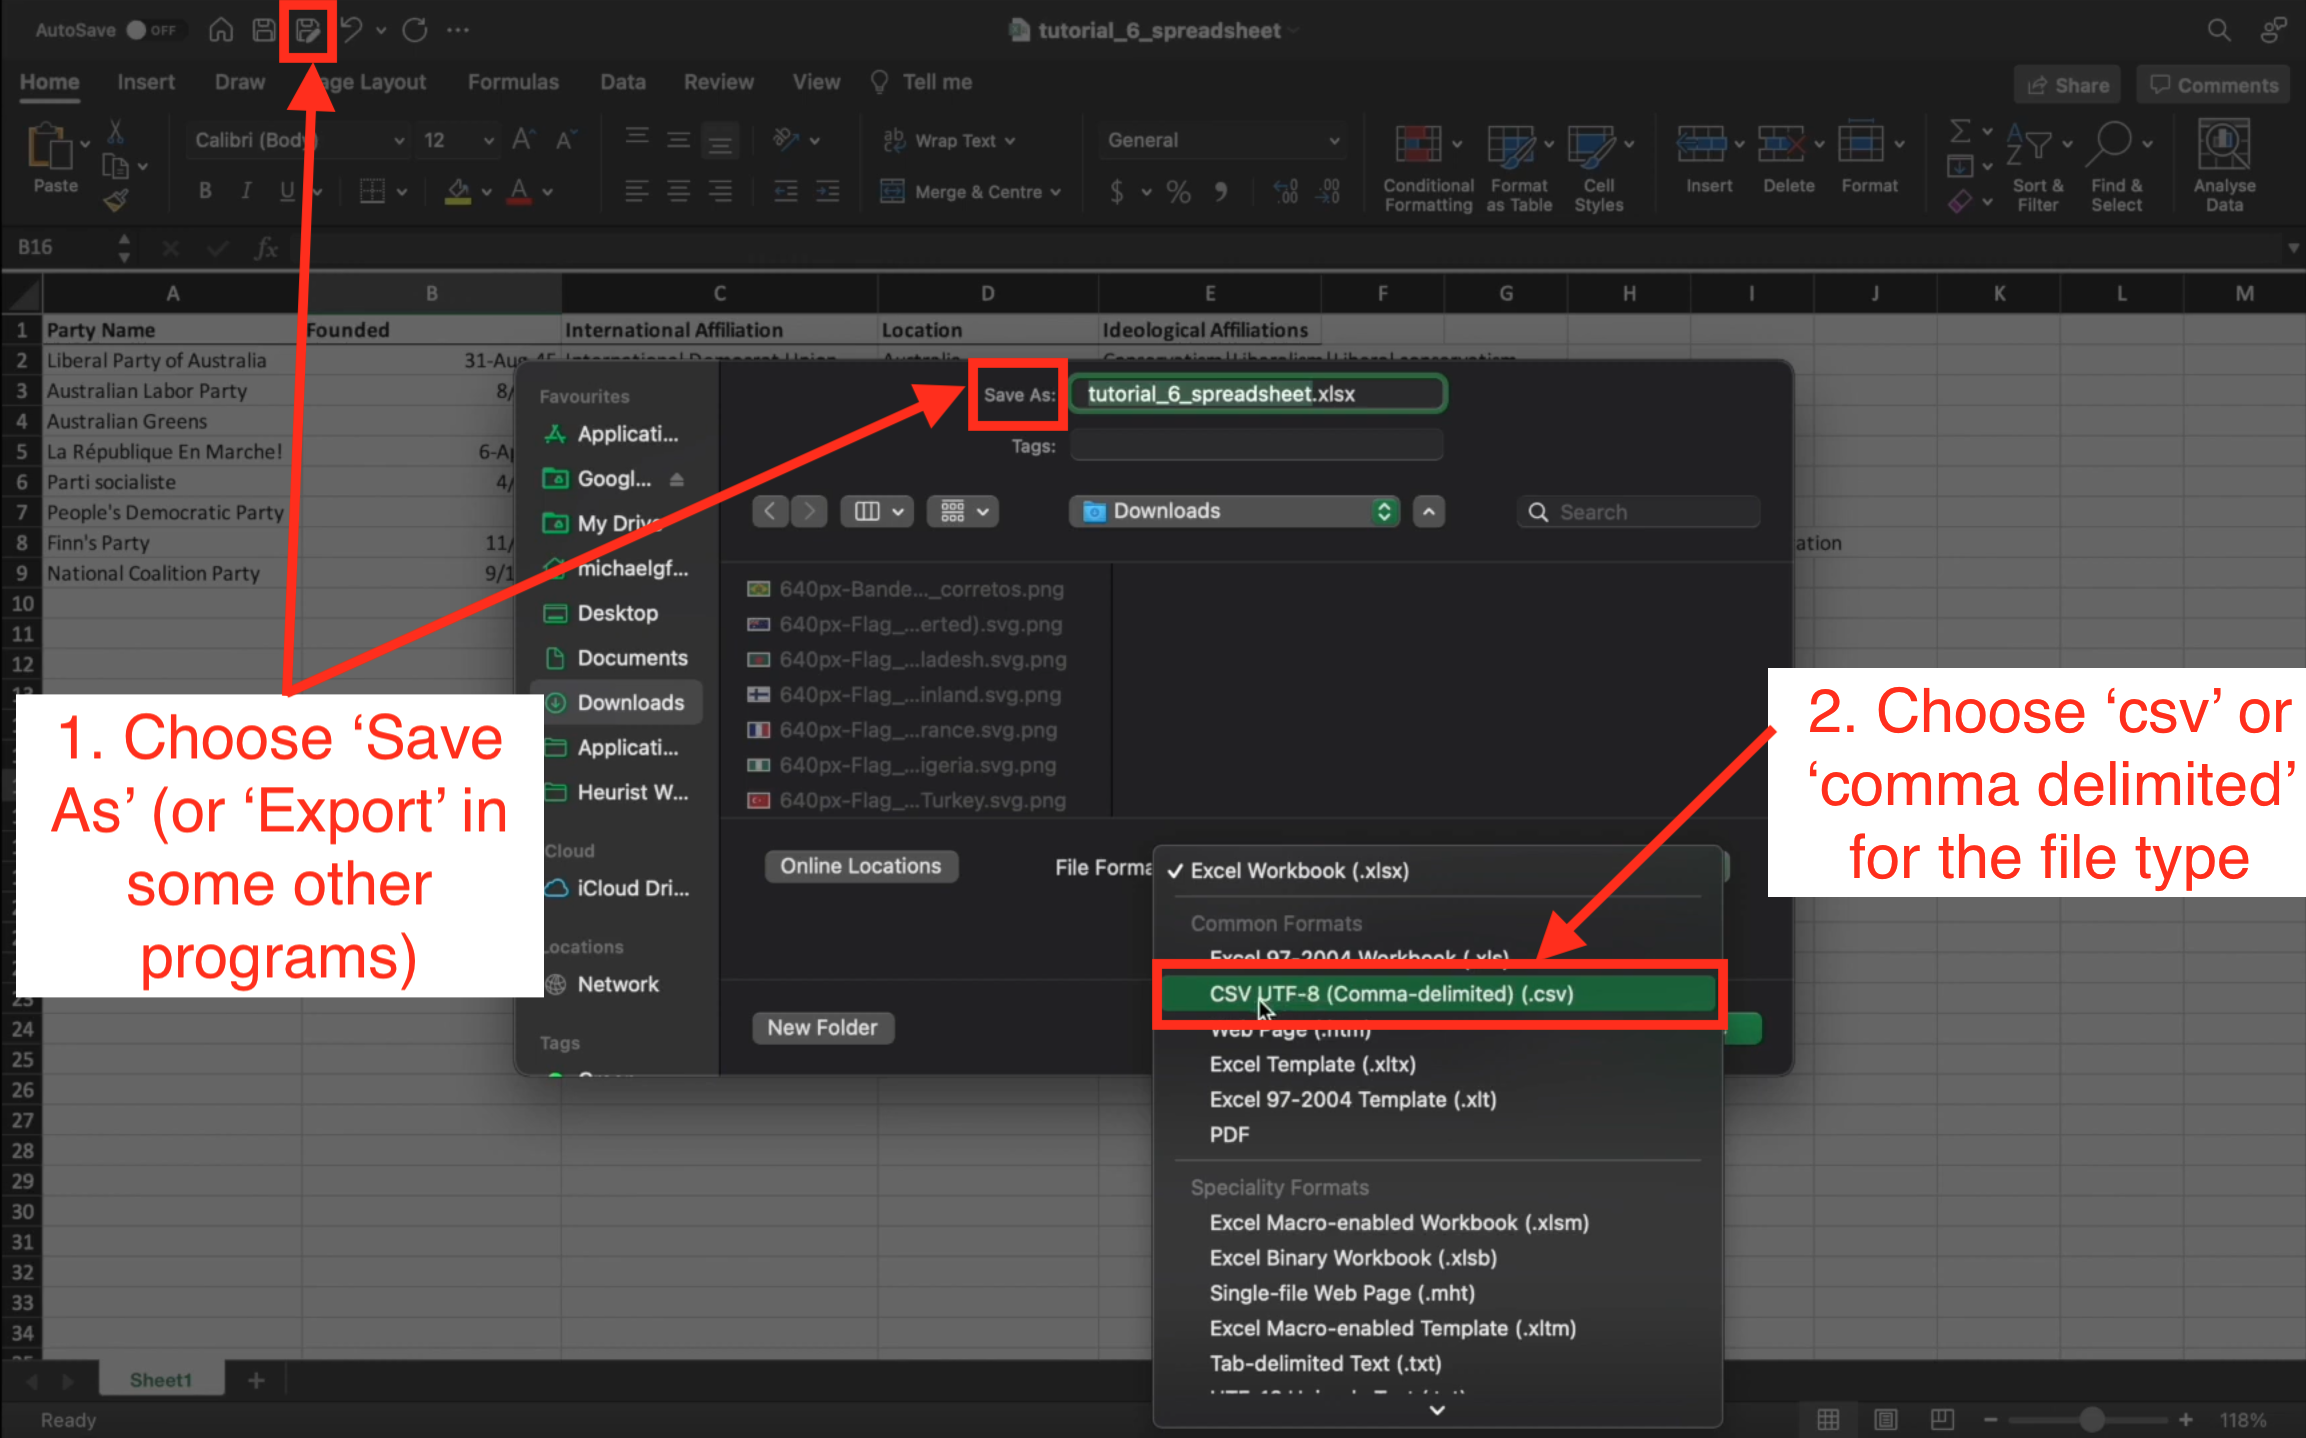
Every major spreadsheet program enables you to export your data as a csv. To do this in Excel, choose ‘Save As’ and then select ‘CSV’ as the file type. You can always tell a csv file because it will have the .csv file extension.
Accessing the csv importer
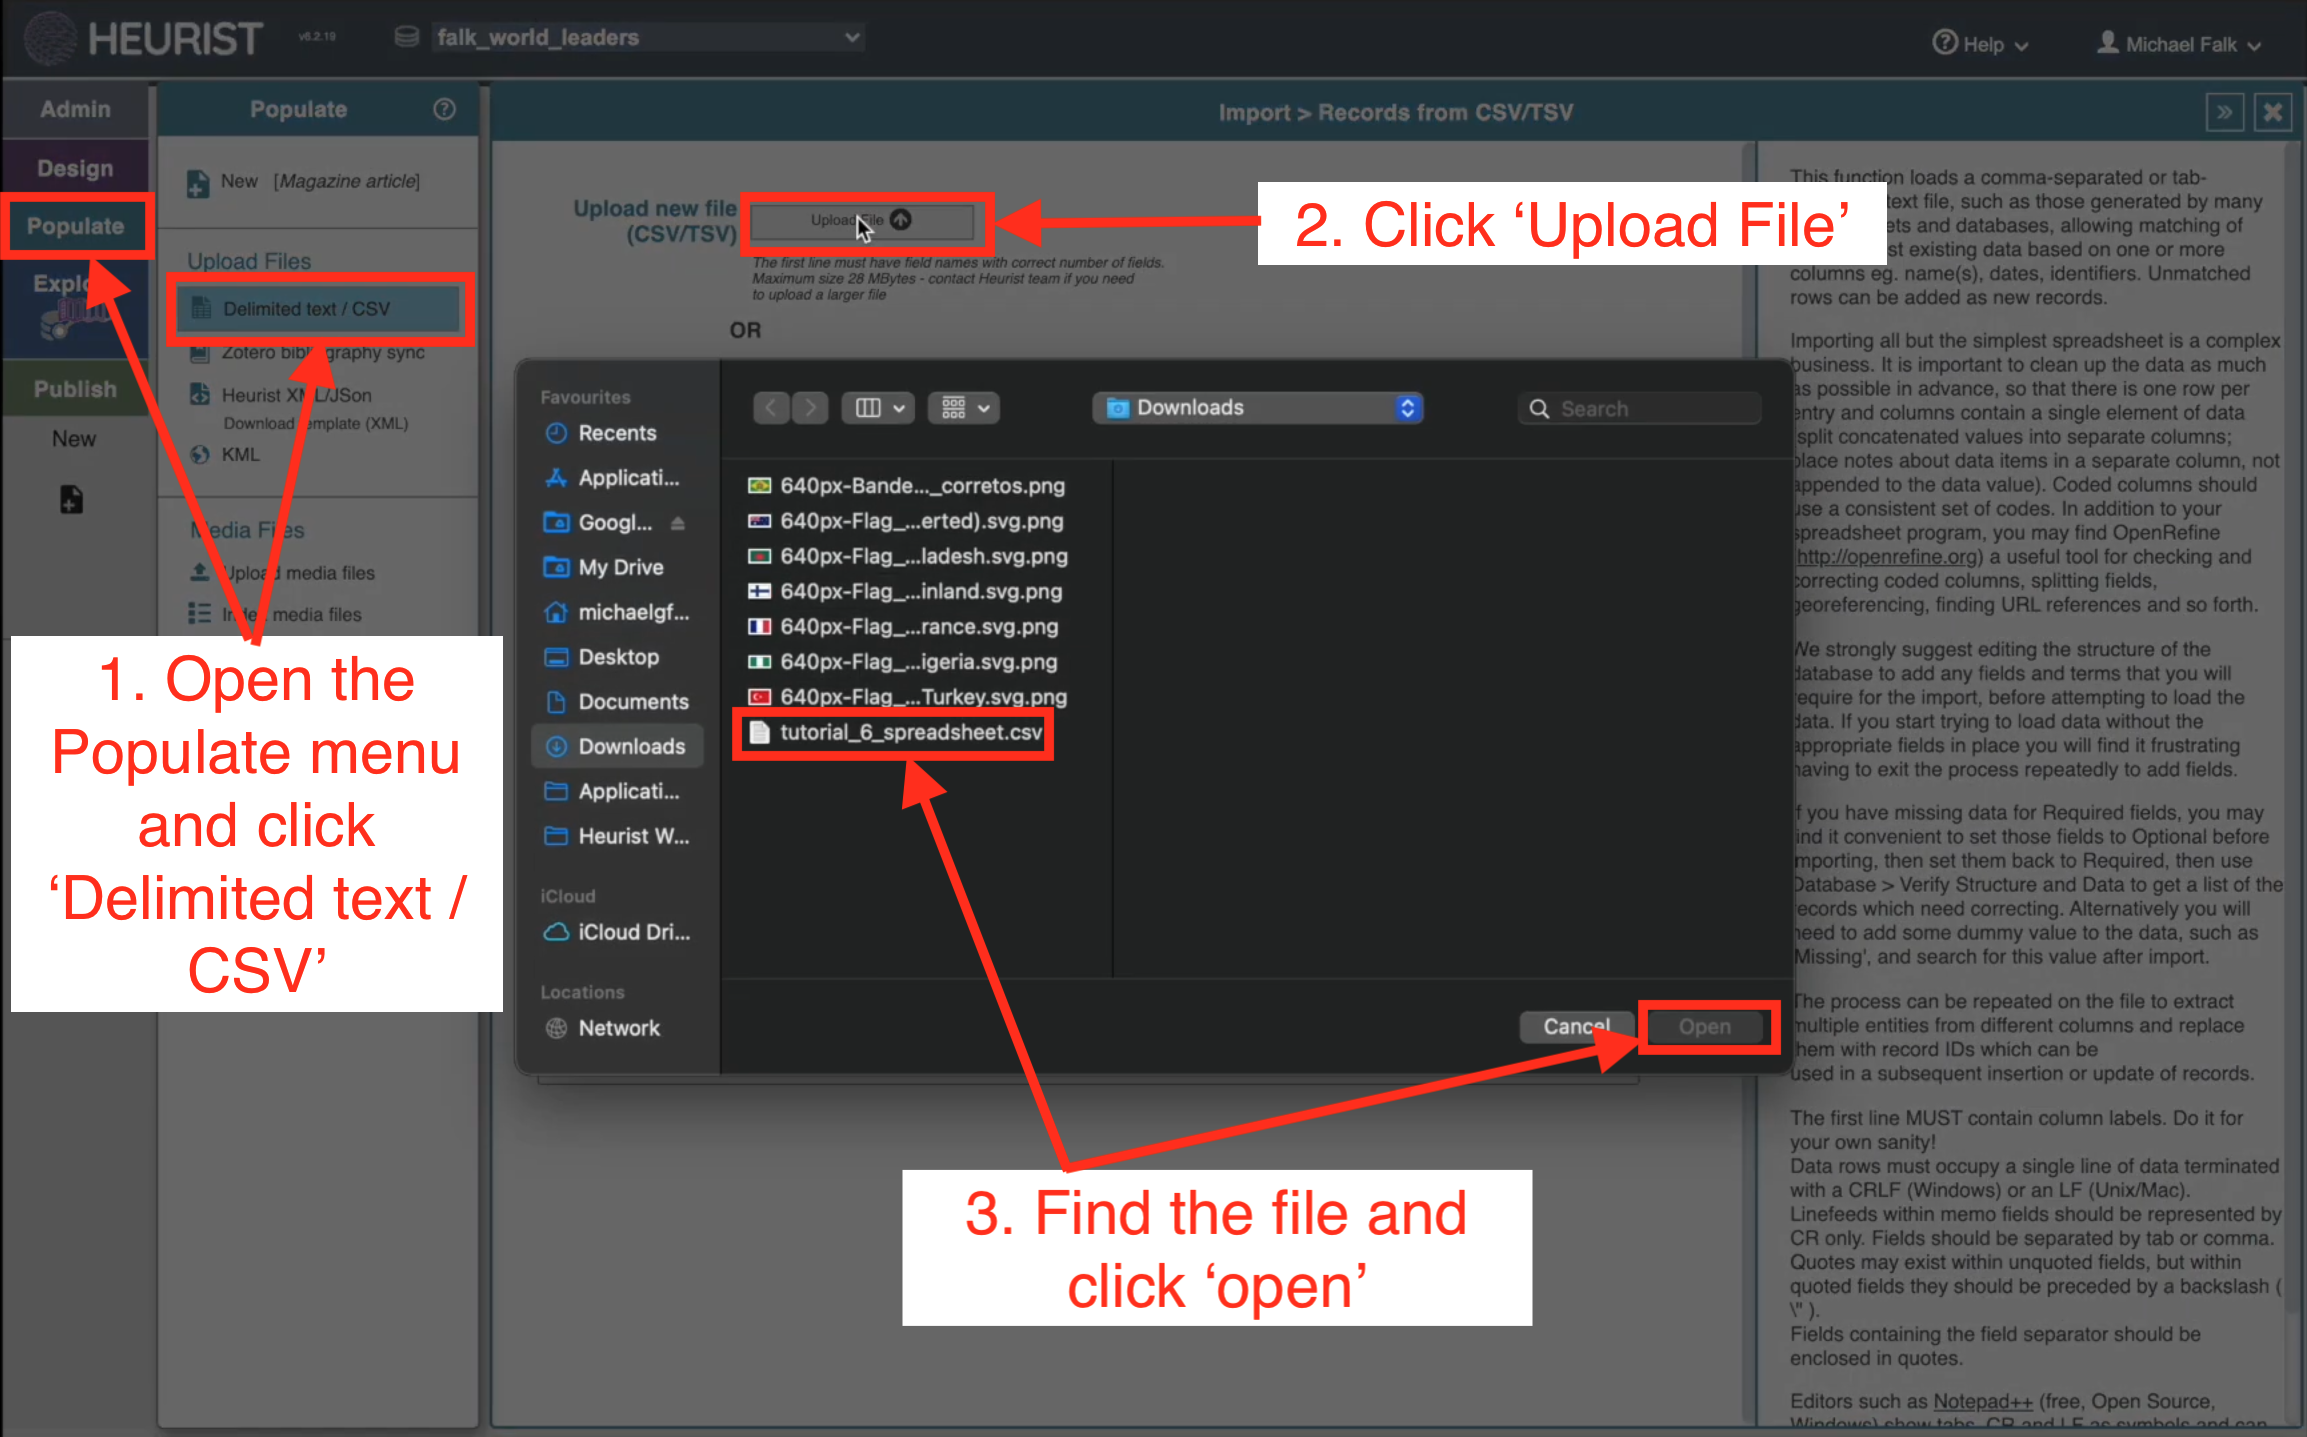
Once you have a csv prepared for uploading, it is time to access the csv import tool in the ‘Populate’ menu, and upload your file:
There are numerous options you can configure to ensure the spreadsheet is imported correctly. If you have exported the csv directly from Excel, Google, Numbers or a similar program, however, you should be able to ignore these settings. To check it all has worked, click ‘Analyse data’ and look at Heurist’s representation of your spreadsheet. Does it look right? Are all the data points in the right place? If you are having trouble with this step, please do contact support@heuristnetwork.org.

The import process
There are two main phases to the import process:
- Tell Heurist what record types to create
- Go through the process of Match → Prepare → Insert for each record type
There is a reason why this process is slightly complicated. A spreadsheet records data in a ‘flat’ manner. All data points are arranged on a grid. A spreadsheet can therefore only store information about a single entity type. In this example, the spreadsheet records information about political parties. Heurist does not store data in this way. Instead of storing data in a table, it allows you to create many different types of entity, and then record whatever information you like about each one. In the ‘World Leaders’ database, each political party is an entity, but so is each political international and each country. To import this spreadsheet, we need to tell Heurist that it mentions political internationals and countries as well as political parties. Then we need to systematically check whether these political parties, political internationals and countries are already in the database, match the existing records against the new data in the spreadsheet, and then create new records or update old records as appropriate.
Phase 1: Tell Heurist what record types to create
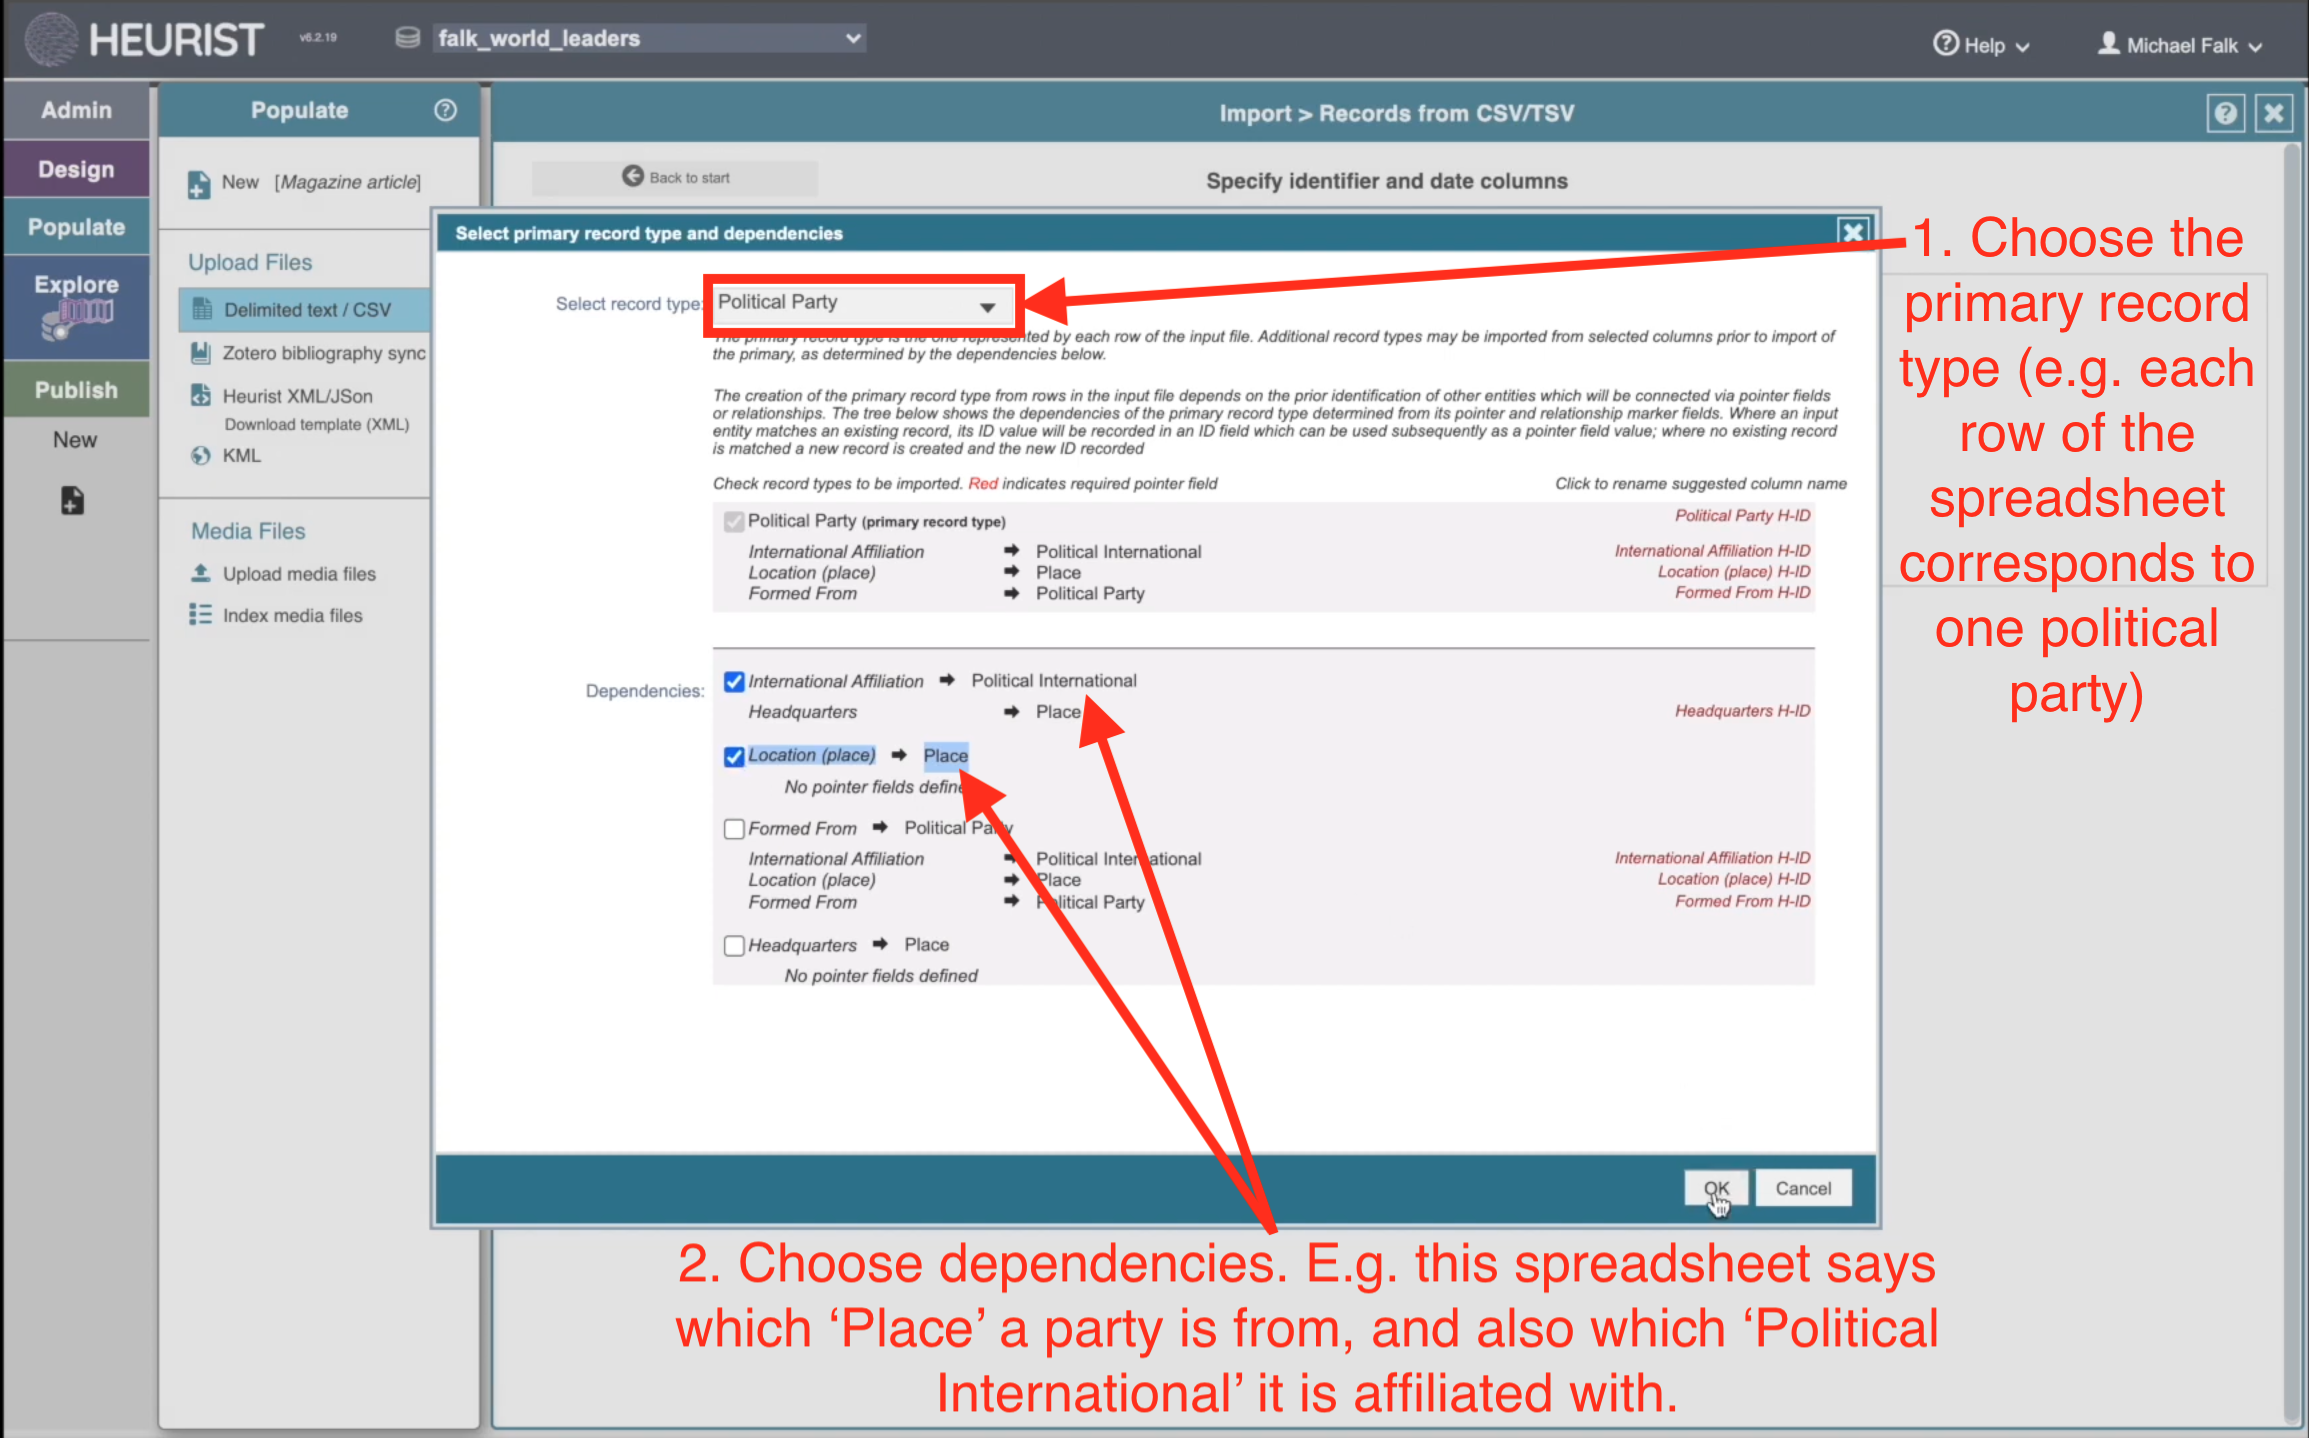
If you have set up your spreadsheet correctly, then each row should correspond to a particular record type. After clicking ‘continue’, you first need to tell Heurist what the main record type of the spreadsheet is. In this case, we have a spreadsheet of political parties. Once you have chosen a target record type, you will then be able to tell Heurist which linked record types (or ‘dependencies’) are present in the spreadsheet. In this case, the ‘Location’ of each political party is recorded, as well as its ‘International Affiliation’ to a political international:
Phase 2: Repeat the Match → Prepare → Insert process for each Record Type:
Once you have chosen which record types to create from your spreadsheet, you now need to systematically import each record type using the following process:
- Match: Check the database to see if the record already exists. (E.g. Does the database already contain a record for the ‘Liberal Party of Australia’, the ‘International Democrat Union’ or ‘Australia’?)
- Prepare: Which columns from the spreadsheet do you wish to import for this record? (E.g. When importing the Political Party, which columns of the spreadsheet contain which information about the party?)
- Insert: Once the data has been prepared, create the new records in the database.
We have told Heurist that this spreadsheet mentions three record types: Places, Political Internationals and Political Parties. Accordingly, we will need to perform this procedure three times. The target record type (in this case, Political Party), is always the final type for this procedure. The reason for this will become clear below.
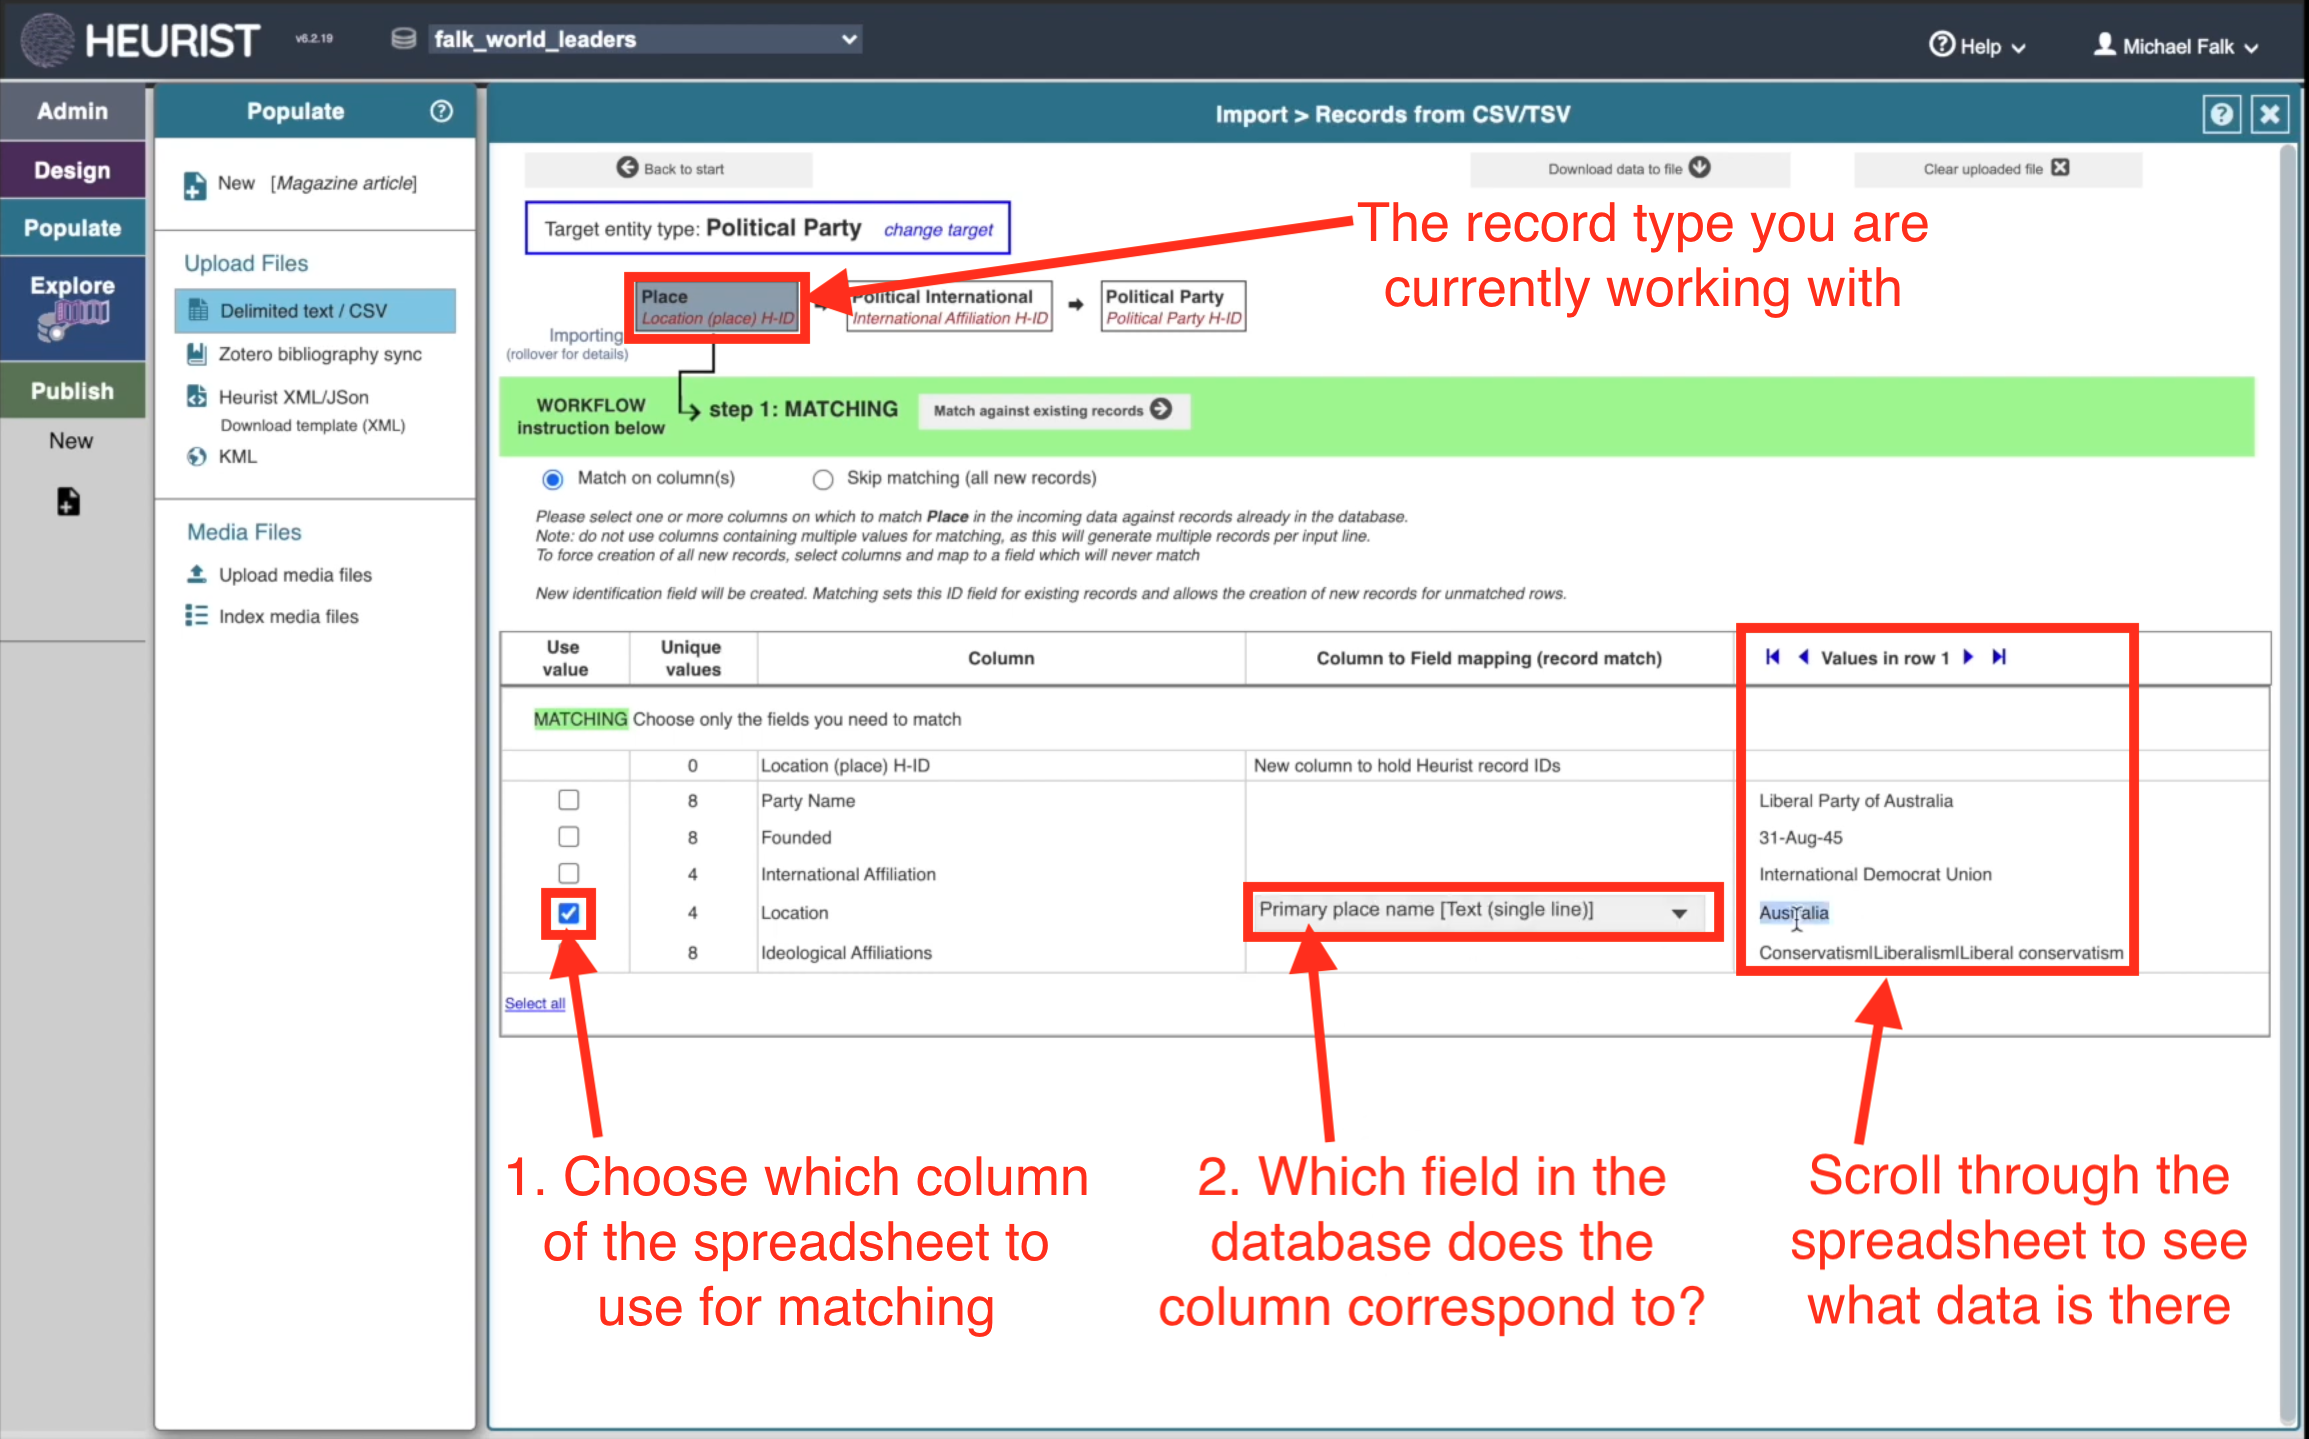
Step 1: Match
The first step is to match records against existing records in the database. In the tutorial video, we are creating three types of records from the spreadsheet: Places, Political Internationals and Political Parties. First we do the data match on the Places. We can search for existing Places in the database using the ‘Location’ column in the spreadsheet, which gives the name of the Place where the relevant Political Party is from. We can match this against the ‘Primary Place Name’ field in the database. When you click ‘Match against existing records’, Heurist will search to see if the Places mentioned in the spreadsheet (‘France’, ‘Australia’ etc.) already exist in the database. If the step is successful, you will see a new column appear in your spreadsheet, where Heurist stores the ID number for each place identified in the spreadsheet. This new column is important for linking recored, as I explain below under Advanced.
Step 2: Prepare
After the match step is complete, you will see a report appear in a blue box, telling you how many new records are in the spreadsheet, and how many existing records have been identified in the database. In the screenshot, you will see the two of the places mentioned in the spreadsheet already existed in the databast, while the spreadsheet also contained data about two new places. You can click ‘show’ to the right of the blue box to see which Places Heurist has identified. Meanwhile, you now need to choose which fields from the spreadsheet to import for the current data type. As the only information about Places in the spreadsheet is the name of the Place, you can simply import the ‘Location’ column from the spreadsheet. When you have configured things, click ‘Prepare’ and Heurist will check for any problems:

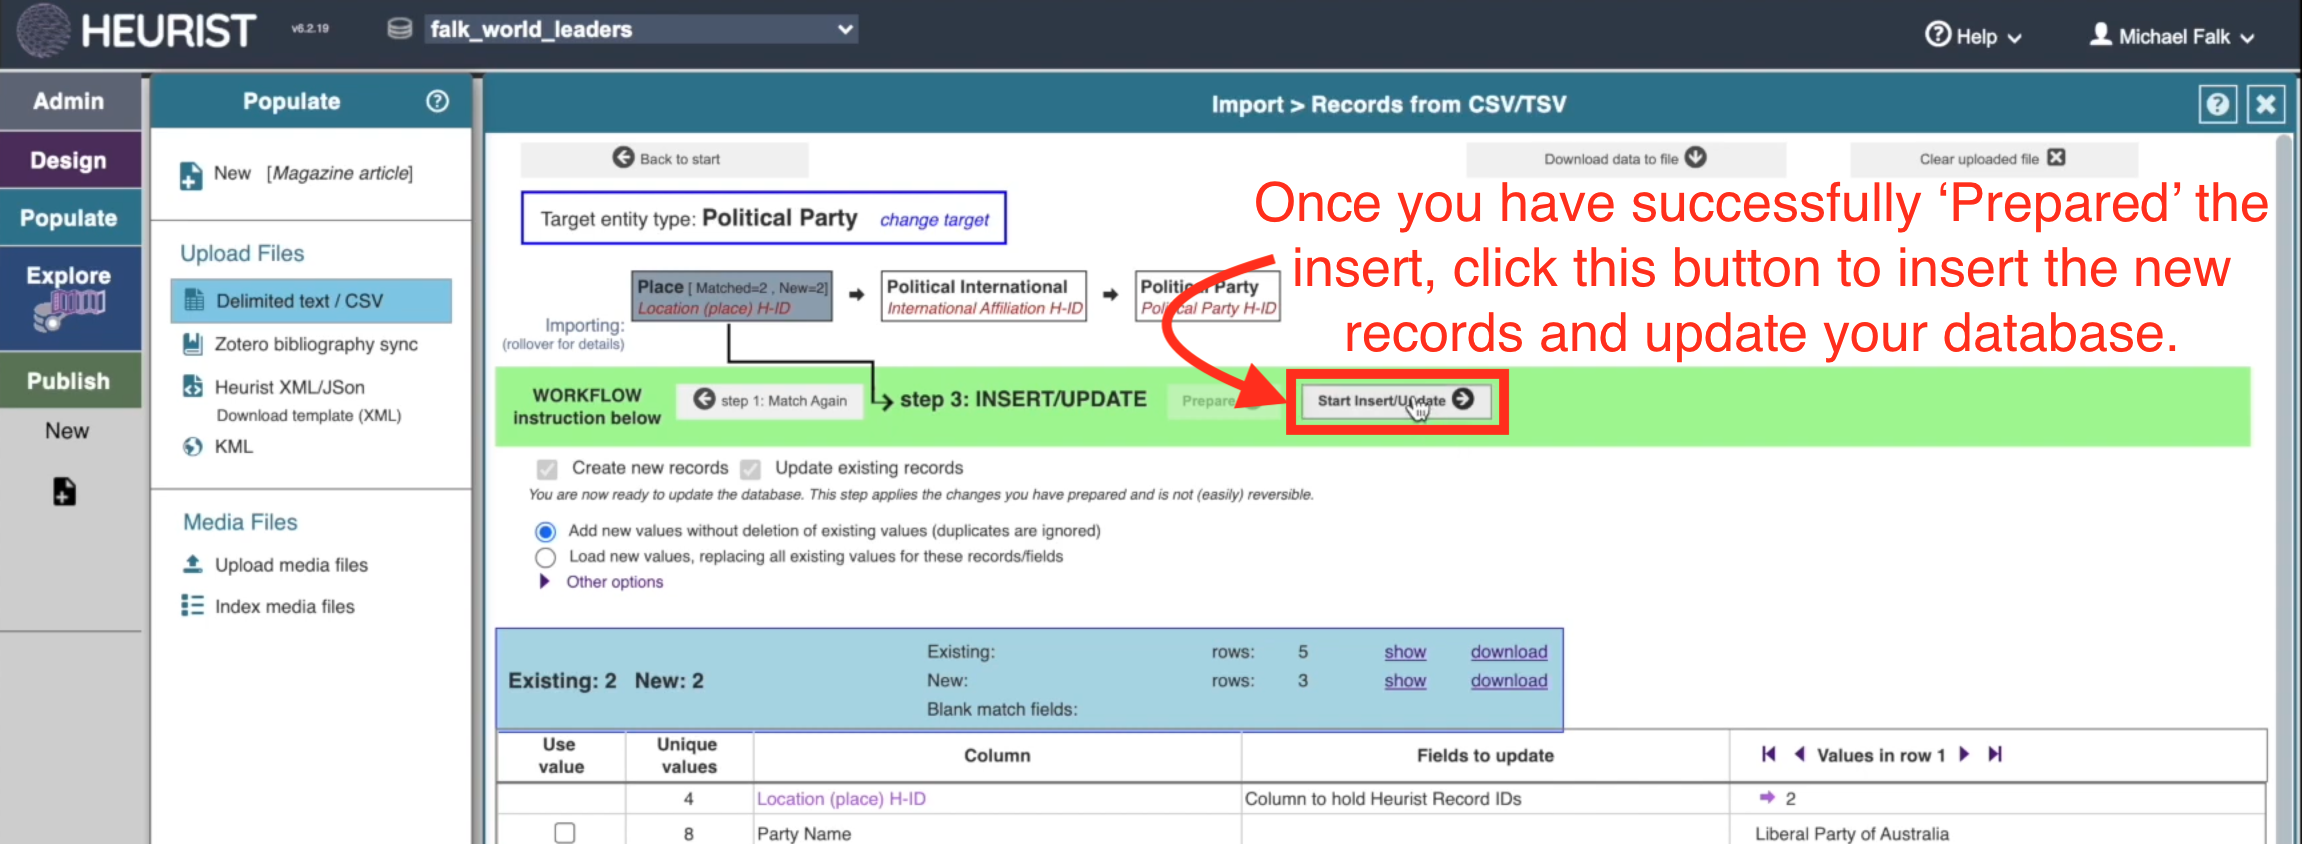
Step 3: Insert
After clicking ‘Prepare’, Heurist will have checked for any problems. Assuming there are no major problems, you can now click ‘Start insert’ to insert the new records into the database. In the video tutorial, I perform this process first for Places in the spreadsheet, then for Political Internationals, and then for Political Parties. The result is that I insert 2 new Places into the database, 3 new Political Internationals and 8 new Political Parties. All from one spreadsheet.
Advanced: Linked records and new vocabulary items
In the video, the Prepare step is more complex for the Political Parties. One reason is because we need to use ‘record pointers’ to record each Party’s Location (Place) and International Affiliation (Political International). This is why the Political Parties are imported last: first we need to import all the Places and Internationals so that the new Political Parties can be correctly linked to them. In addition to this data linking problem, in the ‘Ideological Affiliation’ column, there are many new vocabulary terms which need to be inserted into the database. To deal with these problems, you can use the more advanced procedures explained below:
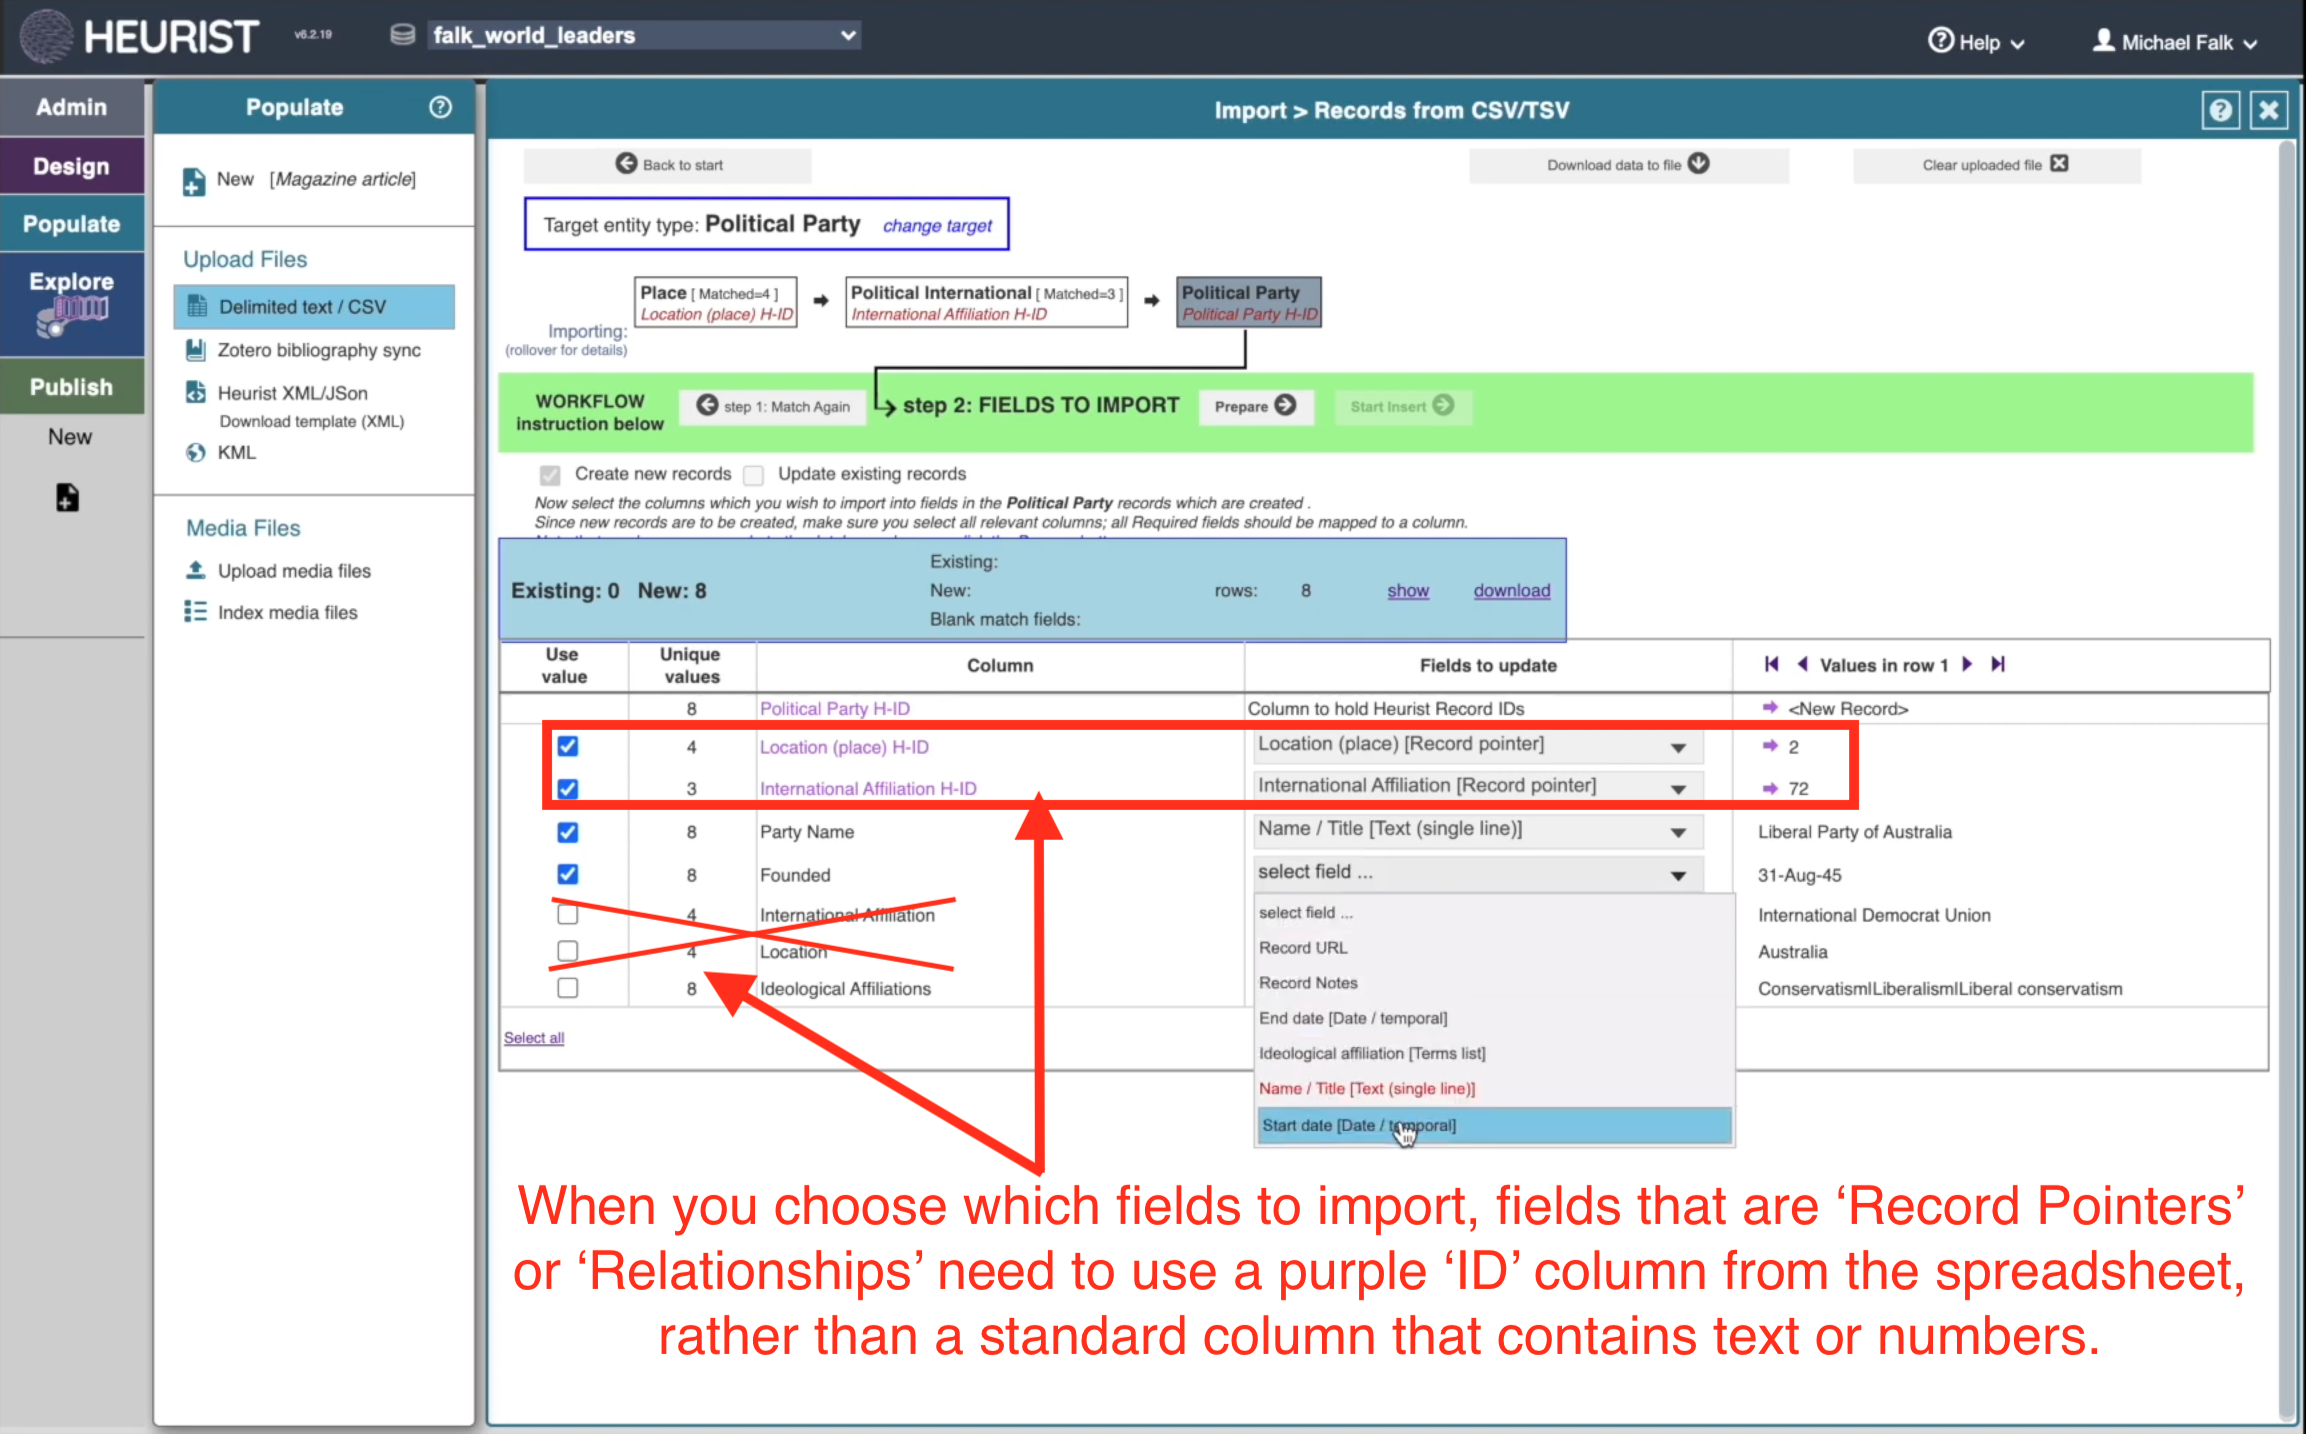
Using H-IDs to link records together
As you have matched, prepared, and imported the Places and Political Internationals from the spreadsheet, you will have seen new columns appear in your spreadsheet, highlighted in purple. These columns record the Heurist ID numbers for the Places and Political Internationals mentioned in the spreadsheet. When you finally come to import the target record type (the Political Parties), you should use these ID columns for the data import rather than the original ‘Location’ and ‘International Affiliation’ columns from the spreadsheet. Why? Consider the Location column. In the original spreadsheet, the ‘Location’ of each part is simply a word, such as ‘Australia’. In your Heurist databse, however, the Location of each Political Party is a ‘Place’, a separate record in the database. To link the Political Party to its Location, you need to give Heurist the ID number for the Location, rather than simply the name of the Place as text:
Importing new vocabulary items from the spreadsheet
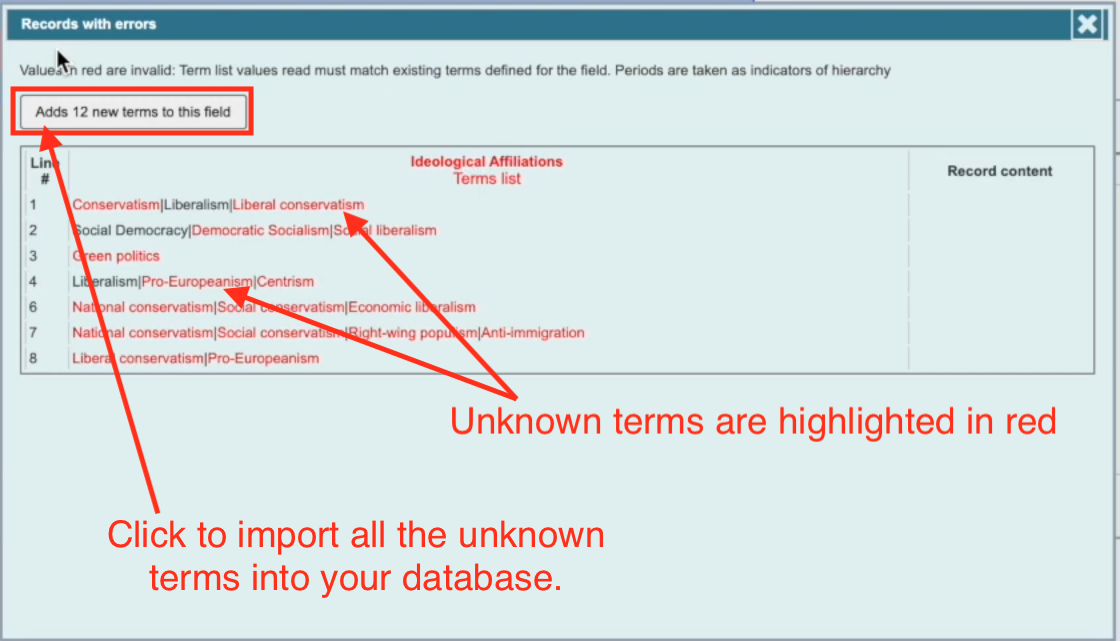
In the video, the ‘Prepare’ step for the Political Parties threw an error:

Back in the main screen, you can click ‘Show’ to investigate any such error messages:
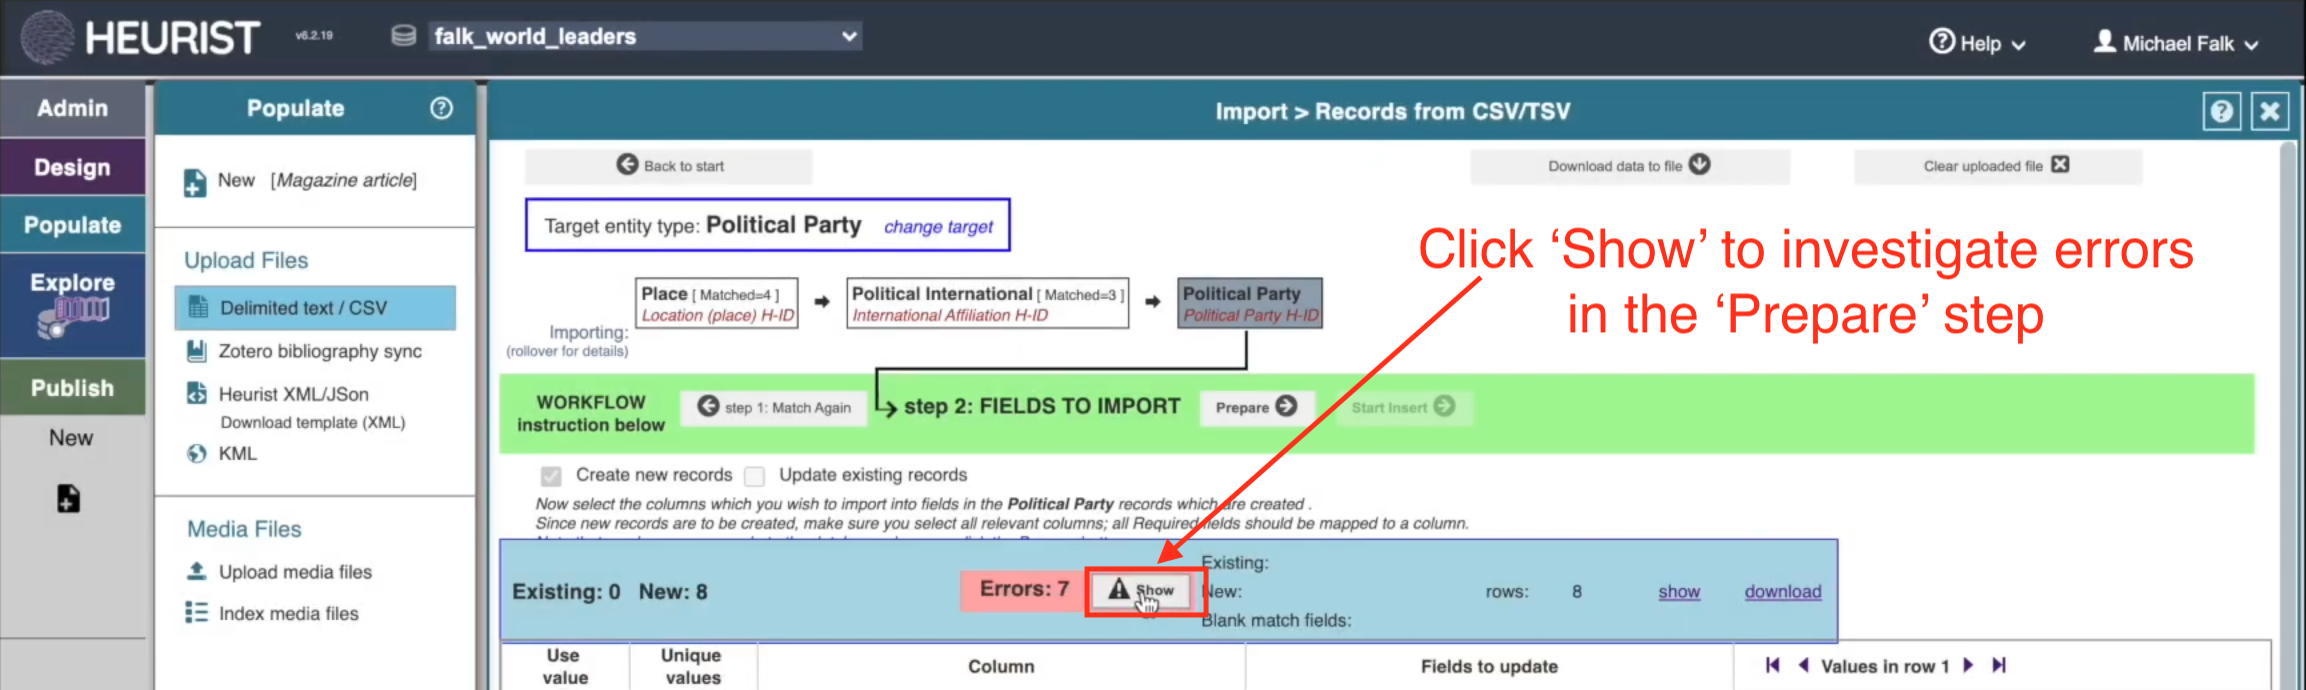
In this case, the problem was simply that the database’s vocabulary of political ideologies did not contain several of the ideologies listed in the spreadsheet (see Tutorial 2 for a refresher on vocaularies). If you are happy to add all the new terms to your database, simply click ‘Adds X new terms to this field’. This will update the vocabulary. If you repeat the ‘Prepare’ step, the error should have disappeared, and you will be able to import your records from the spreadsheet.
Importing a Directory of Media Files
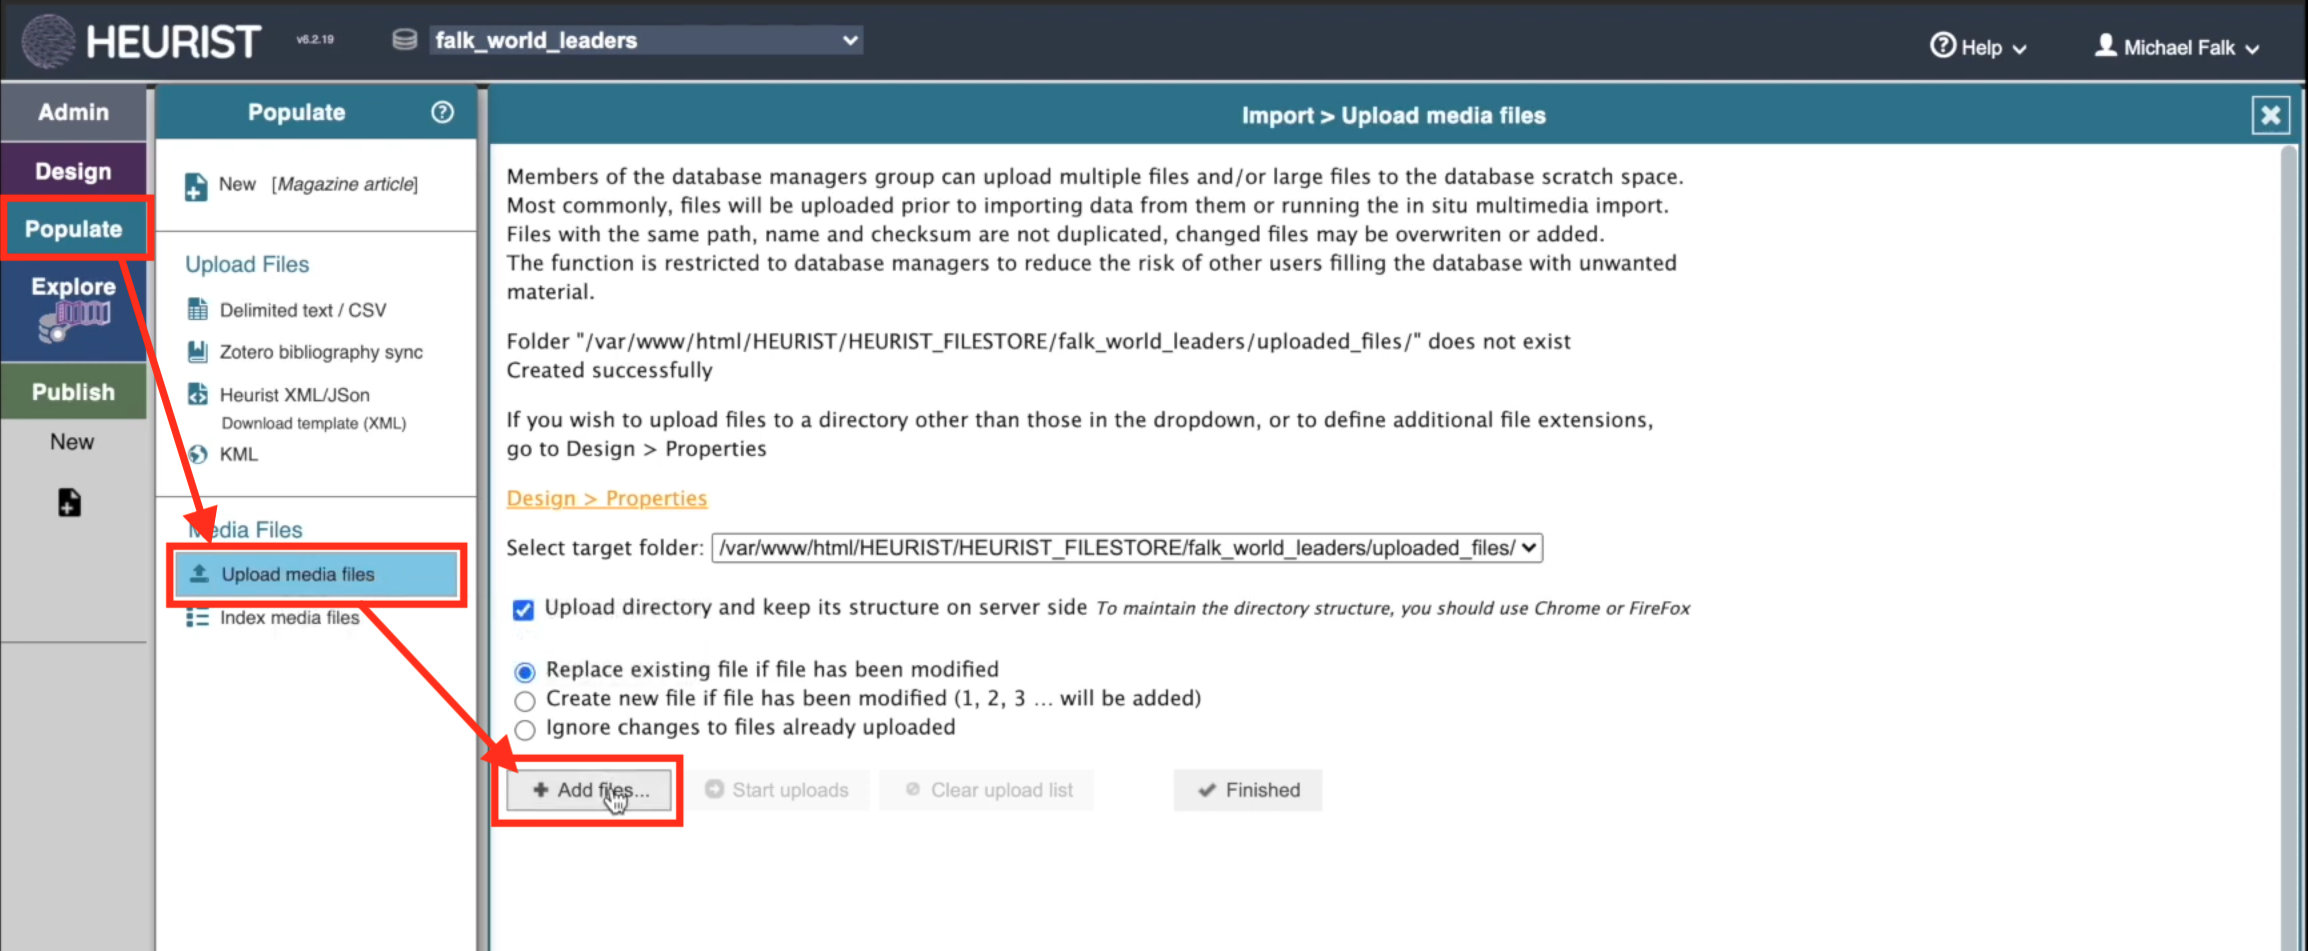
As well as importing textual or numerical data from a spreadsheet, Heurist also allows you to import media files such as images from your computer or a drive. The key point to understand is that Heurist expects you to import an entire folder of images, rather than simply certain selected images. In the Populate menu, choose Import Media Files, and then click ‘+ Add Files’:
This will take you to a new screen, where you can locate the folder in which the images are located. Depending on your particular computer, you may or may not be able to see the files in the folder. On my machine, the files are visible, but are greyed out and cannot be selected. When you have found the right folder with the images in it, click ‘Upload’:

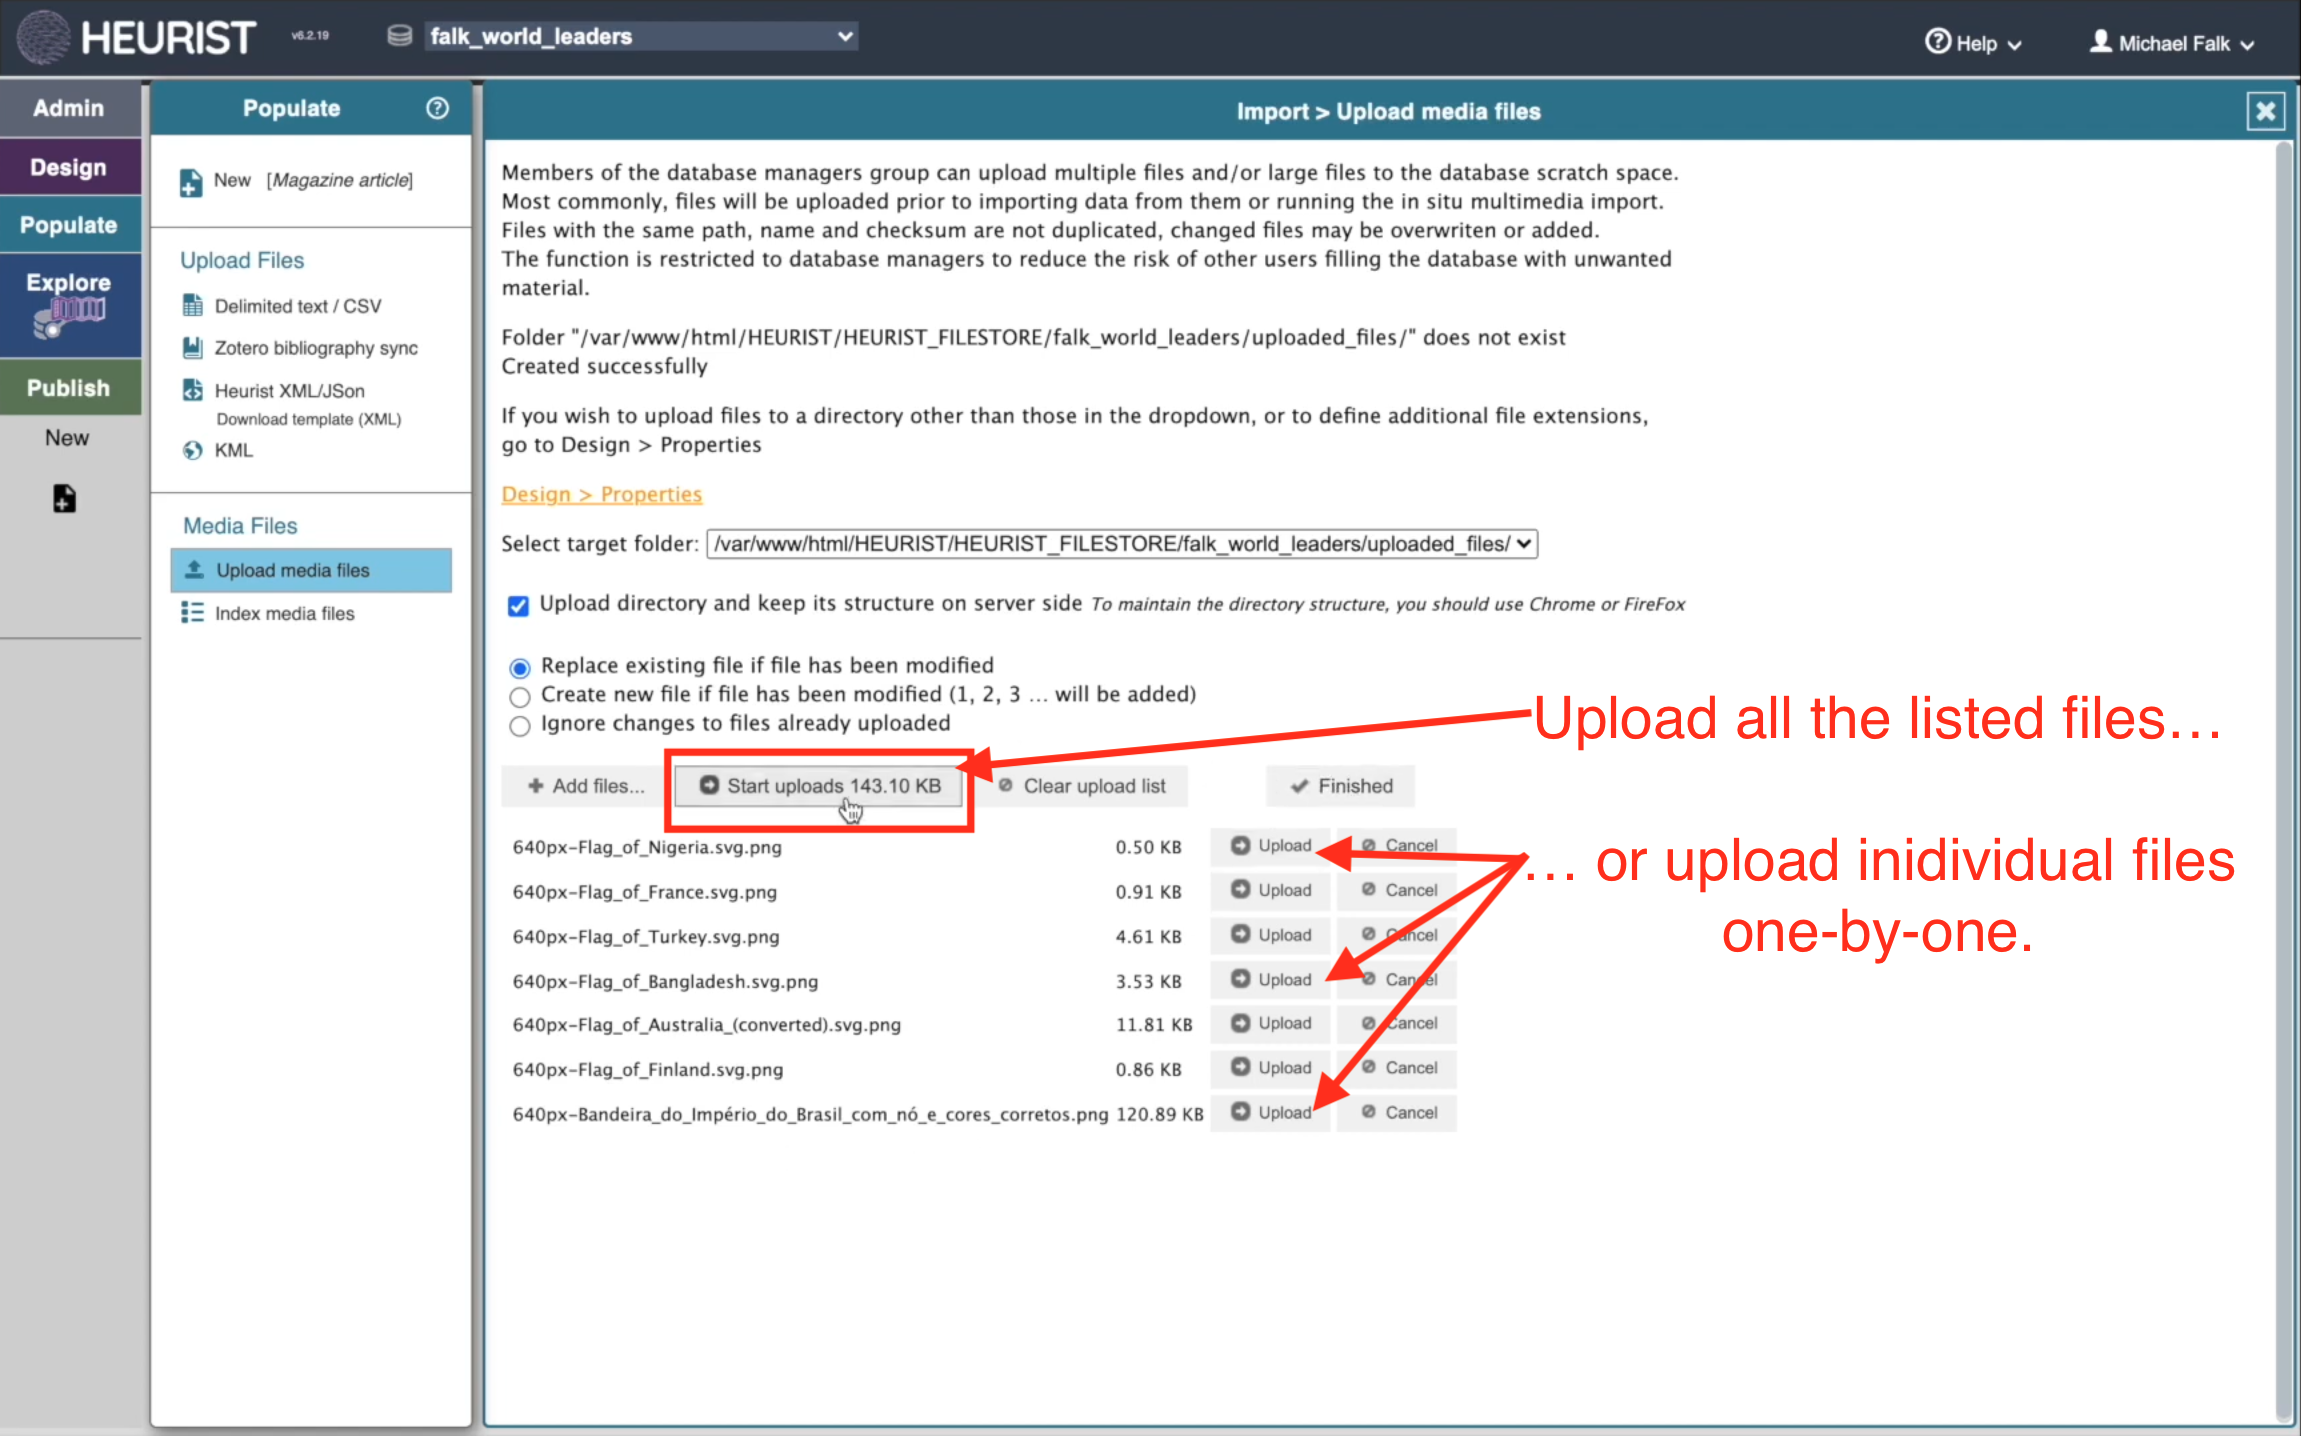
On the following screen, you will be presented with a list of the files found in the folder. Either click ‘➡ Upload’ next to the particular files you wish to upload, or click ‘➡ Start uploads’ to upload them all. This will place all the selected media files on our server, where they can be become part of your Heurist database and website.
Indexing Media Files
Once you have uploaded images onto the Heurist server, they are immediately available for use in your database. In this case, we uploaded a series of flags onto the server, for different countries in the database. You can now easily attach one of these flags to one of the countries in the database: simply open the country’s record, click on the ‘Representative Picture’ field, and then click ‘Choose previously uploaded file’ to see a list of all the images you have stored on our servers. Similarly, if you wish to use one of the images in your website, click ‘Insert Media’ and then ‘Choose previously uploaded file’, and you can use one of the images you have uploaded (see Tutorial 7).
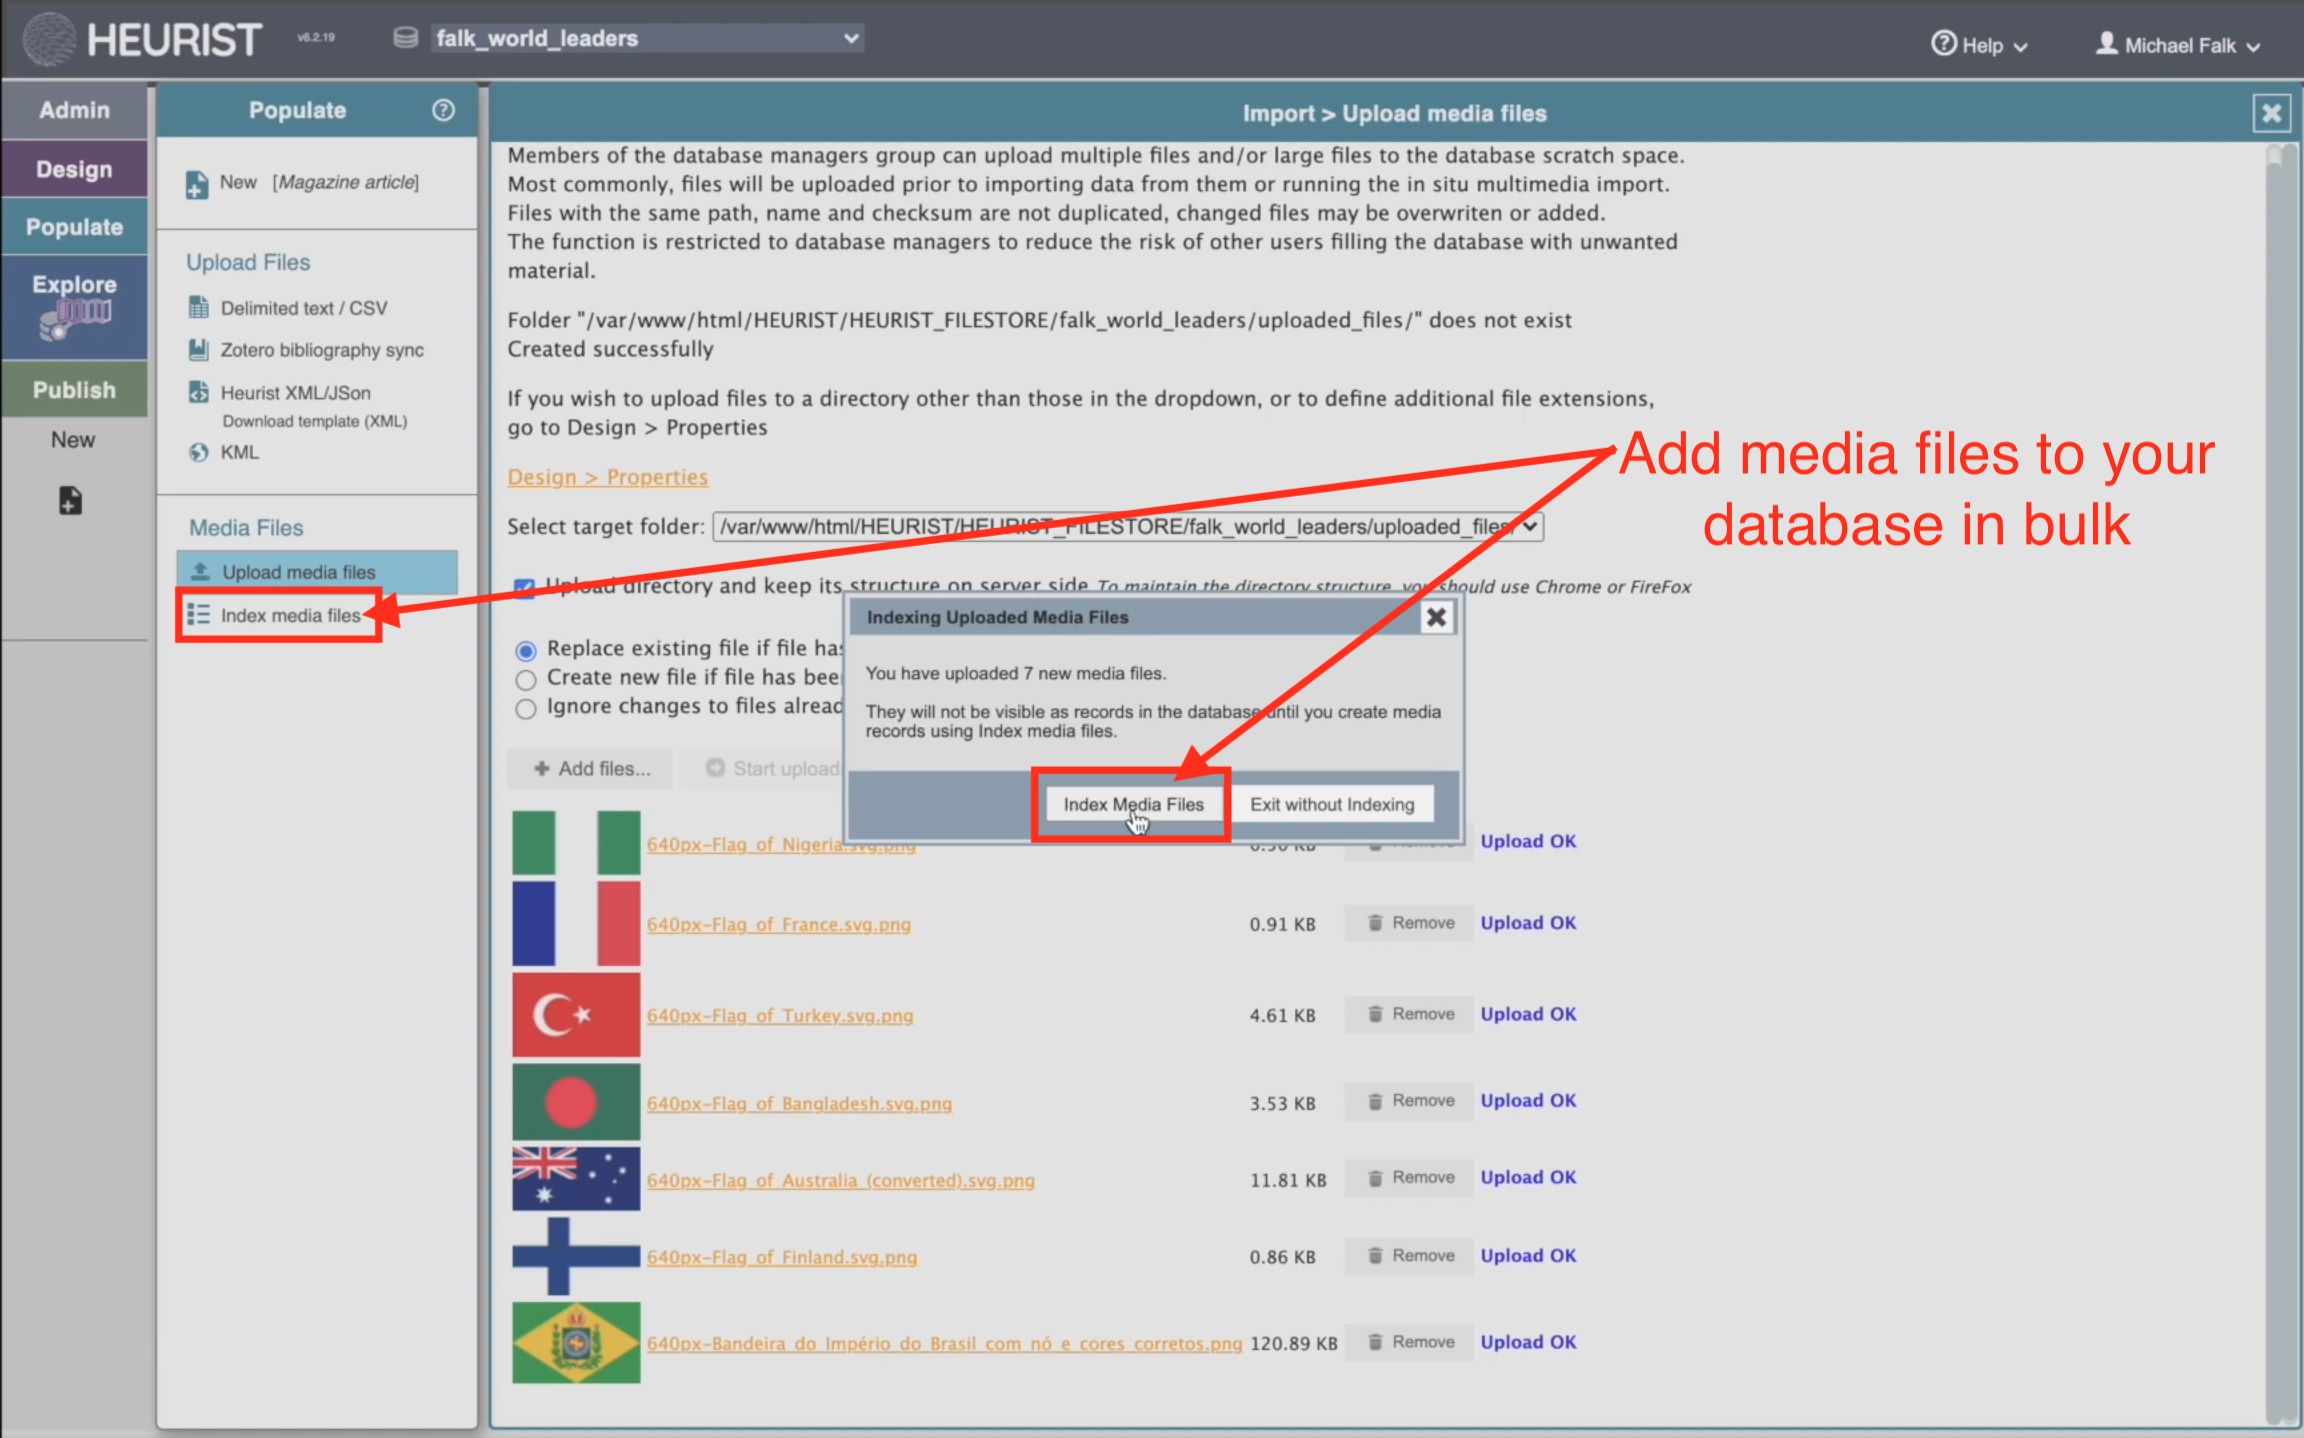
Alternatively, Heurist can create a separate ‘Digital Media’ record in your database for each file you have uploaded. If you wish to do this, you can click ‘Index Media Files’ in the popup that occurs after you have uploaded the images. Or can you perform this step later by clicking ‘Index Media Files’ in the Populate menu:
In the Index Media Files screen, simply click ‘Continue’ to index all the media files you have uploaded:

Heurist will tell you how many new records it has created:

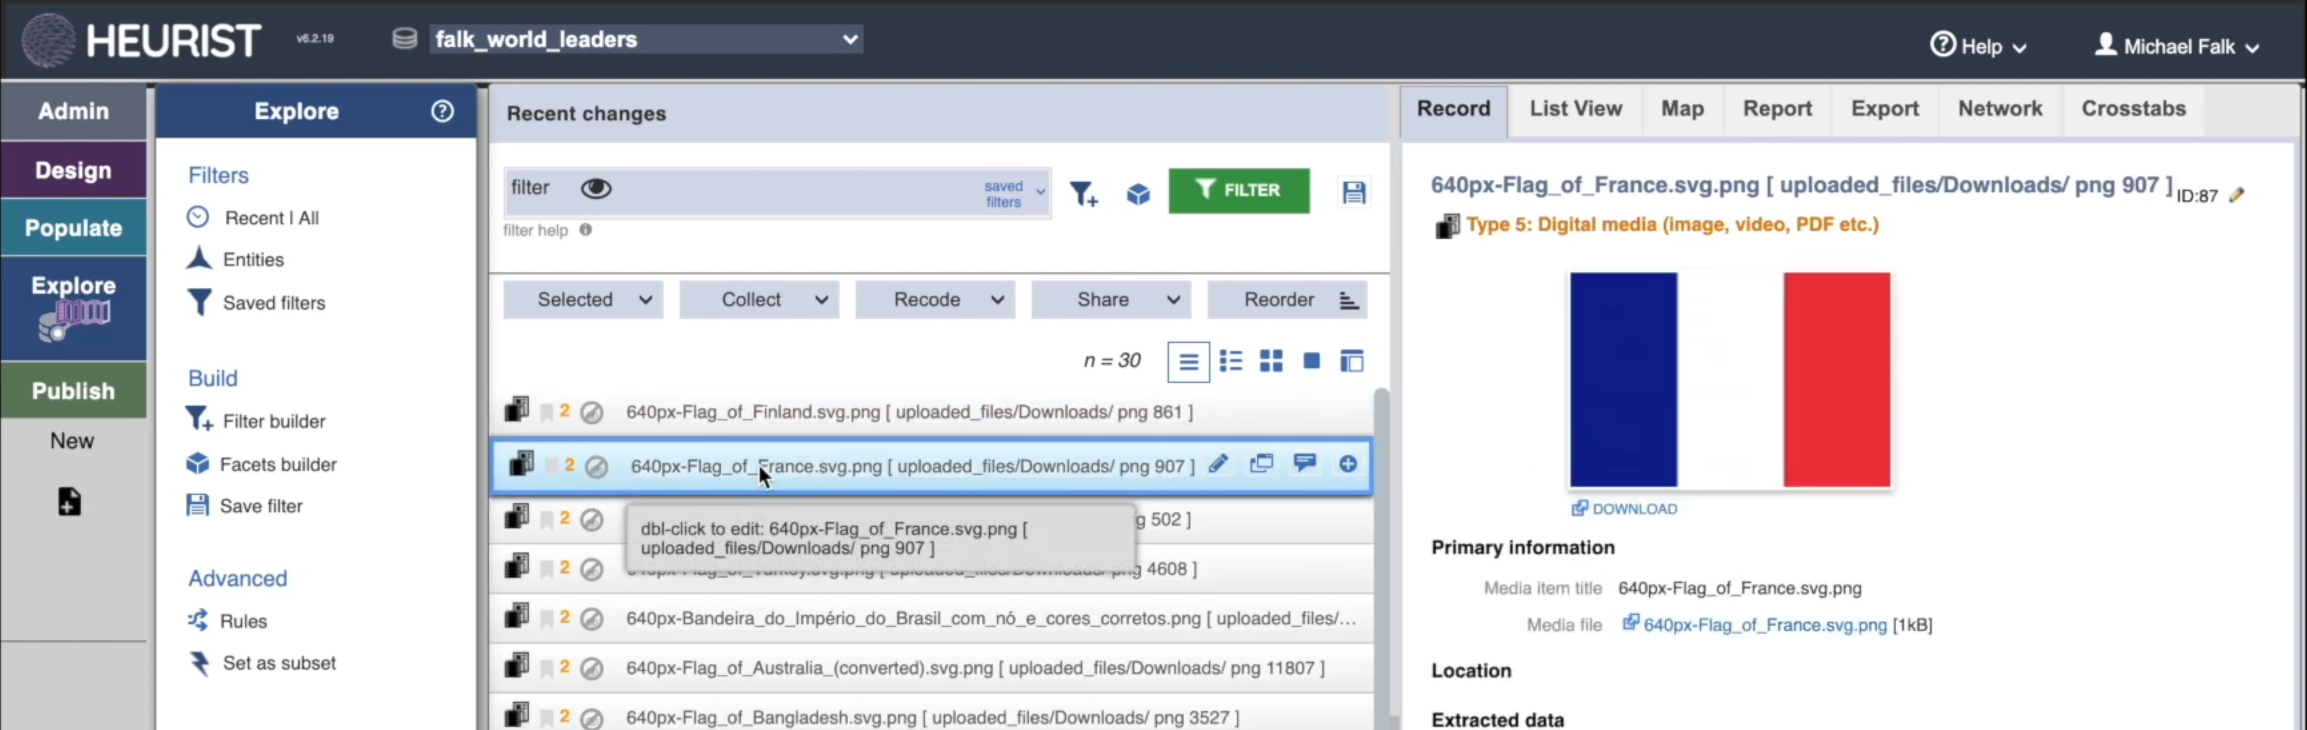
After performing this step, visit the Explore menu, and you will see a ‘Digital Media’ record for each file:
Next Tutorial: The Publish Menu
Take our next tutorial to learn how to use Heurist’s Publish menu to share your database with others, either through a public website or through various kinds of exported files.
Our Tutorials
Do you need help with something else? Contact Us, and let us know what additional tutorials you think we should provide.
