
Tutorial 5 | The Design Menu
Heurist’s Design menu allows you to analyse the structure of your database, and ensure it is configured correctly for your project. In this tutorial, you will learn how to see the different record types that make up your database, learn how to import new record types from template databases, and also see how you can adapt the structure of your database on the fly.
Create a Heurist database (free institutionally-supported services)
These free services are kindly supported by Intersect Australia, Huma-Num (France) and contributions from users.
To begin, watch the video. For more detailed instructions, you can consult the walkthrough. To learn something else, see our full list of tutorials.
The Record Types tool
Each time you enter data into a Heurist database, it is associated with a particular ‘record type’. For example, if you want to add a new world leader to the World Leaders Database, you would create a record of the ‘Person’ type to represent the world leader, and a record of the ‘Place’ type to represent the country that they lead.
You can gain an overview of all the different record types available in your database using the ‘record types’ too. Enter the design menu, and click ‘record types’ at the top of the second column. The record types are arranged in groups (or folders) to help you understand the structure of your database. These groups can be changed to suit your needs. When you click on a group, all the record types associated with that group will appear. Here you can edit, delete or duplicate existing record types. Clicking “+ ADD” at the top of the screen will add a completely new record type to the database. As a starting point, it is good practice to drag record types you use frequently into the ‘My Record Types’ group. As your database becomes more complex, you may create several custom record type groups, containing different record types for different aspects of your research.

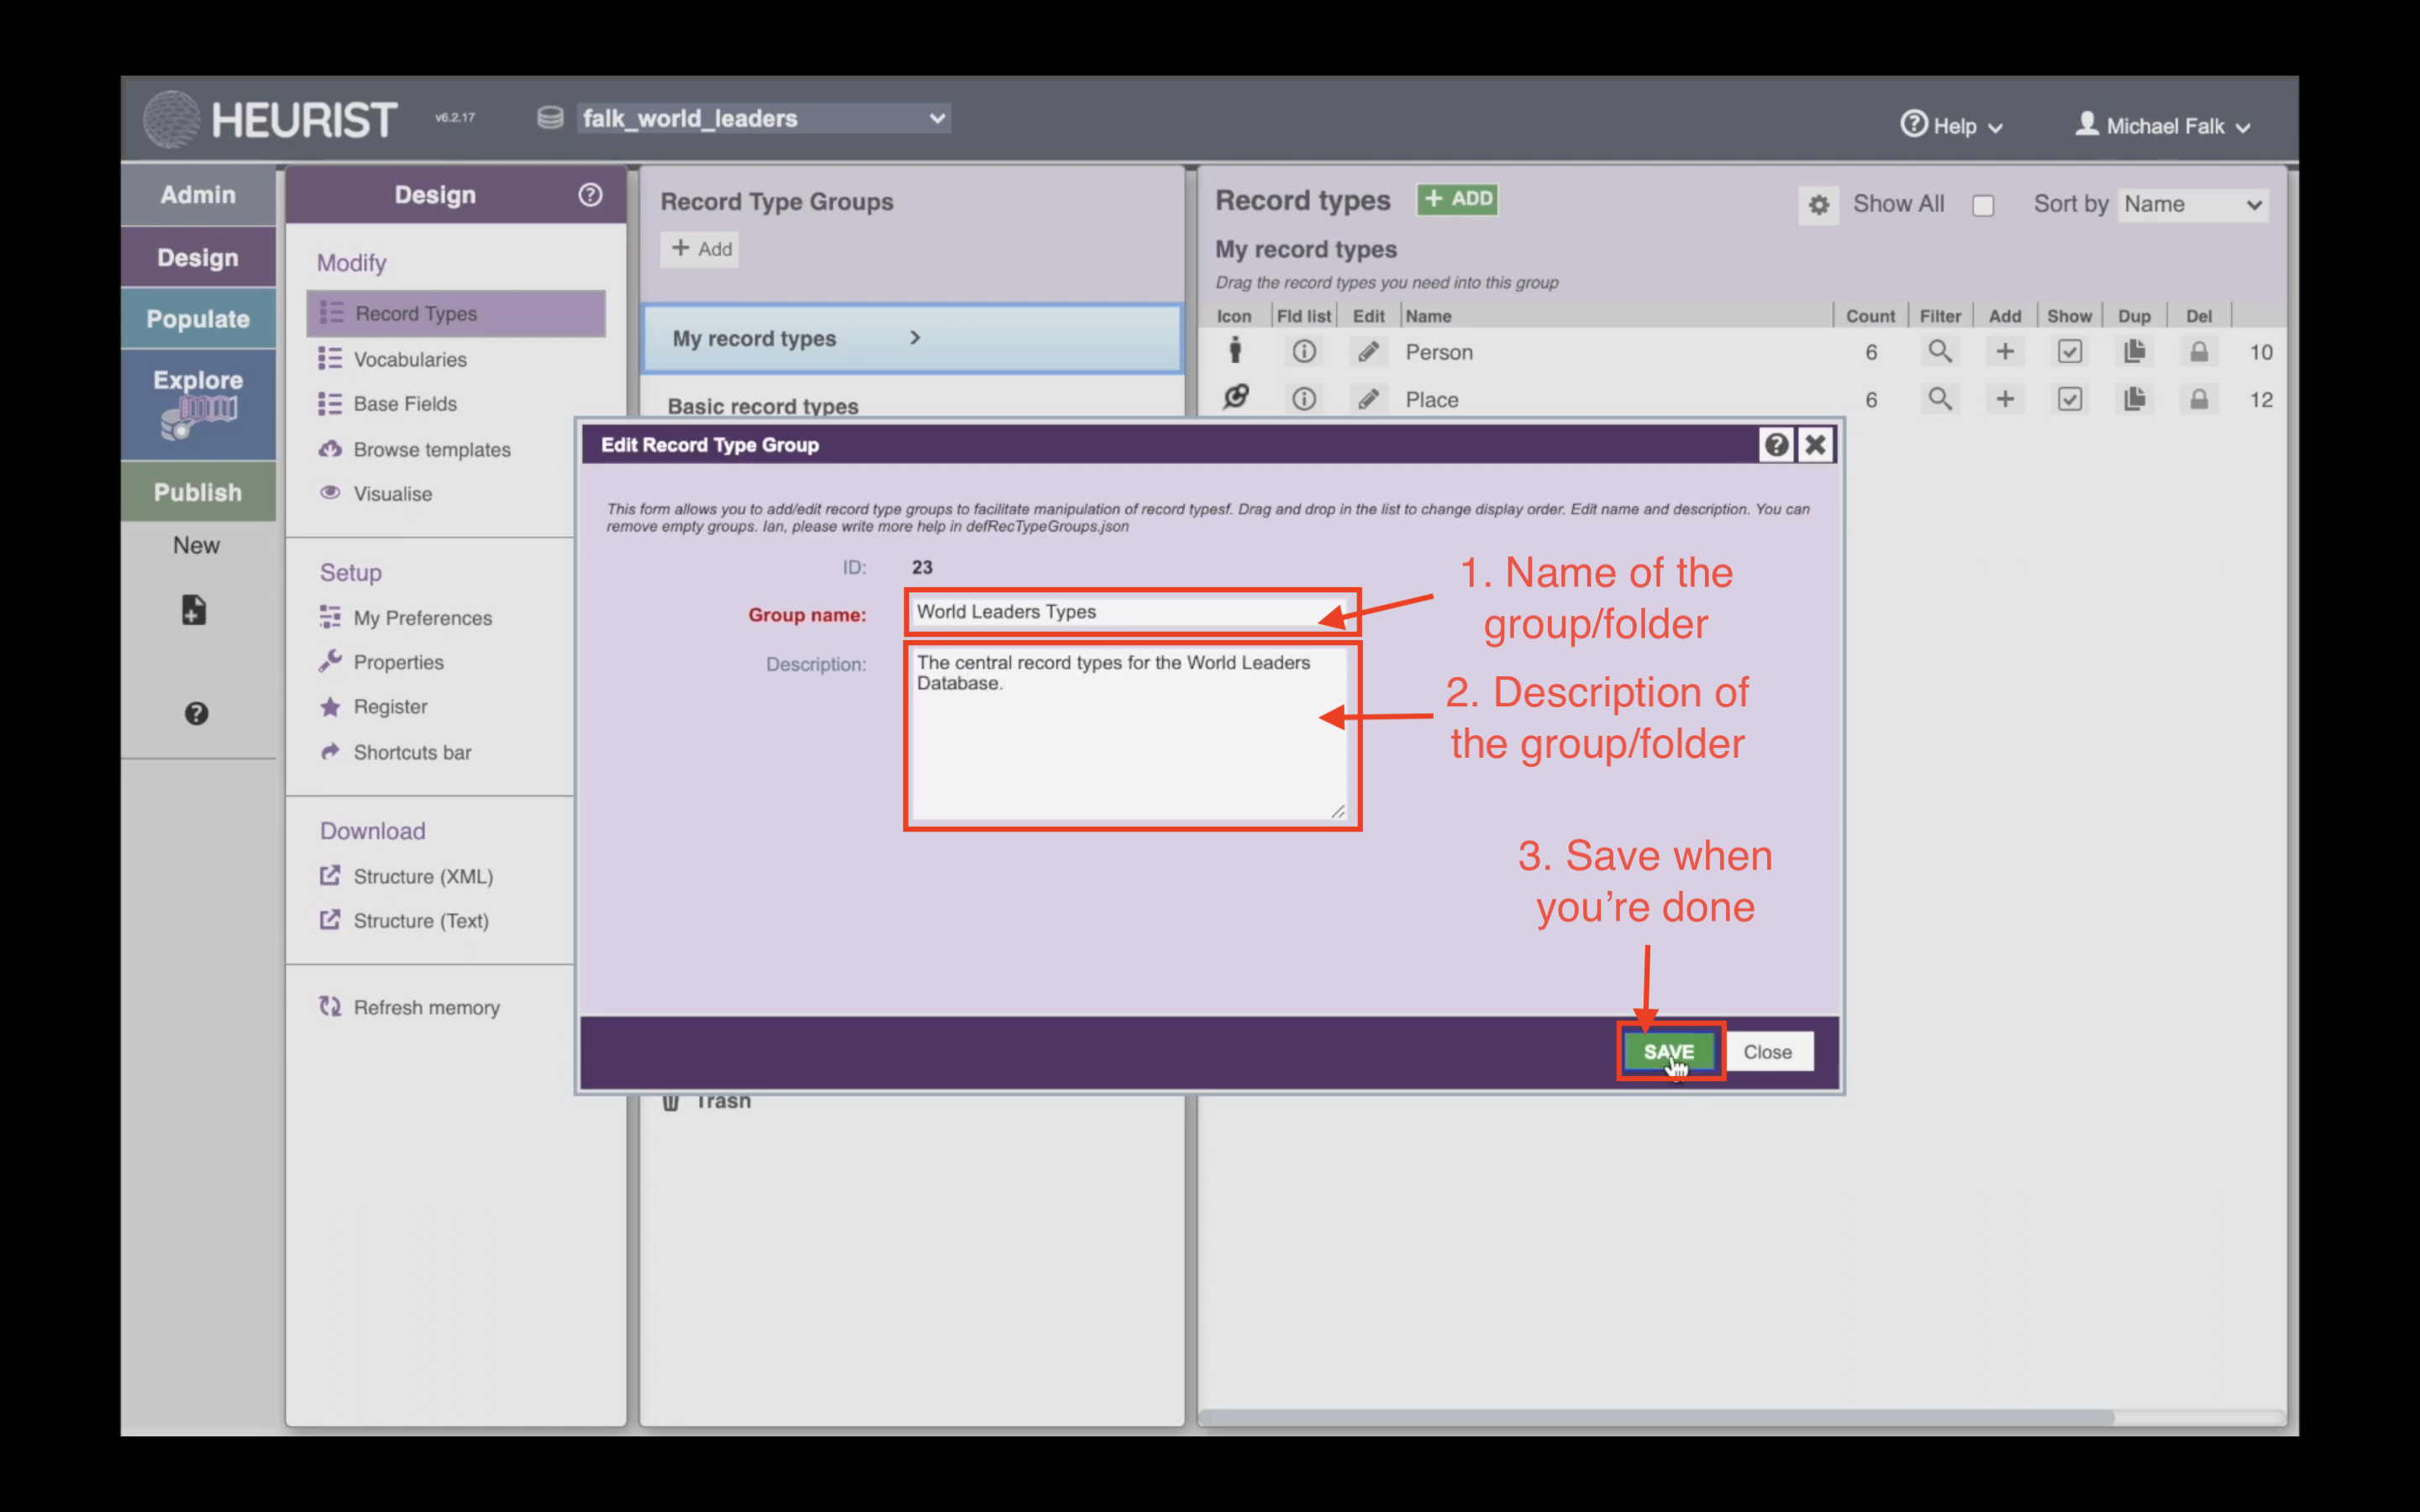
You can change the name of a record type group/folder by clicking the ✏️ icon next to its name:

This will bring up the ‘Edit record type group’ screen:
Visualise the Structure of your Database
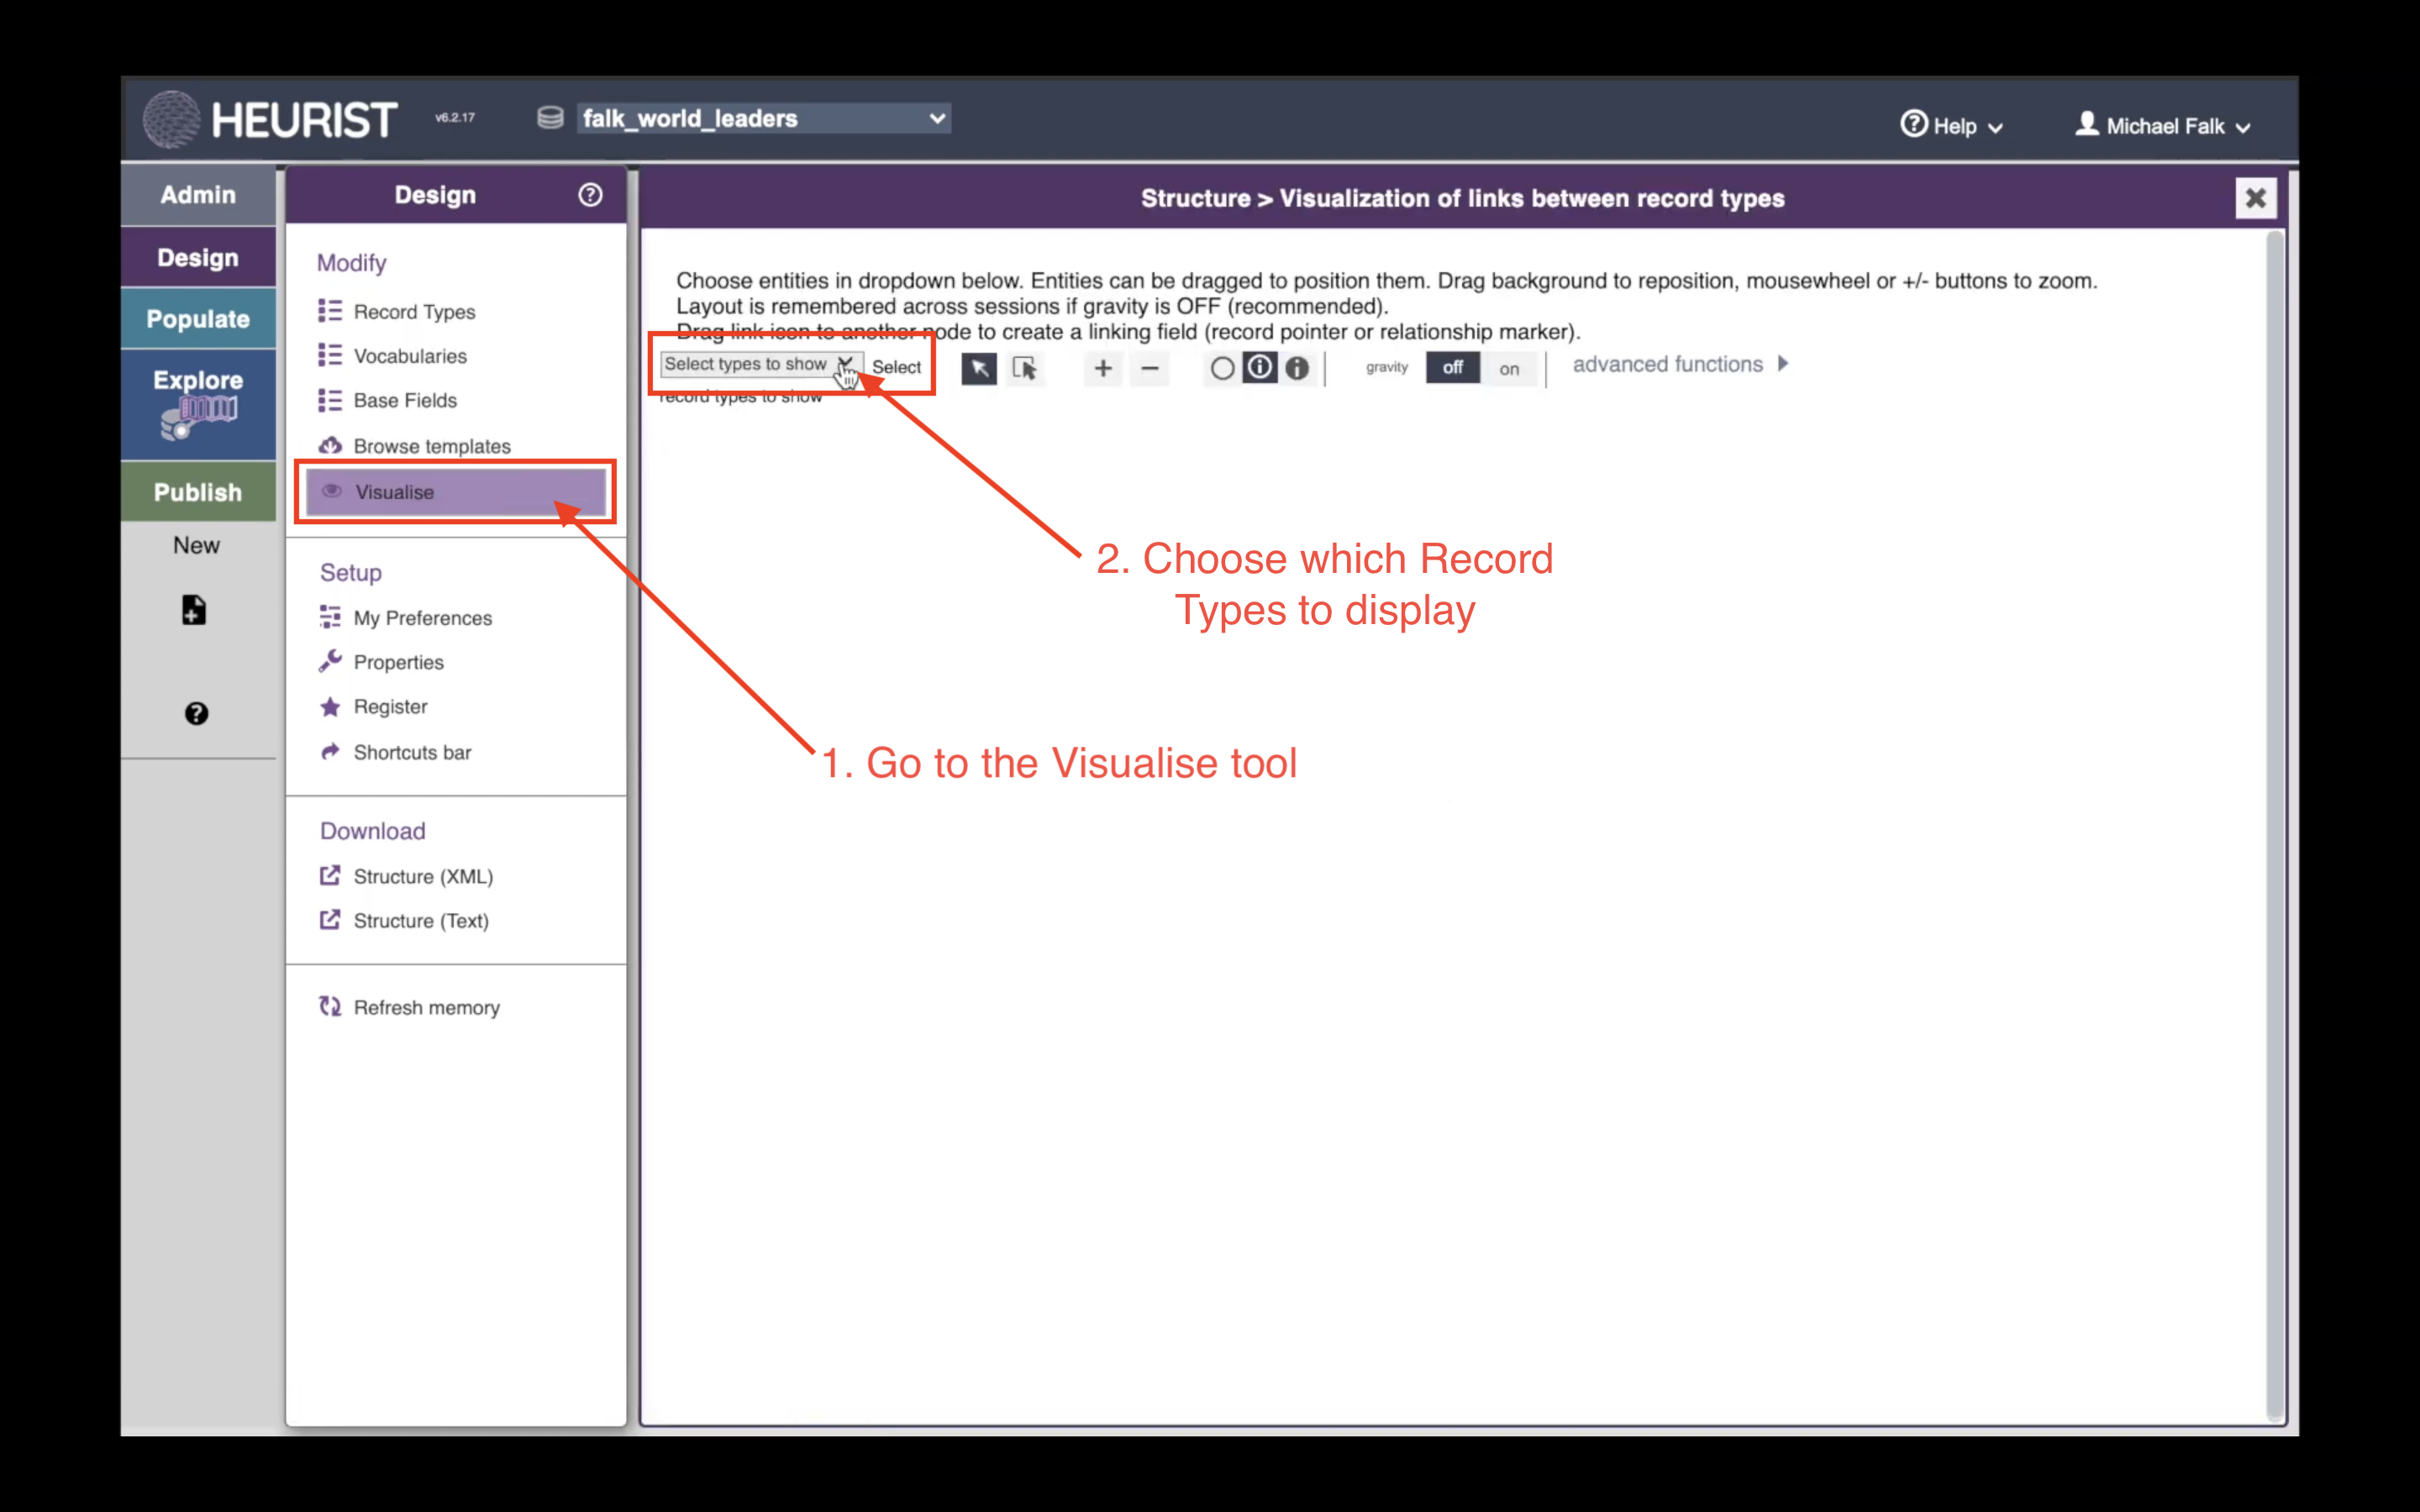
You can also view the structure of your database as an interactive network graph. This view is especially useful if you want to understand how different record types in your database are related to one another. Click ‘Visualise’ in the Design menu to access the network visualisation. To generate the graph, you need to choose which record types to display. Generally, it is best just to visualise a few record types at a time—the graph can get very busy if you show too many types. To choose which record types to display, click the dropdown at the top left of the visualisation:
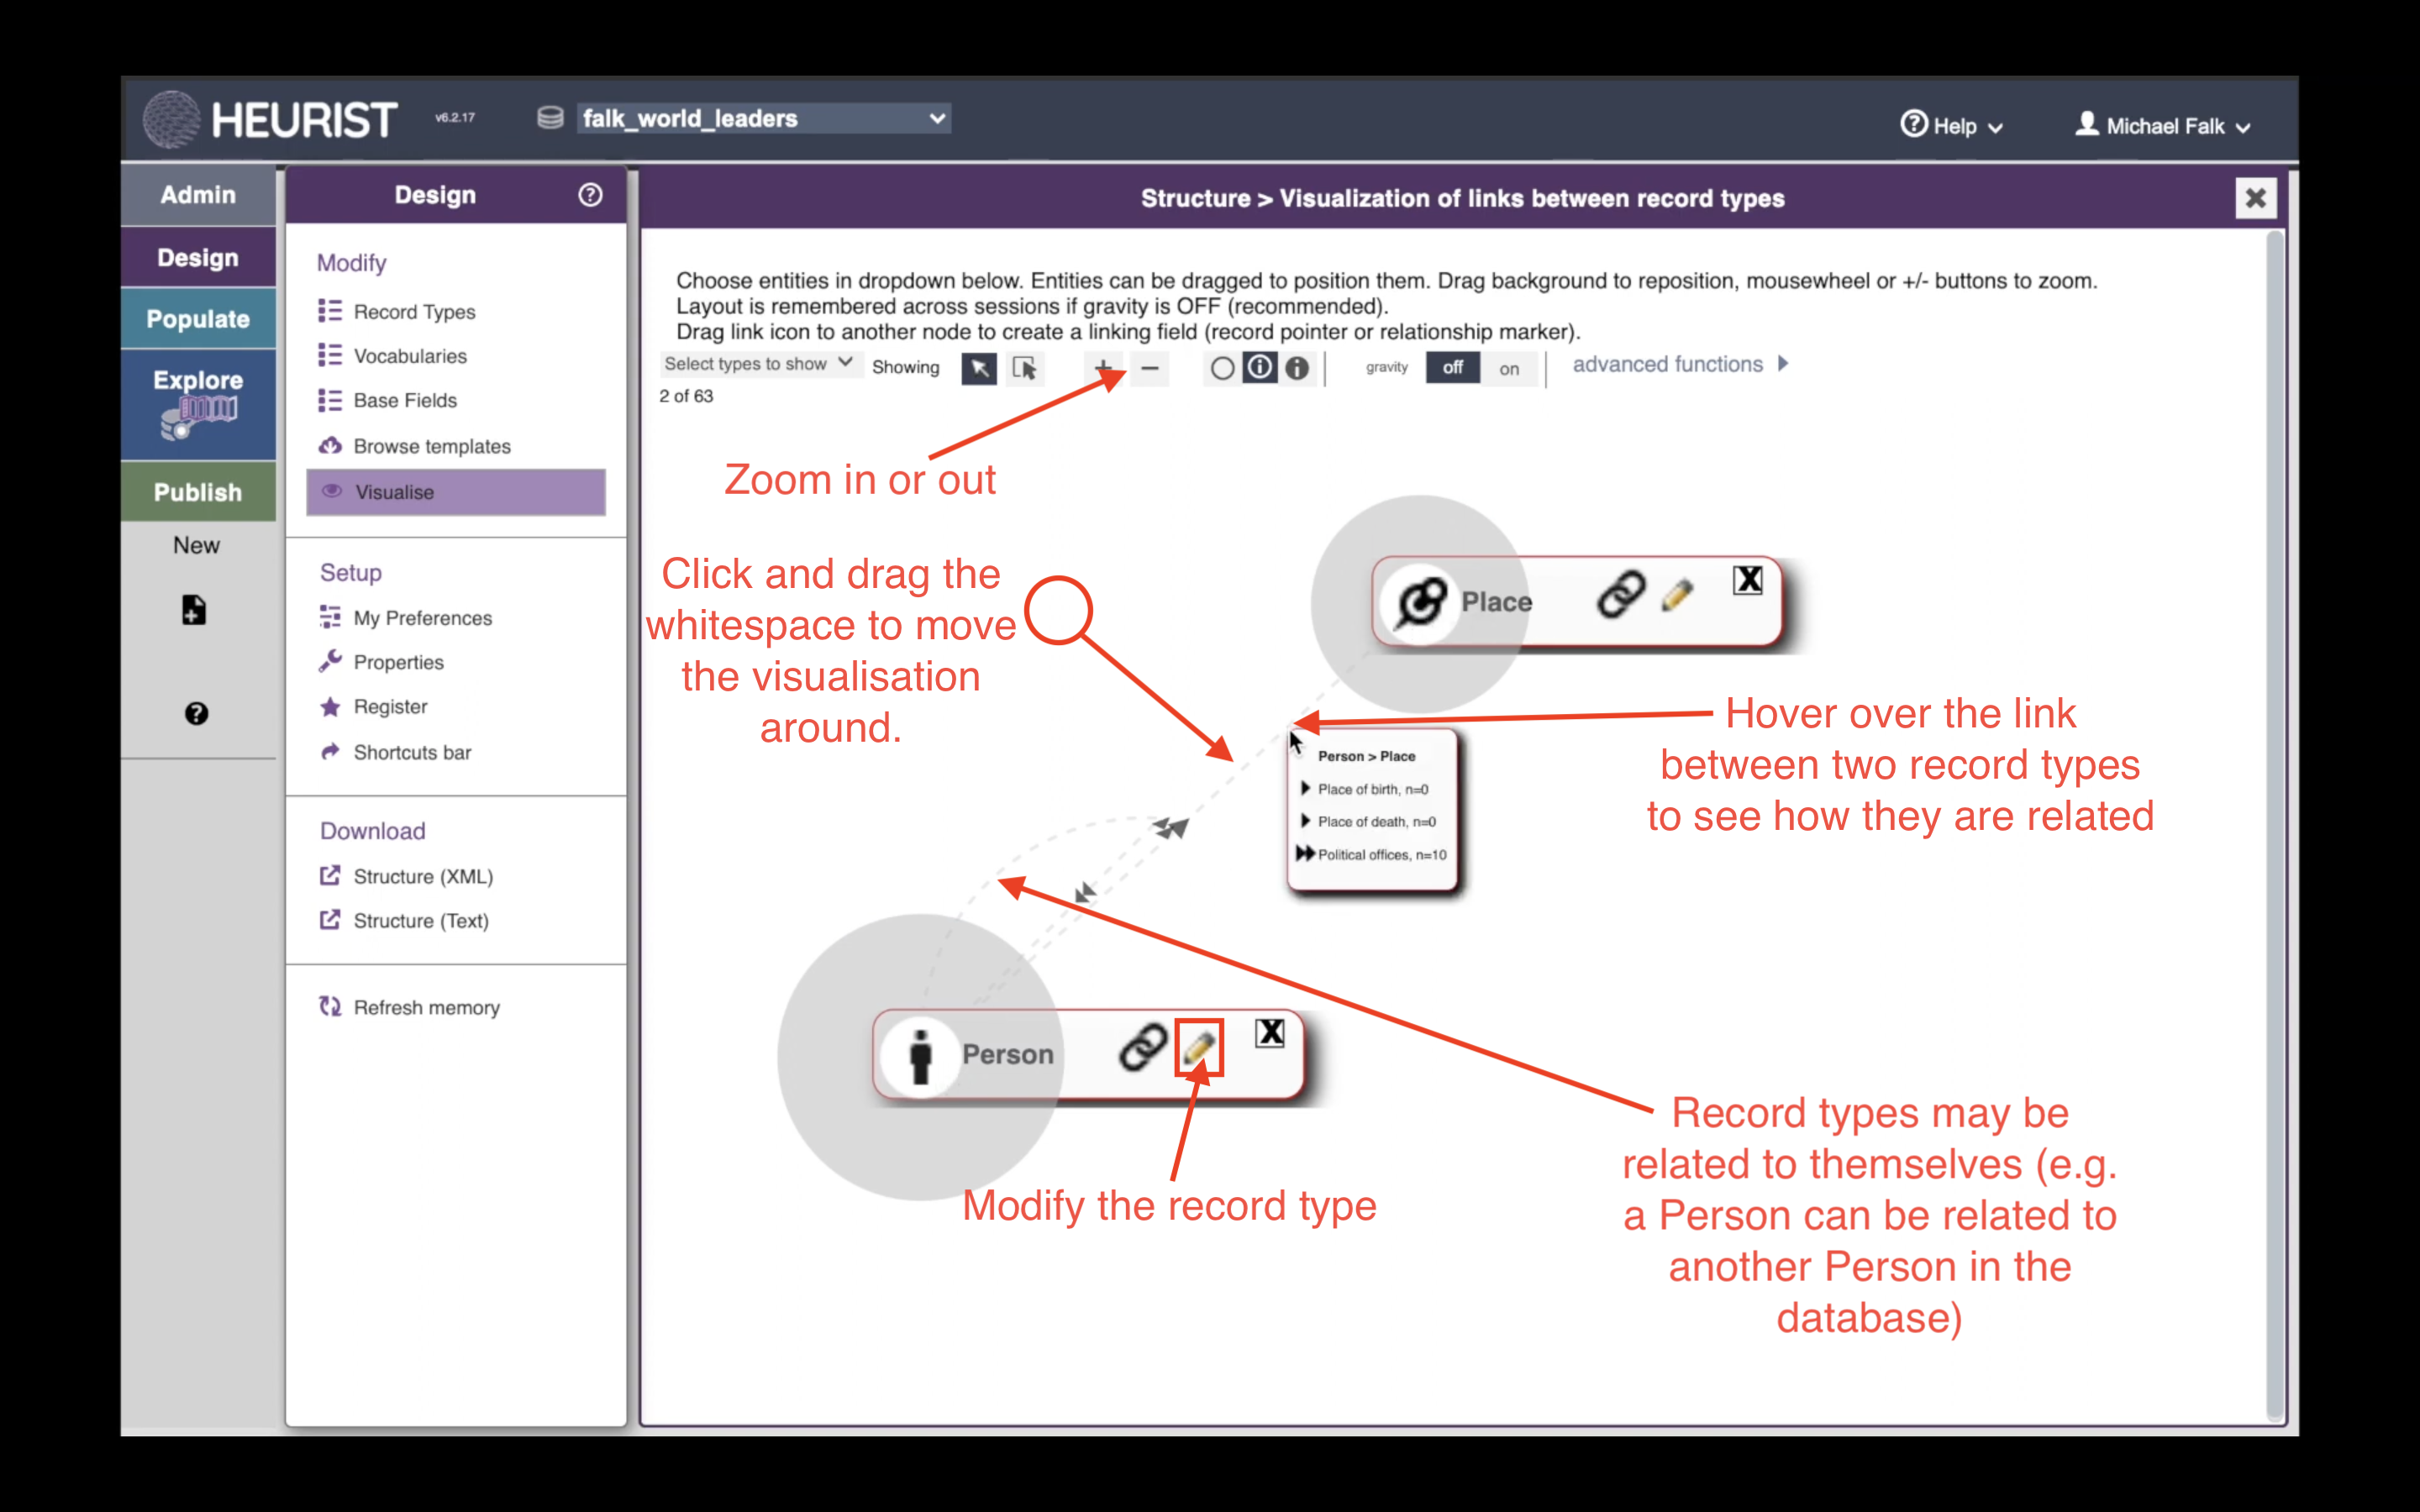
Click the ‘show’ checkbox next to each of the record types you are interested in:

To move the visualisation around, click in the whitespace and drag with your mouse. You can also click and drag the displayed record types. Click the ℹ️ icon to view more information about each record. Click the ✏️ icon to modify the record type. If you hover over a connection between two records, you will see information about how these records are connected to one another. For example, in this database a ‘Person’ can be related to a ‘Place’ in three different ways: the Place might be the Person’s place of birth, the Person’s place of death, or it might be a Place where the Person held a political office. Each of these relationships—place of birth, place of death and political office(s)—is a field in the ‘Person’ type, and can be seen in the data entry form for a ‘Person’.
The Templates tool
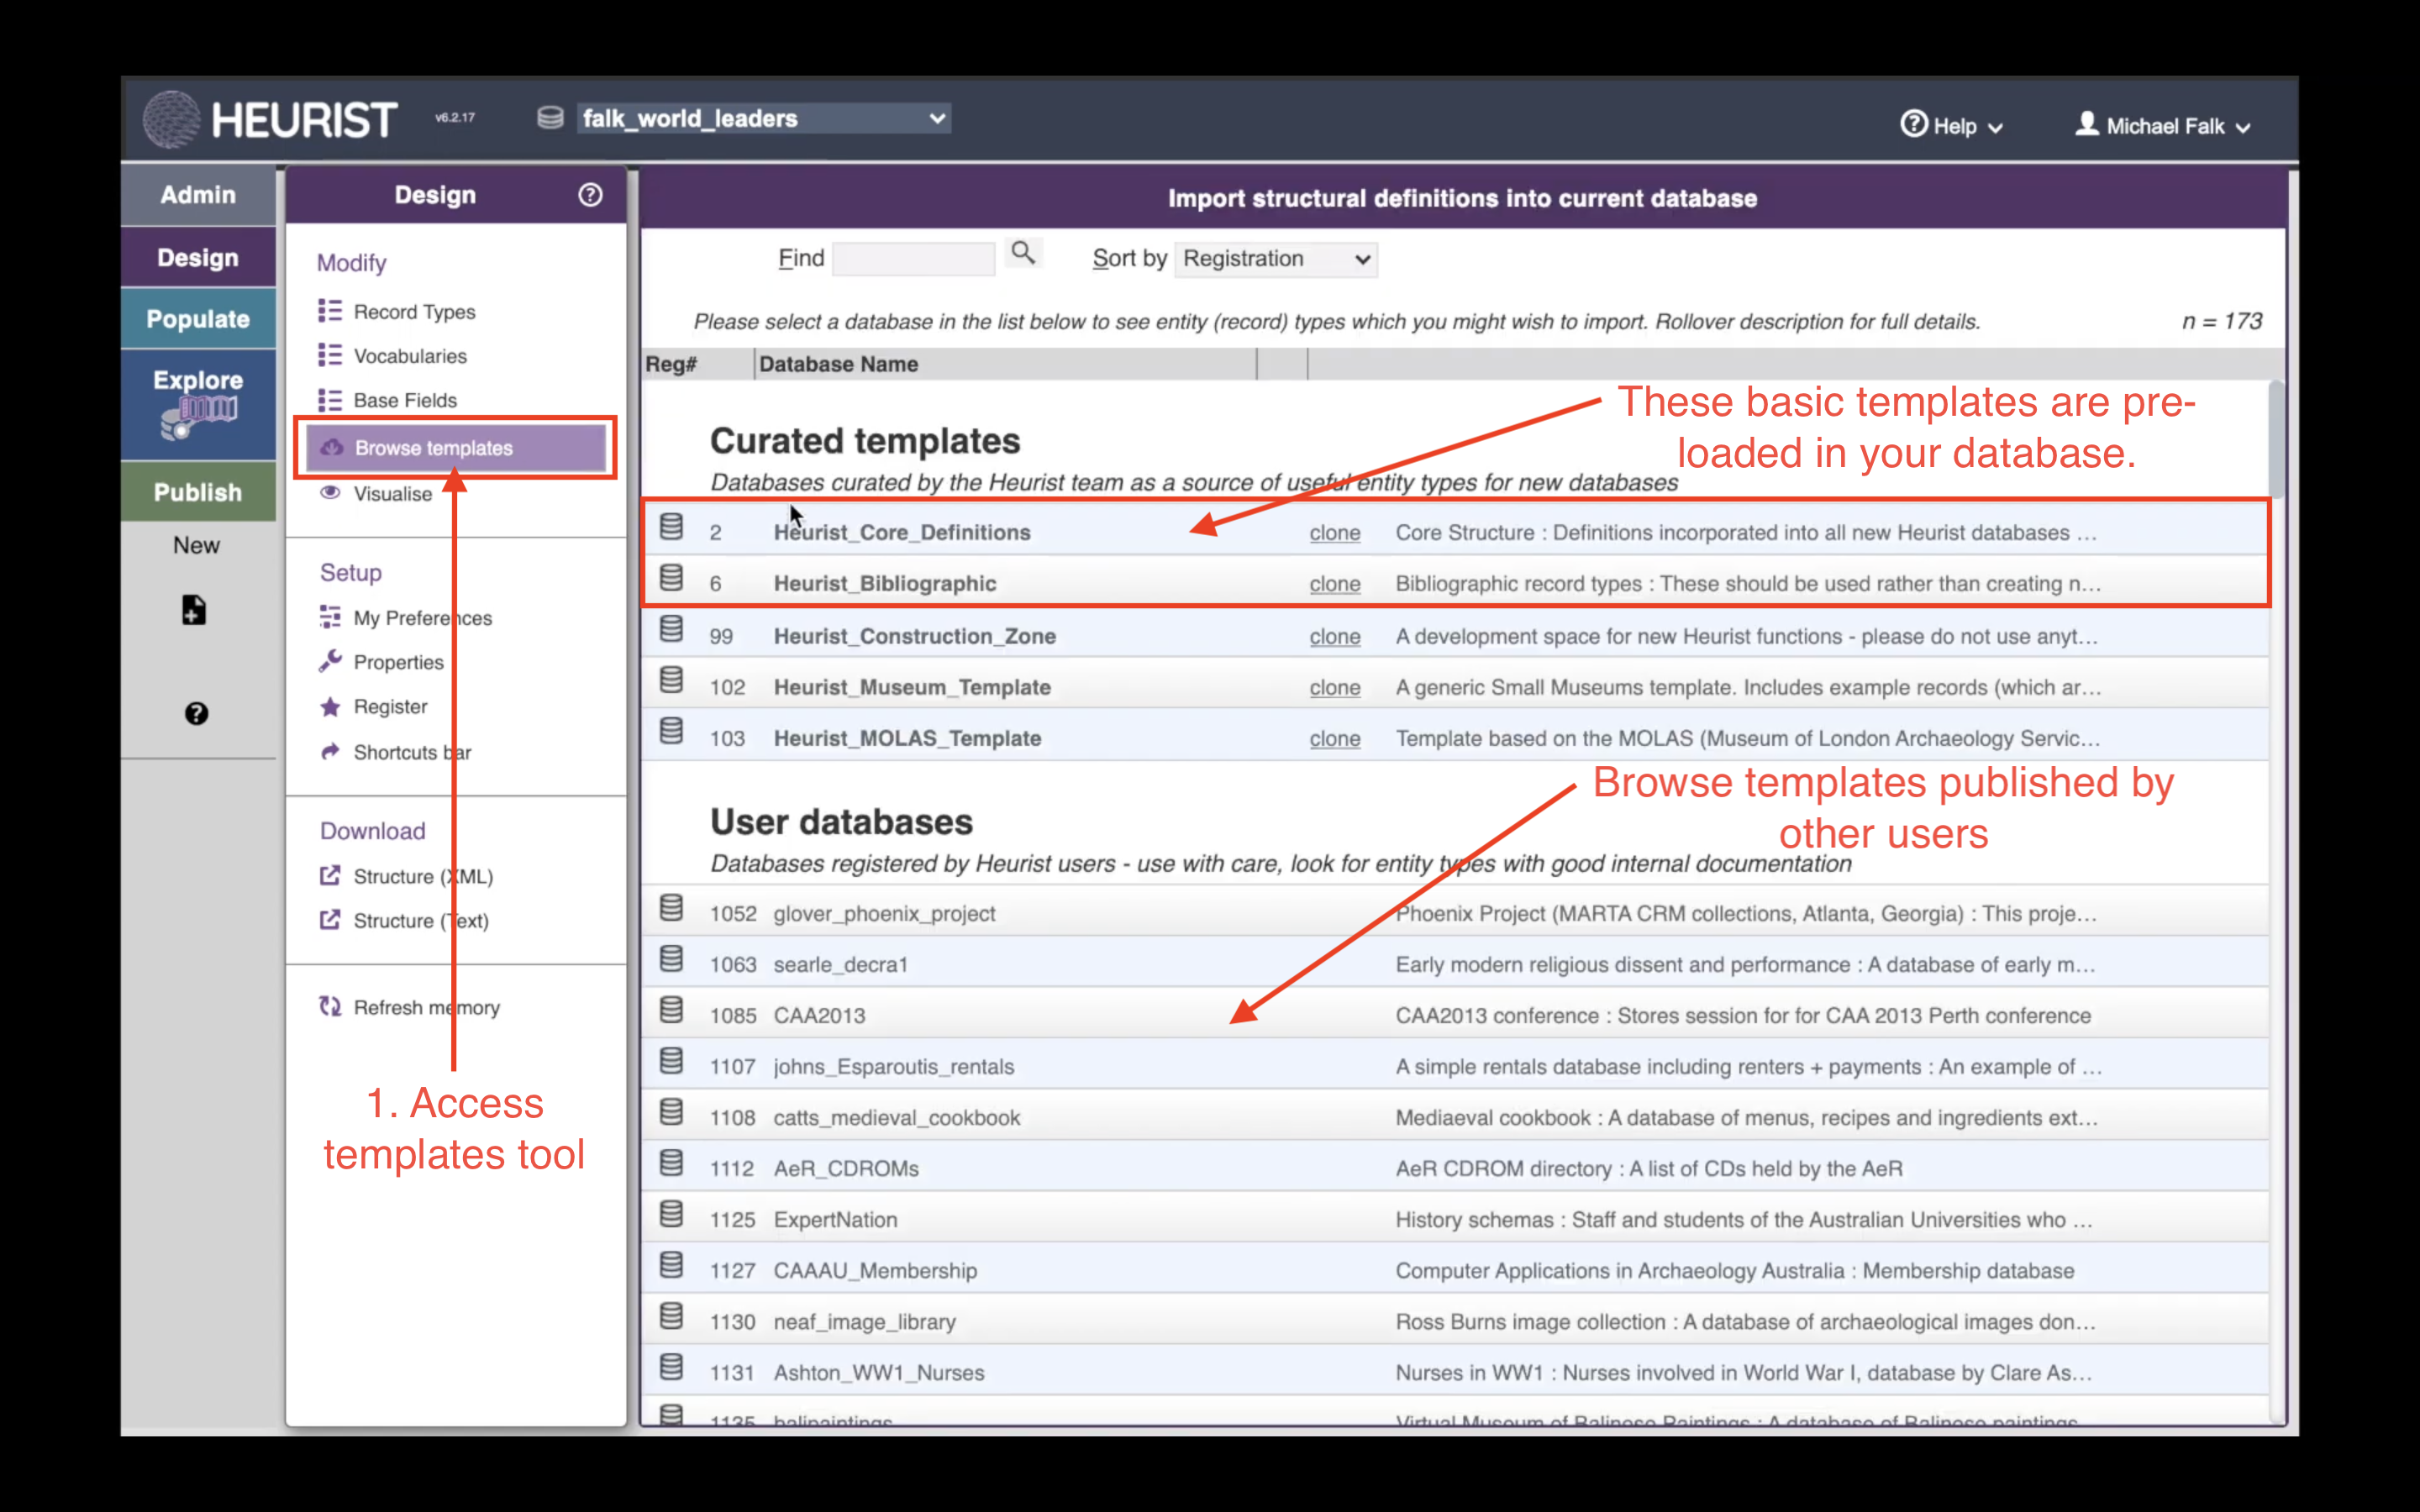
Heurist comes with many record types pre-loaded, but you will probably find in the course of your project that you need more record types to represent particular kinds of data specific to your project. You can of course create new record types yourself, but you also have the option of importing new record types from other Heurist databases on our server. Importing record types from other databases can speed up the configuration of your database, and also prevents you re-inventing the wheel. Other Heurist users may have already come up with good solutions to your particular data modelling needs. To access the list of available templates, click ‘Browse Templates’. At the top of the screen, you will see five templates developed by the Heurist team: the first two templates are automatically imported into every Heurist database, providing you with many basic record types. Below this, you will see a list of all the databases that have been ‘registerd’ on our servers, enabling others to import them as templates.
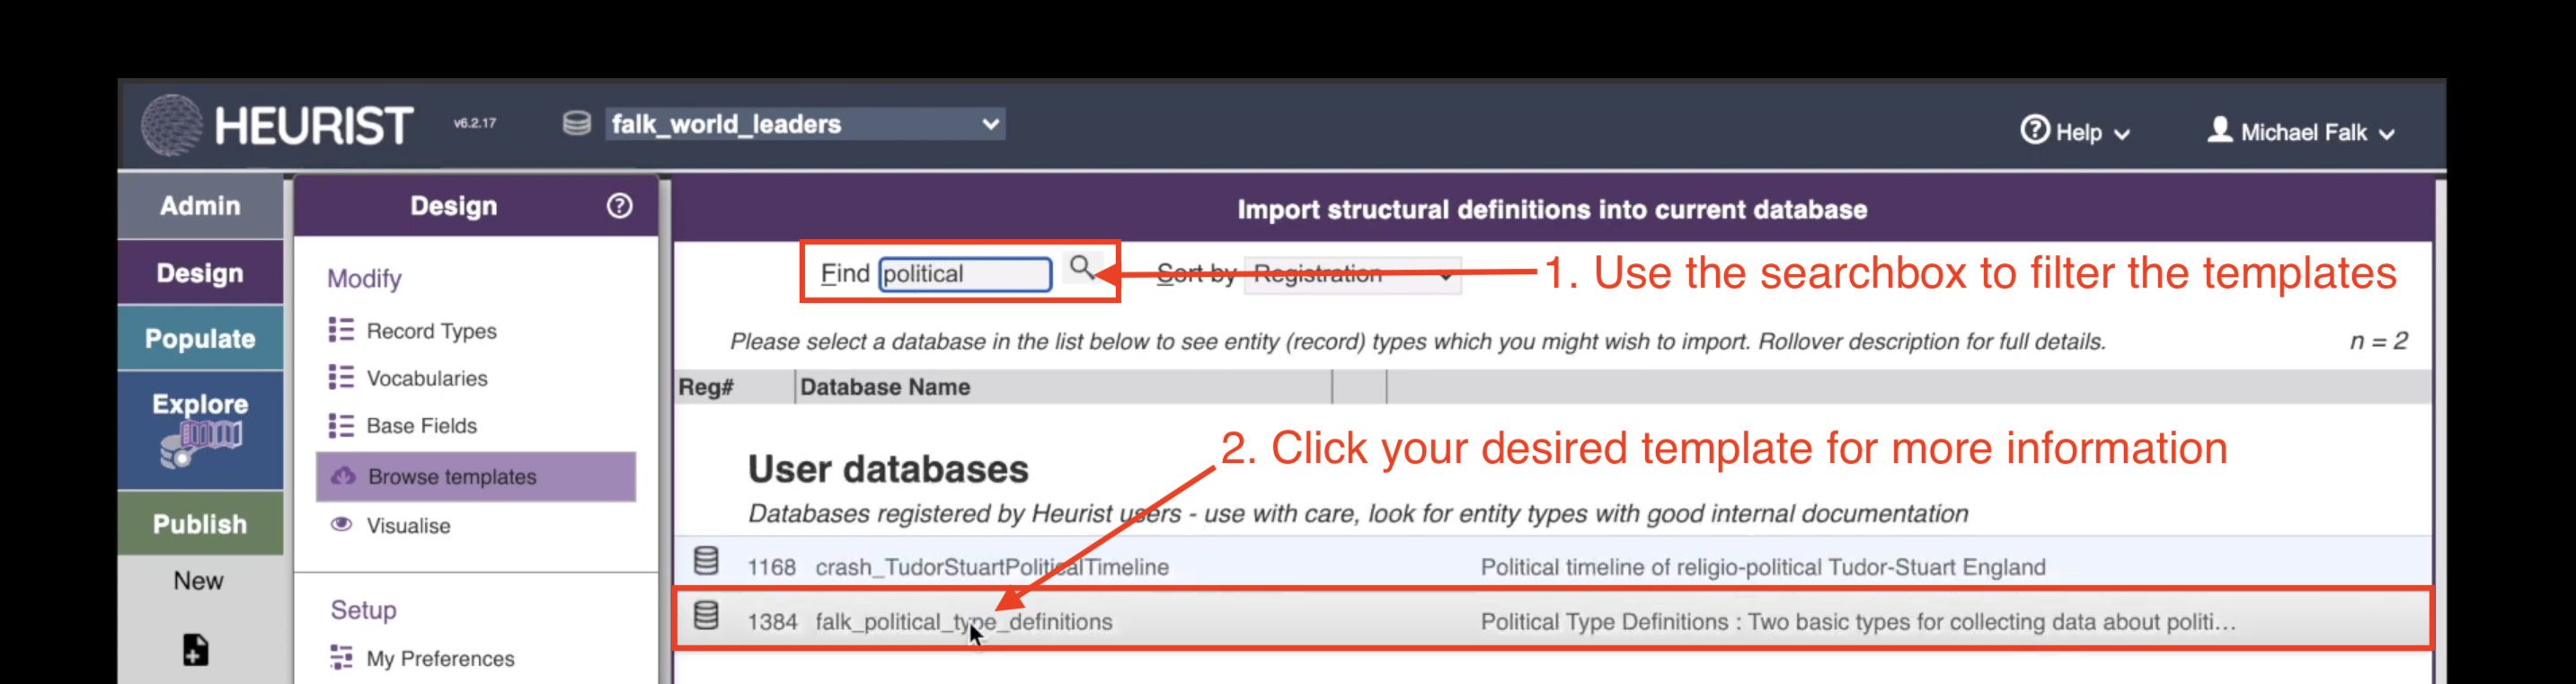
Use the search box to look for relevant templates. In this case, typing ‘political’ will bring up a number of possible template databases. For this walkthrough, you can use falk_political_type_definitions, which contains some useful record types for political databases like the World Leaders Database.
Inspecting a Template
When you click on a template, you will be able to view the record types available in the template. You can choose which of these record types to import into your own database. By default, only new record types are displayed—i.e. record types in the template that are not present in your own database. You can see the fields associated with each record type by clicking the “>” icon. You can import the record type into your database by clicking the ⬇️ icon.

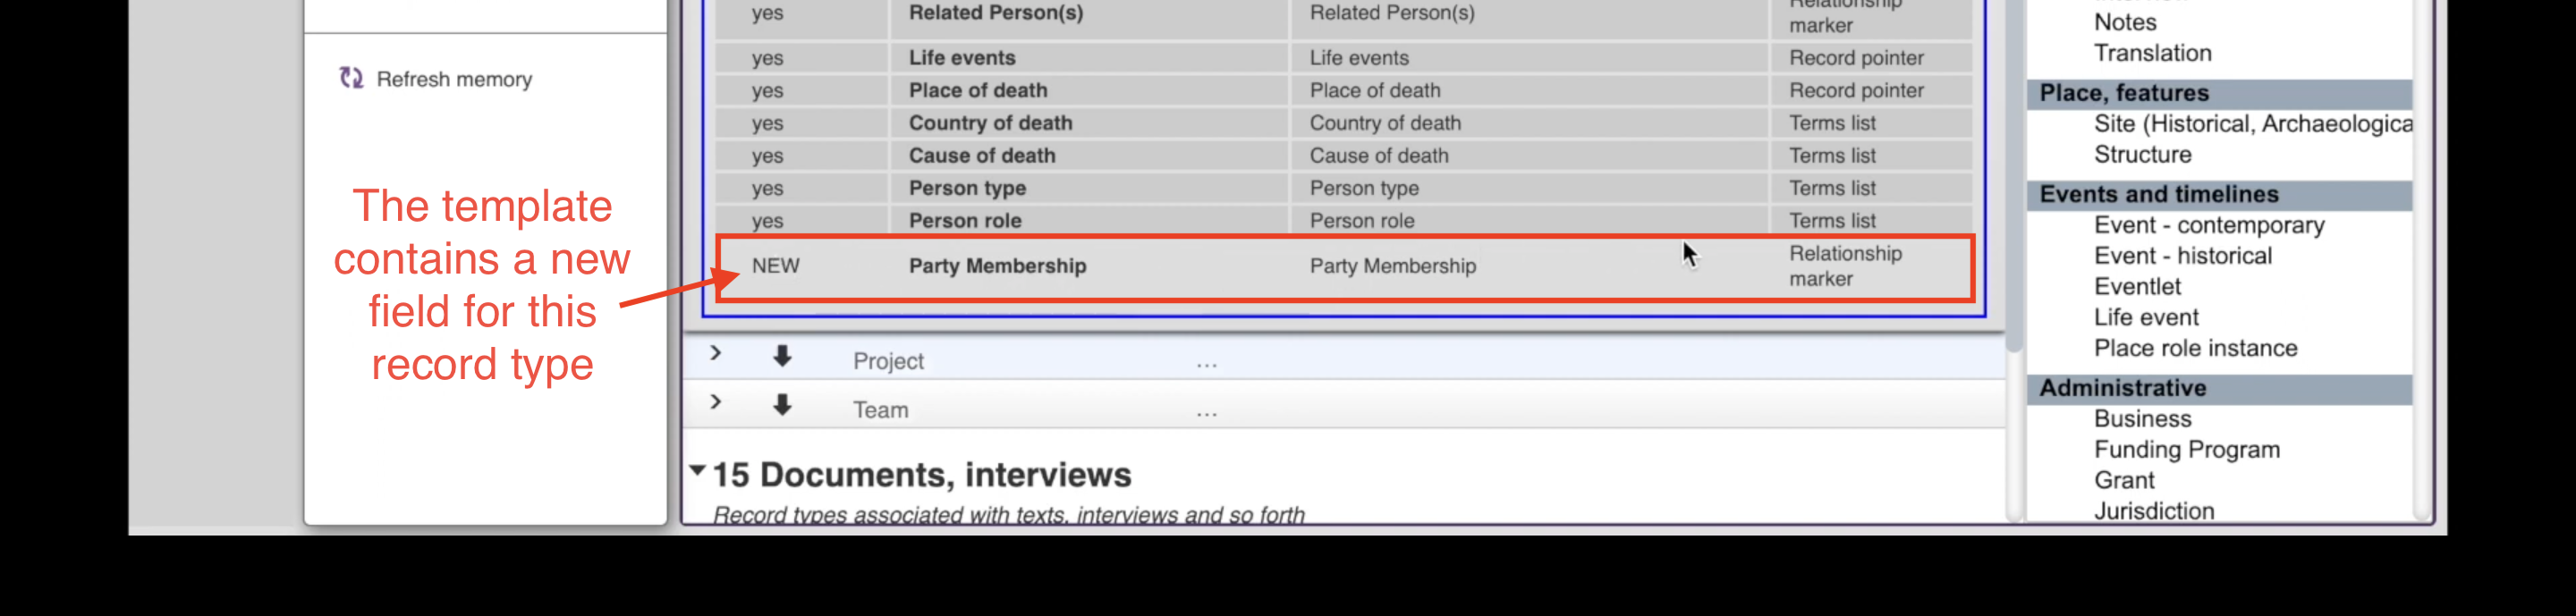
In addition to new record types, a template may also have made useful changes to existingrecord types. In this case, the falk_political_types_definitions database has made a useful change to the ‘Person’ type. To make the new ‘Political Party’ record type more useful, this template has added a new field to the ‘Person’ type where you can record a Person’s party membership. Click the ‘show all’ checkbox at the top of the screen to show existing as well as new record types. Scroll to the Person type, click the “>” to see all the fields associated with this type, and scroll down to the new ‘Political Memberships’ field. If you want to add this field to your database, scroll back up and click the ⬇️ next to ‘Person’:

Improving on the Template
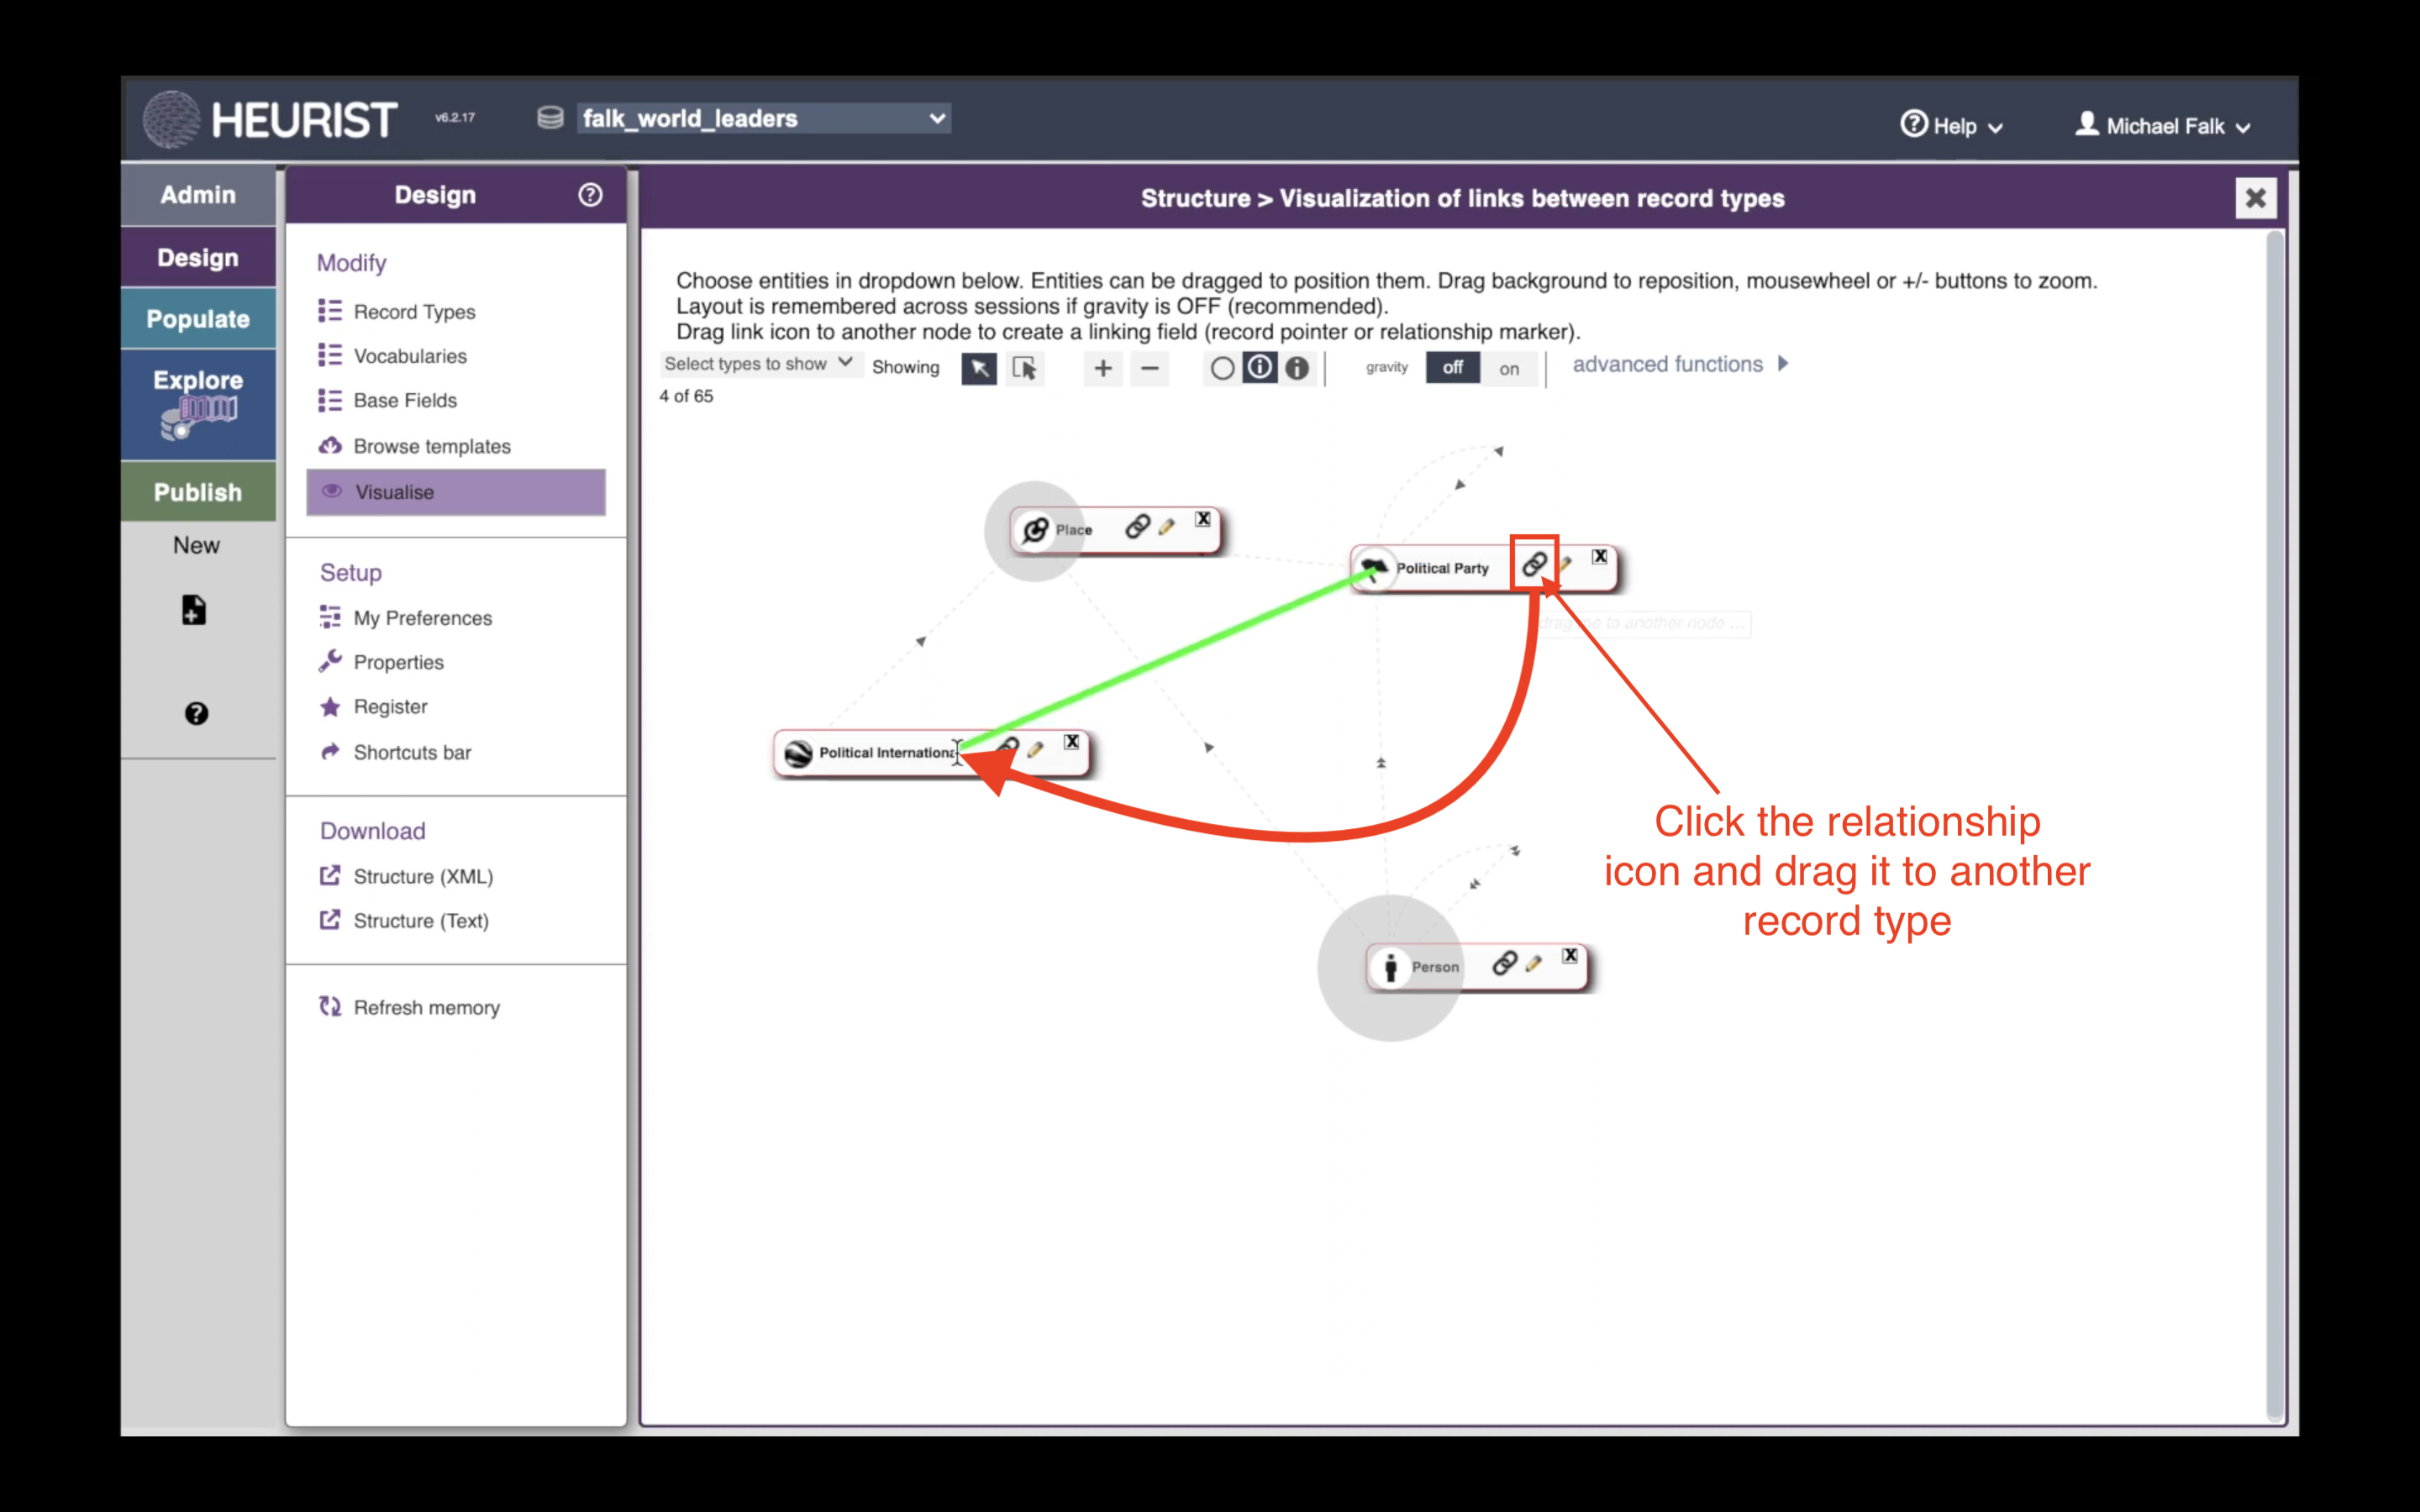
Of course, it is unlikely that any template you import will be perfect as-is. In this case, the template actually has a fault, which we can see back in the ‘Visualise’ tool. There is no connection between ‘Political Party’ and ‘Political International’, even though political internationals are simply associations made up of political parties. You can actually fix this problem from within the Visualise tool. You can create a new connection between record types by dragging the 🔗 icon from one record type to another. In this case, you should drag the 🔗 fromPolitical Party to Political International. This will let you create a field on the ‘Political Party’ data entry form where you can record which Political International(s) that Political Party is associated with.
When you have finished dragging the 🔗, you will be asked what kind of connection you wish to create. In this simple case, choose ‘Record Pointer’.

This will take you to the ‘Insert Field’ form, which we used in Tutorial 2. Give the new field a name, such as ‘International Affiliations’, and click ‘Insert Field’ to create the new connection between Political Parties and Political Internationals. The visualisation will automatically update.

Avoiding the Design Menu
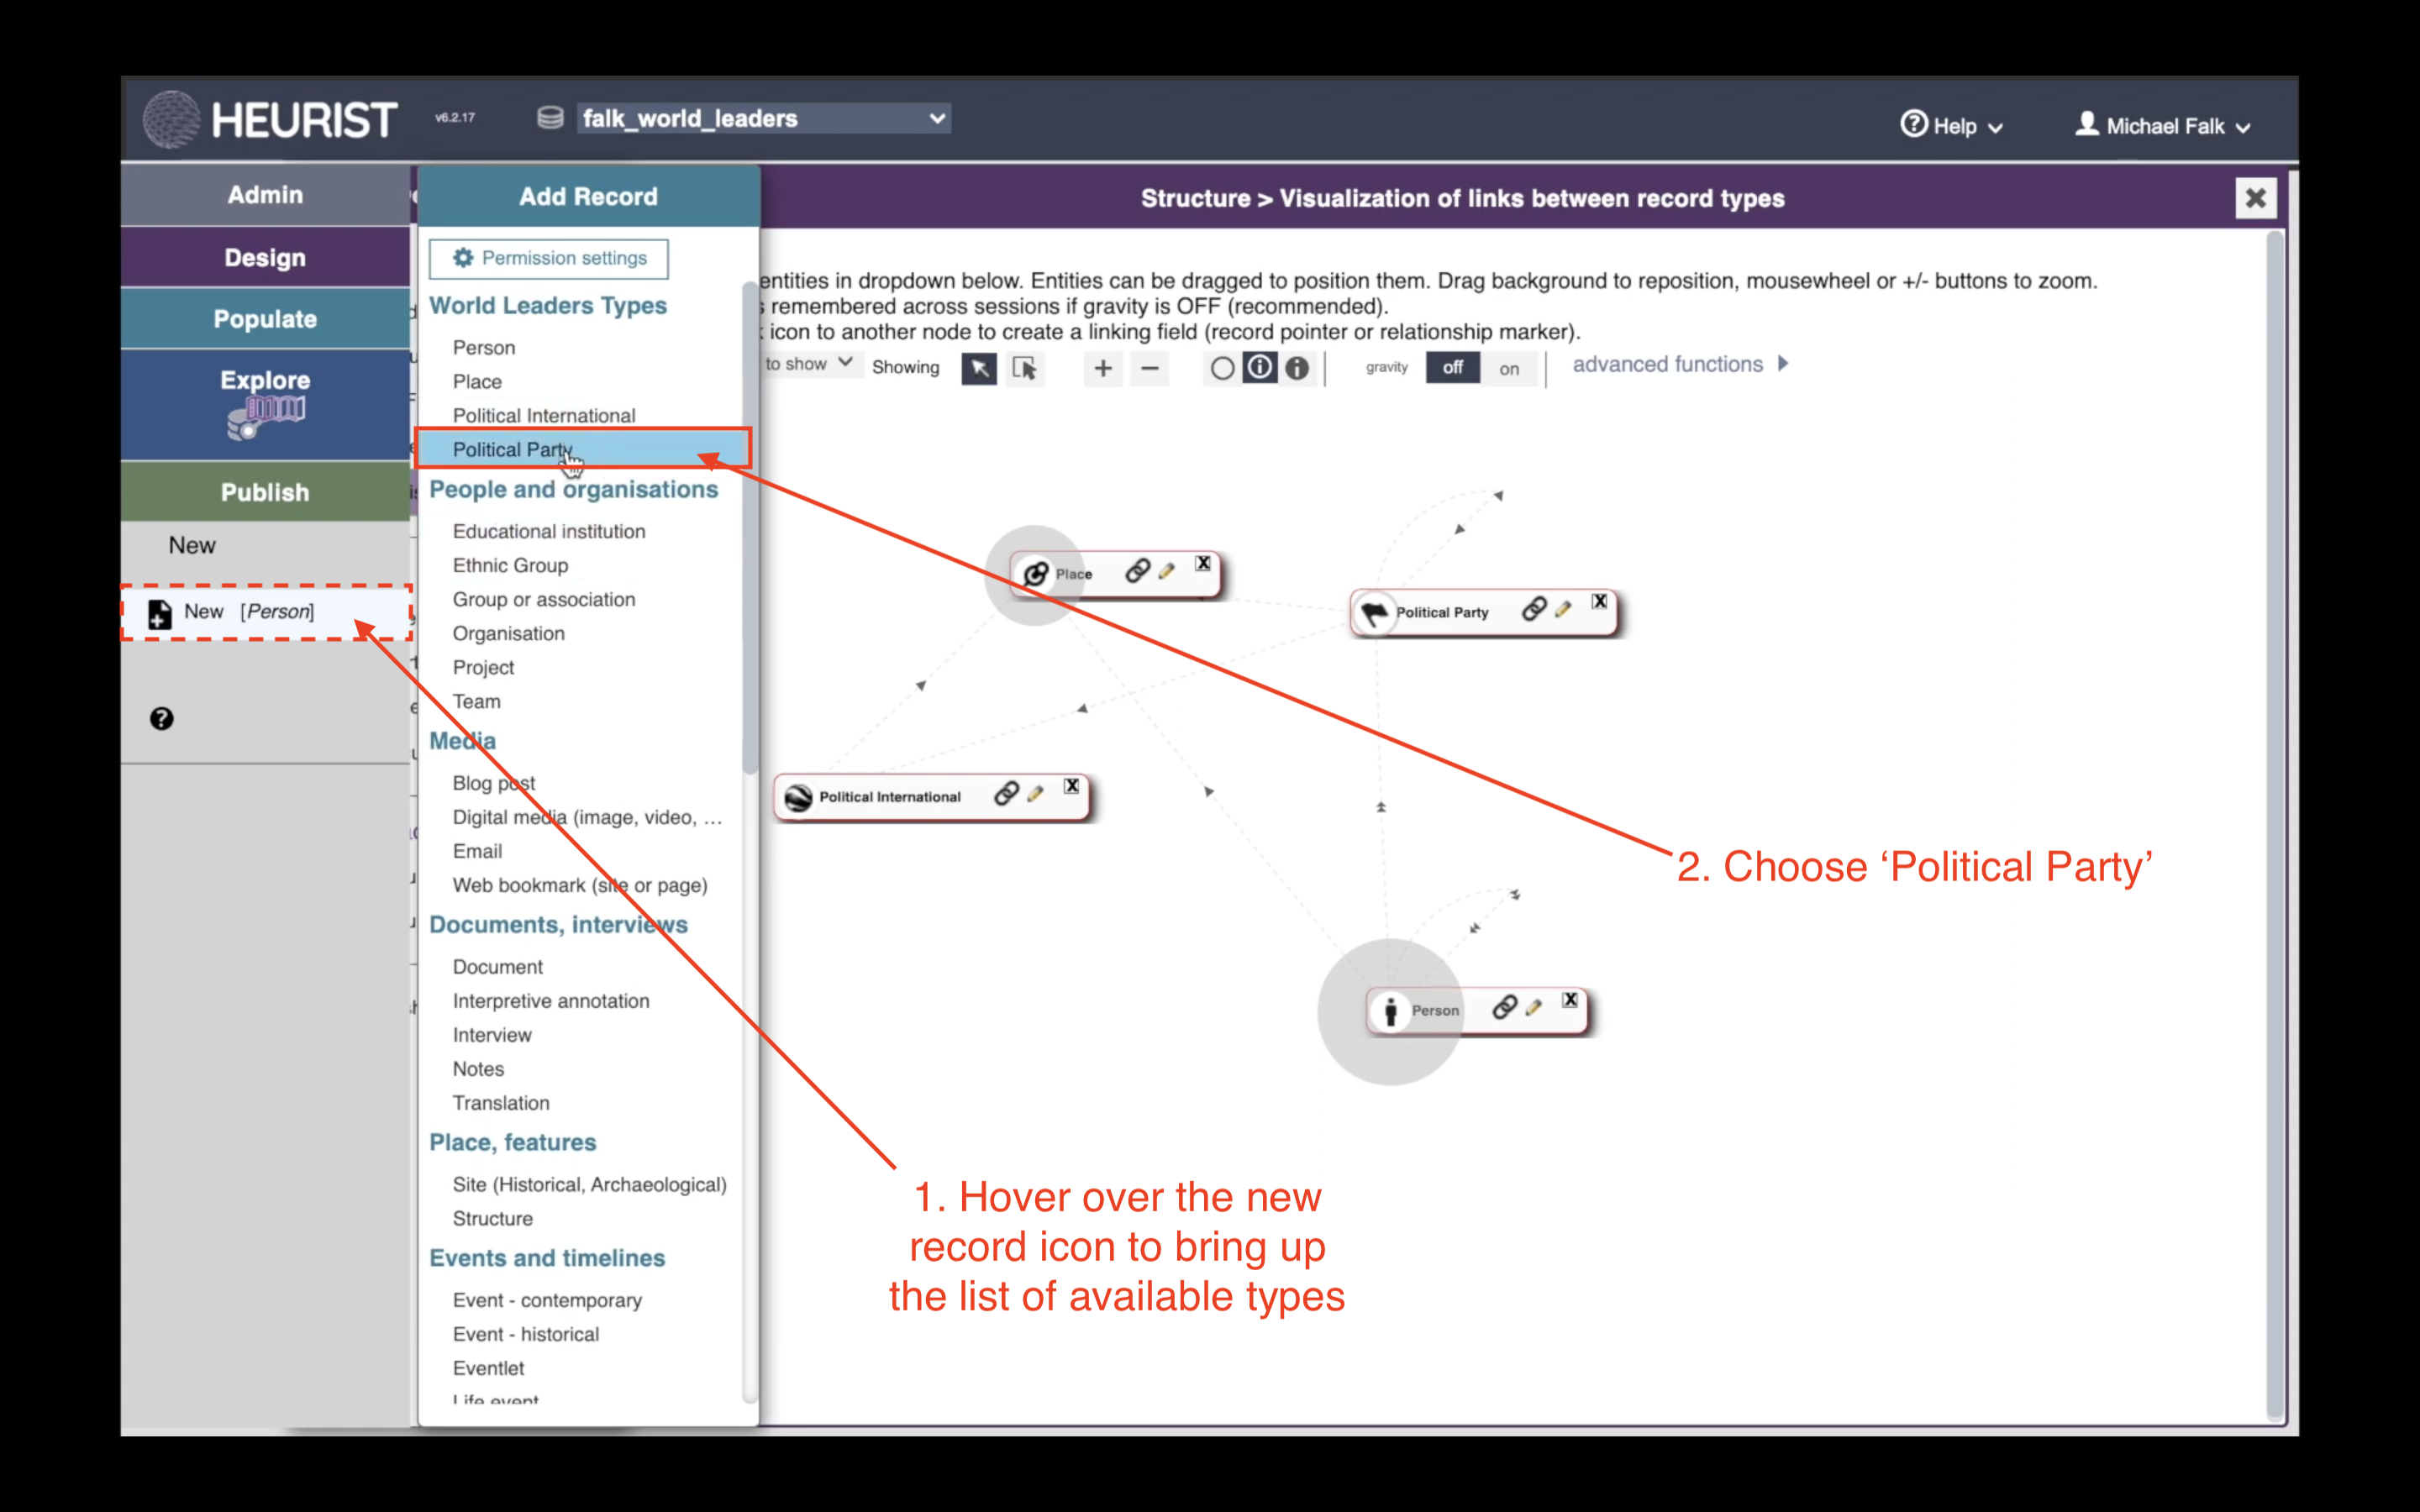
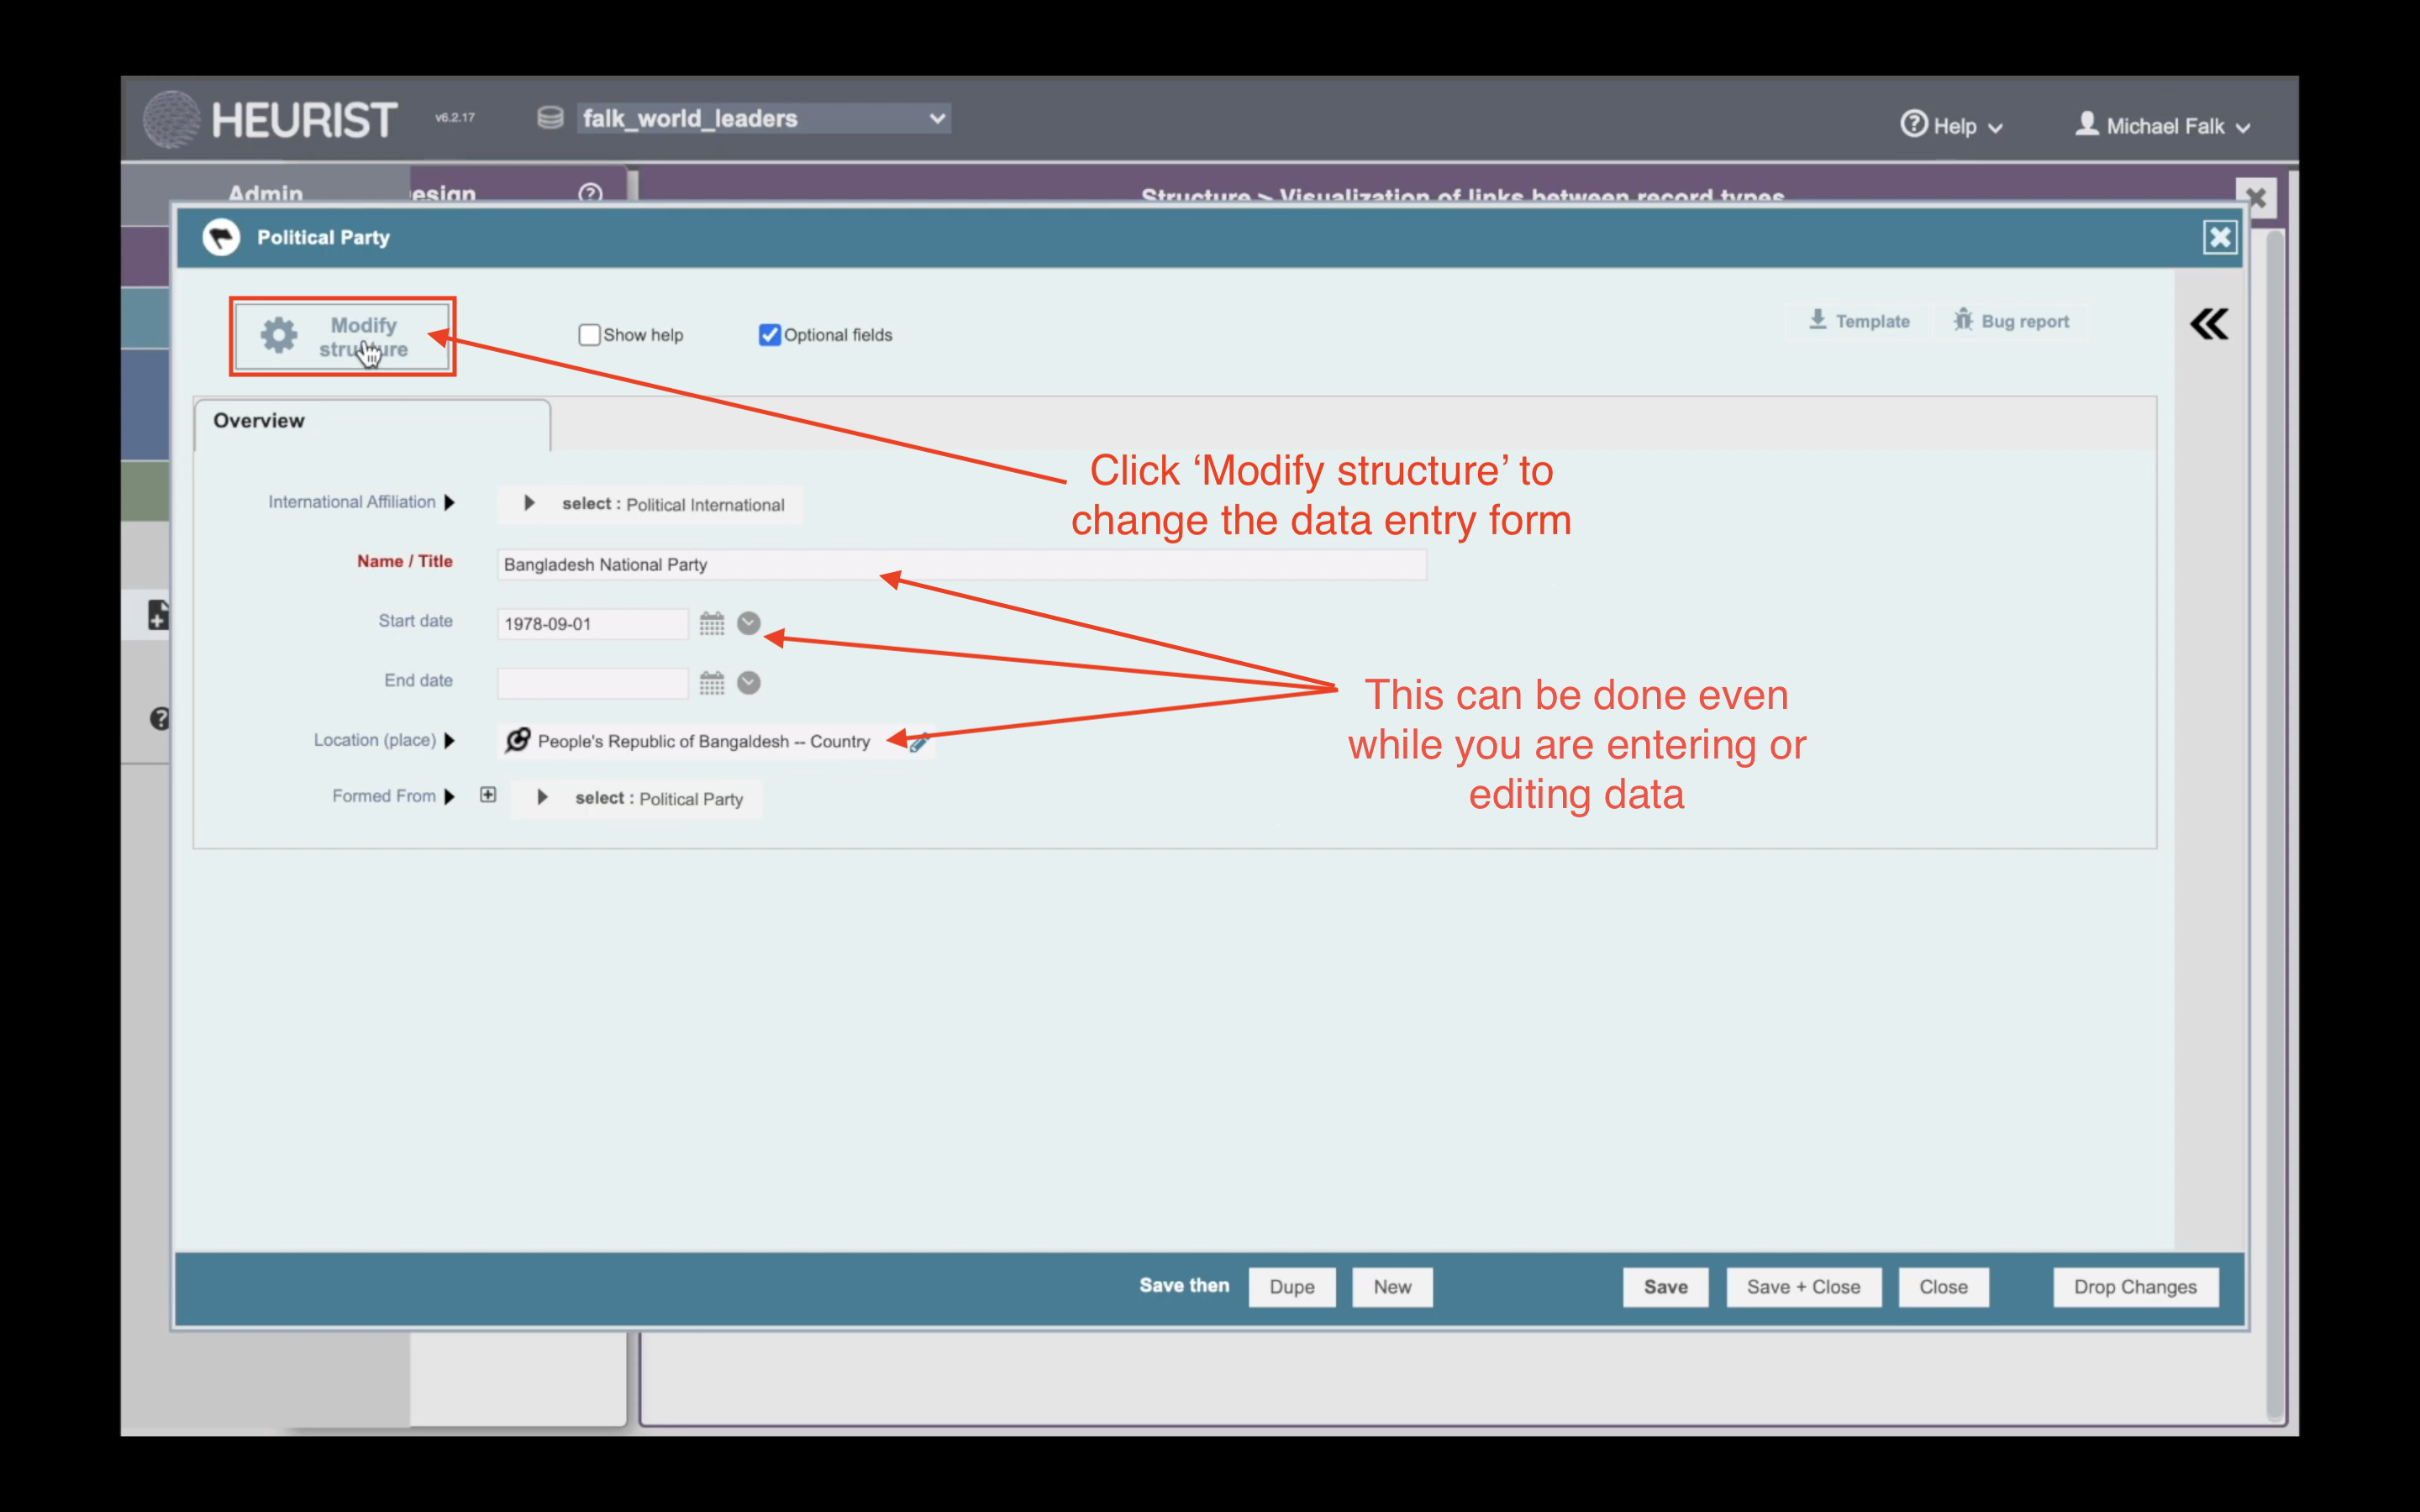
The Design menu is very useful if you want to gain an overview of your whole database, and make major changes to its structure. But it is not necessary to use the Design menu to configure your database. Heurist is designed to grow with your project, and Heurist databases are very easy to configure as you go. In this final section of the tutorial, we will see how you can make incremental changes to your database structure while you are using it. To do this, let’s begin by creating a new record. Hover over the ‘New Record’ button on the far left of the screen, and then choose ‘Political Party’ from the list of record types to create:
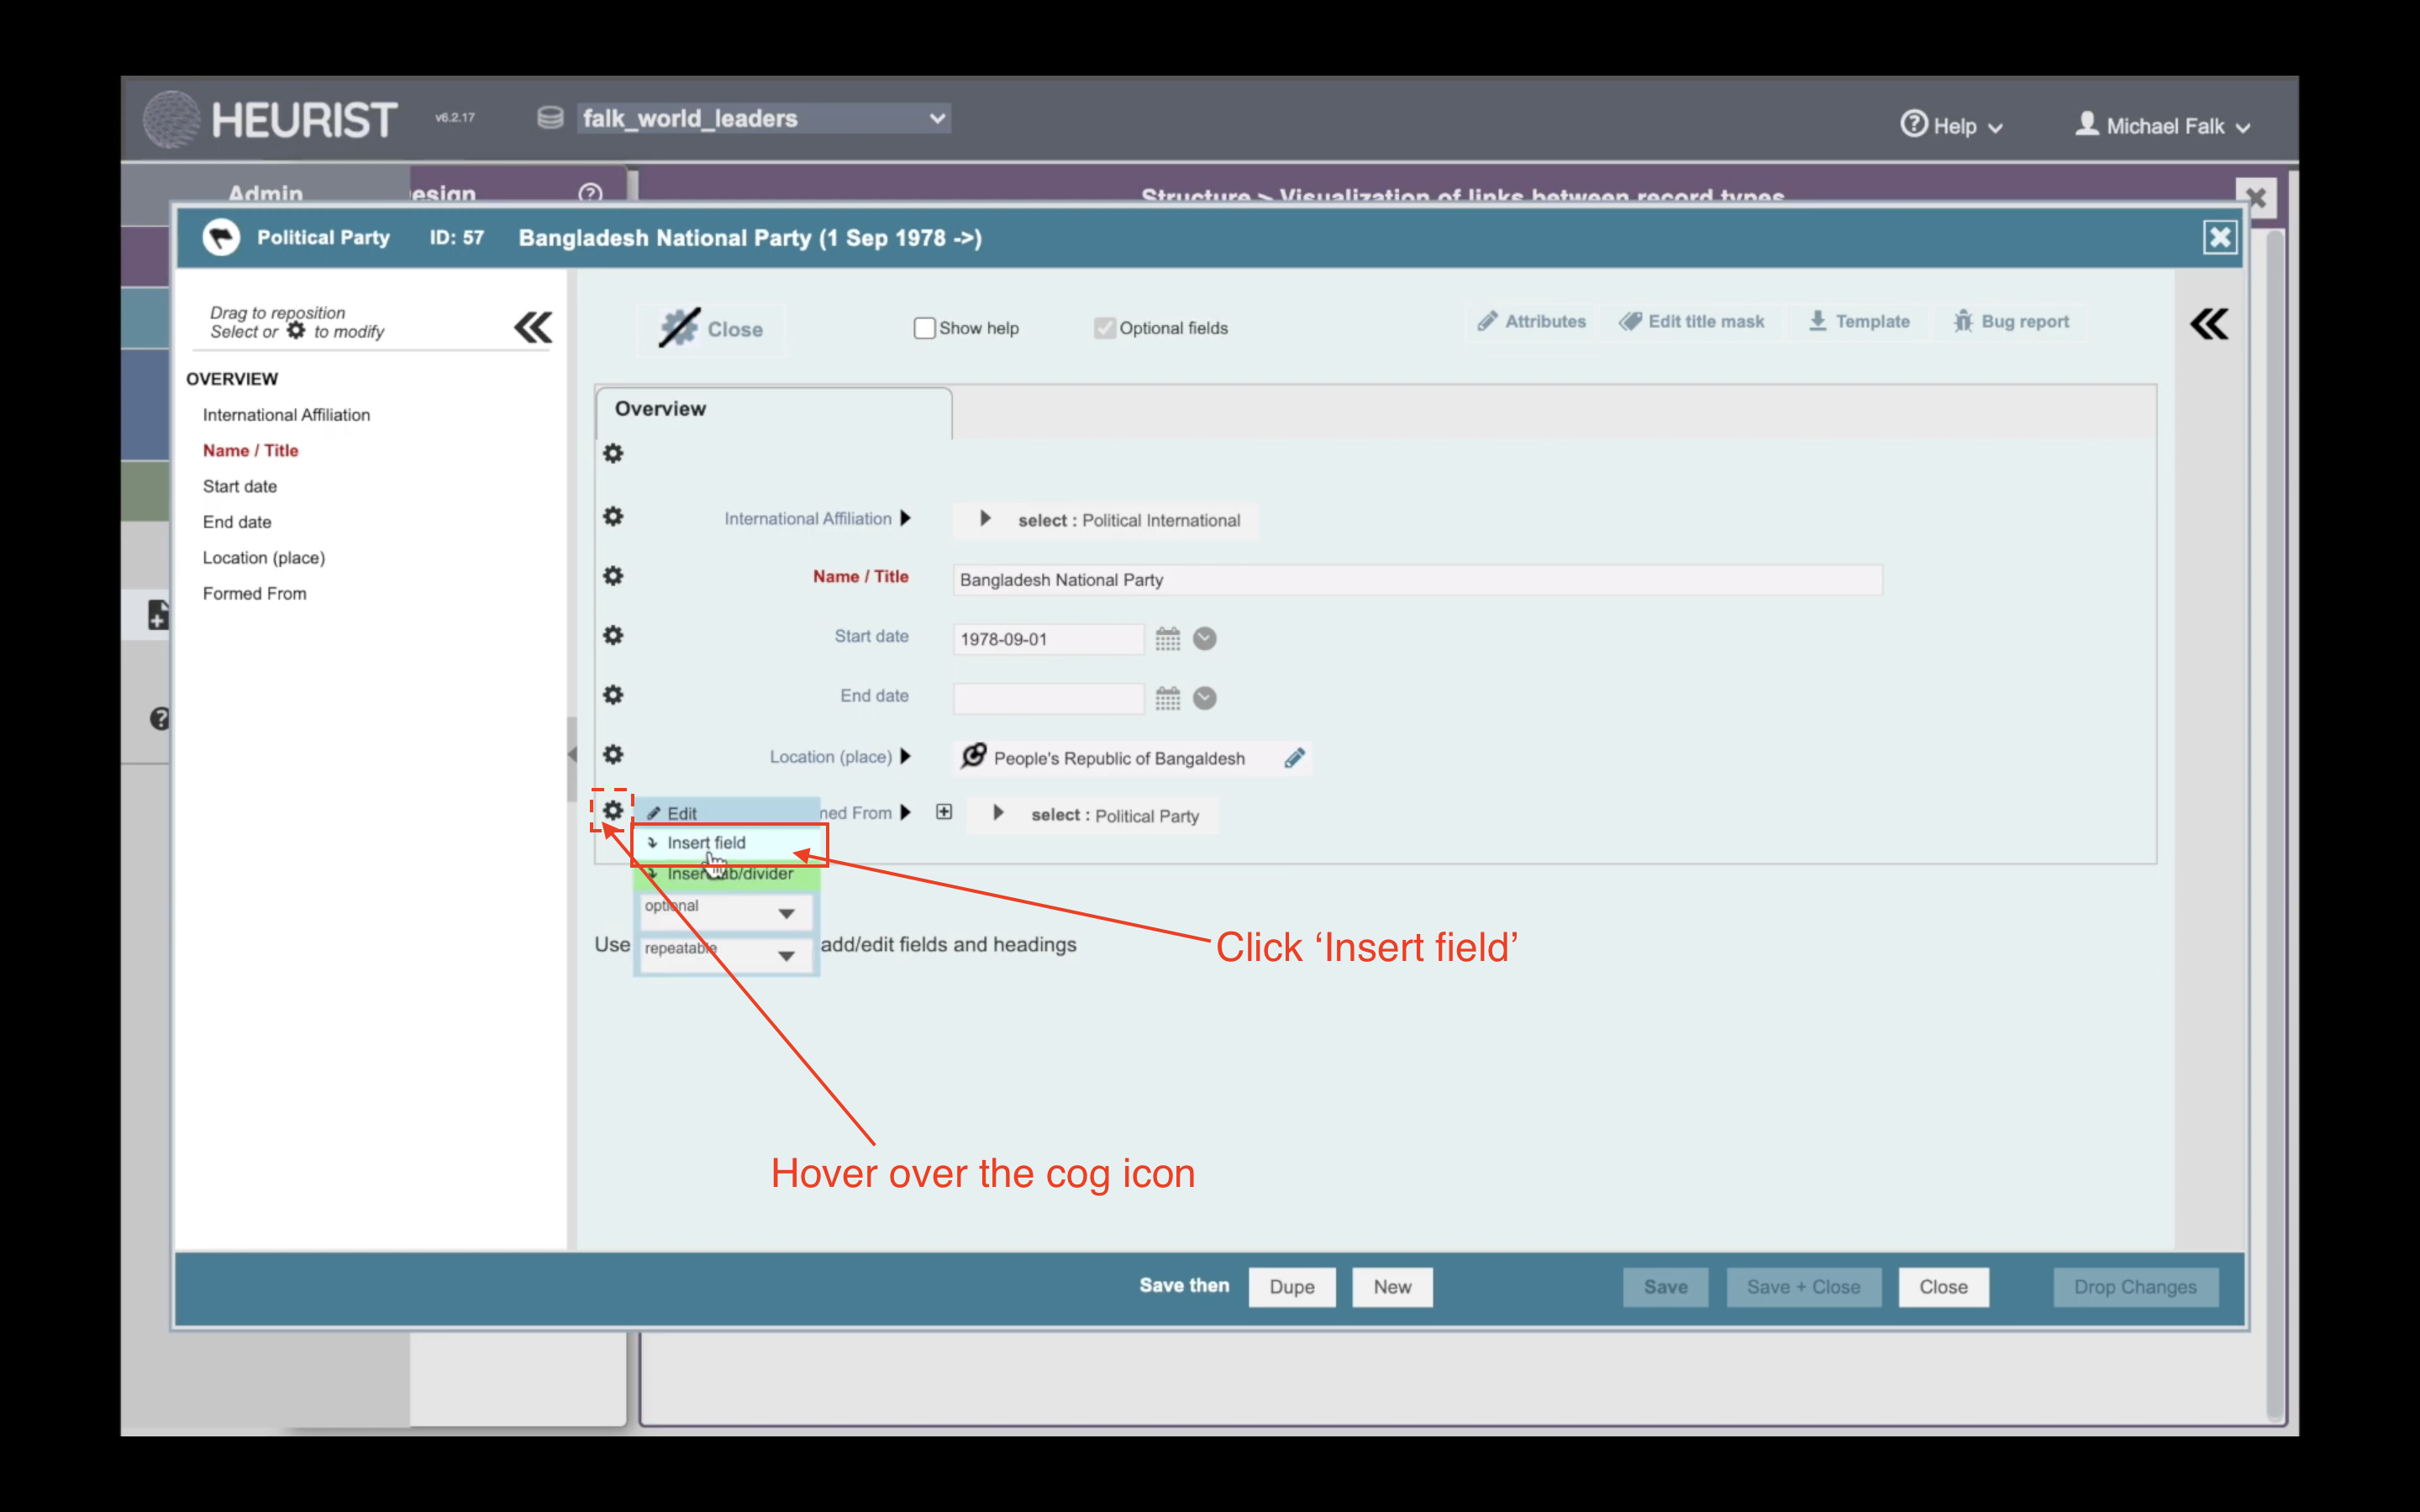
In the data entry form, click ‘Modify Structure’ to make changes to the form. As in Tutorial 2, you can insert a new field into the data entry form by hovering over one of the cog icons to the left of the screen.
Add An Existing Field to this Record Type
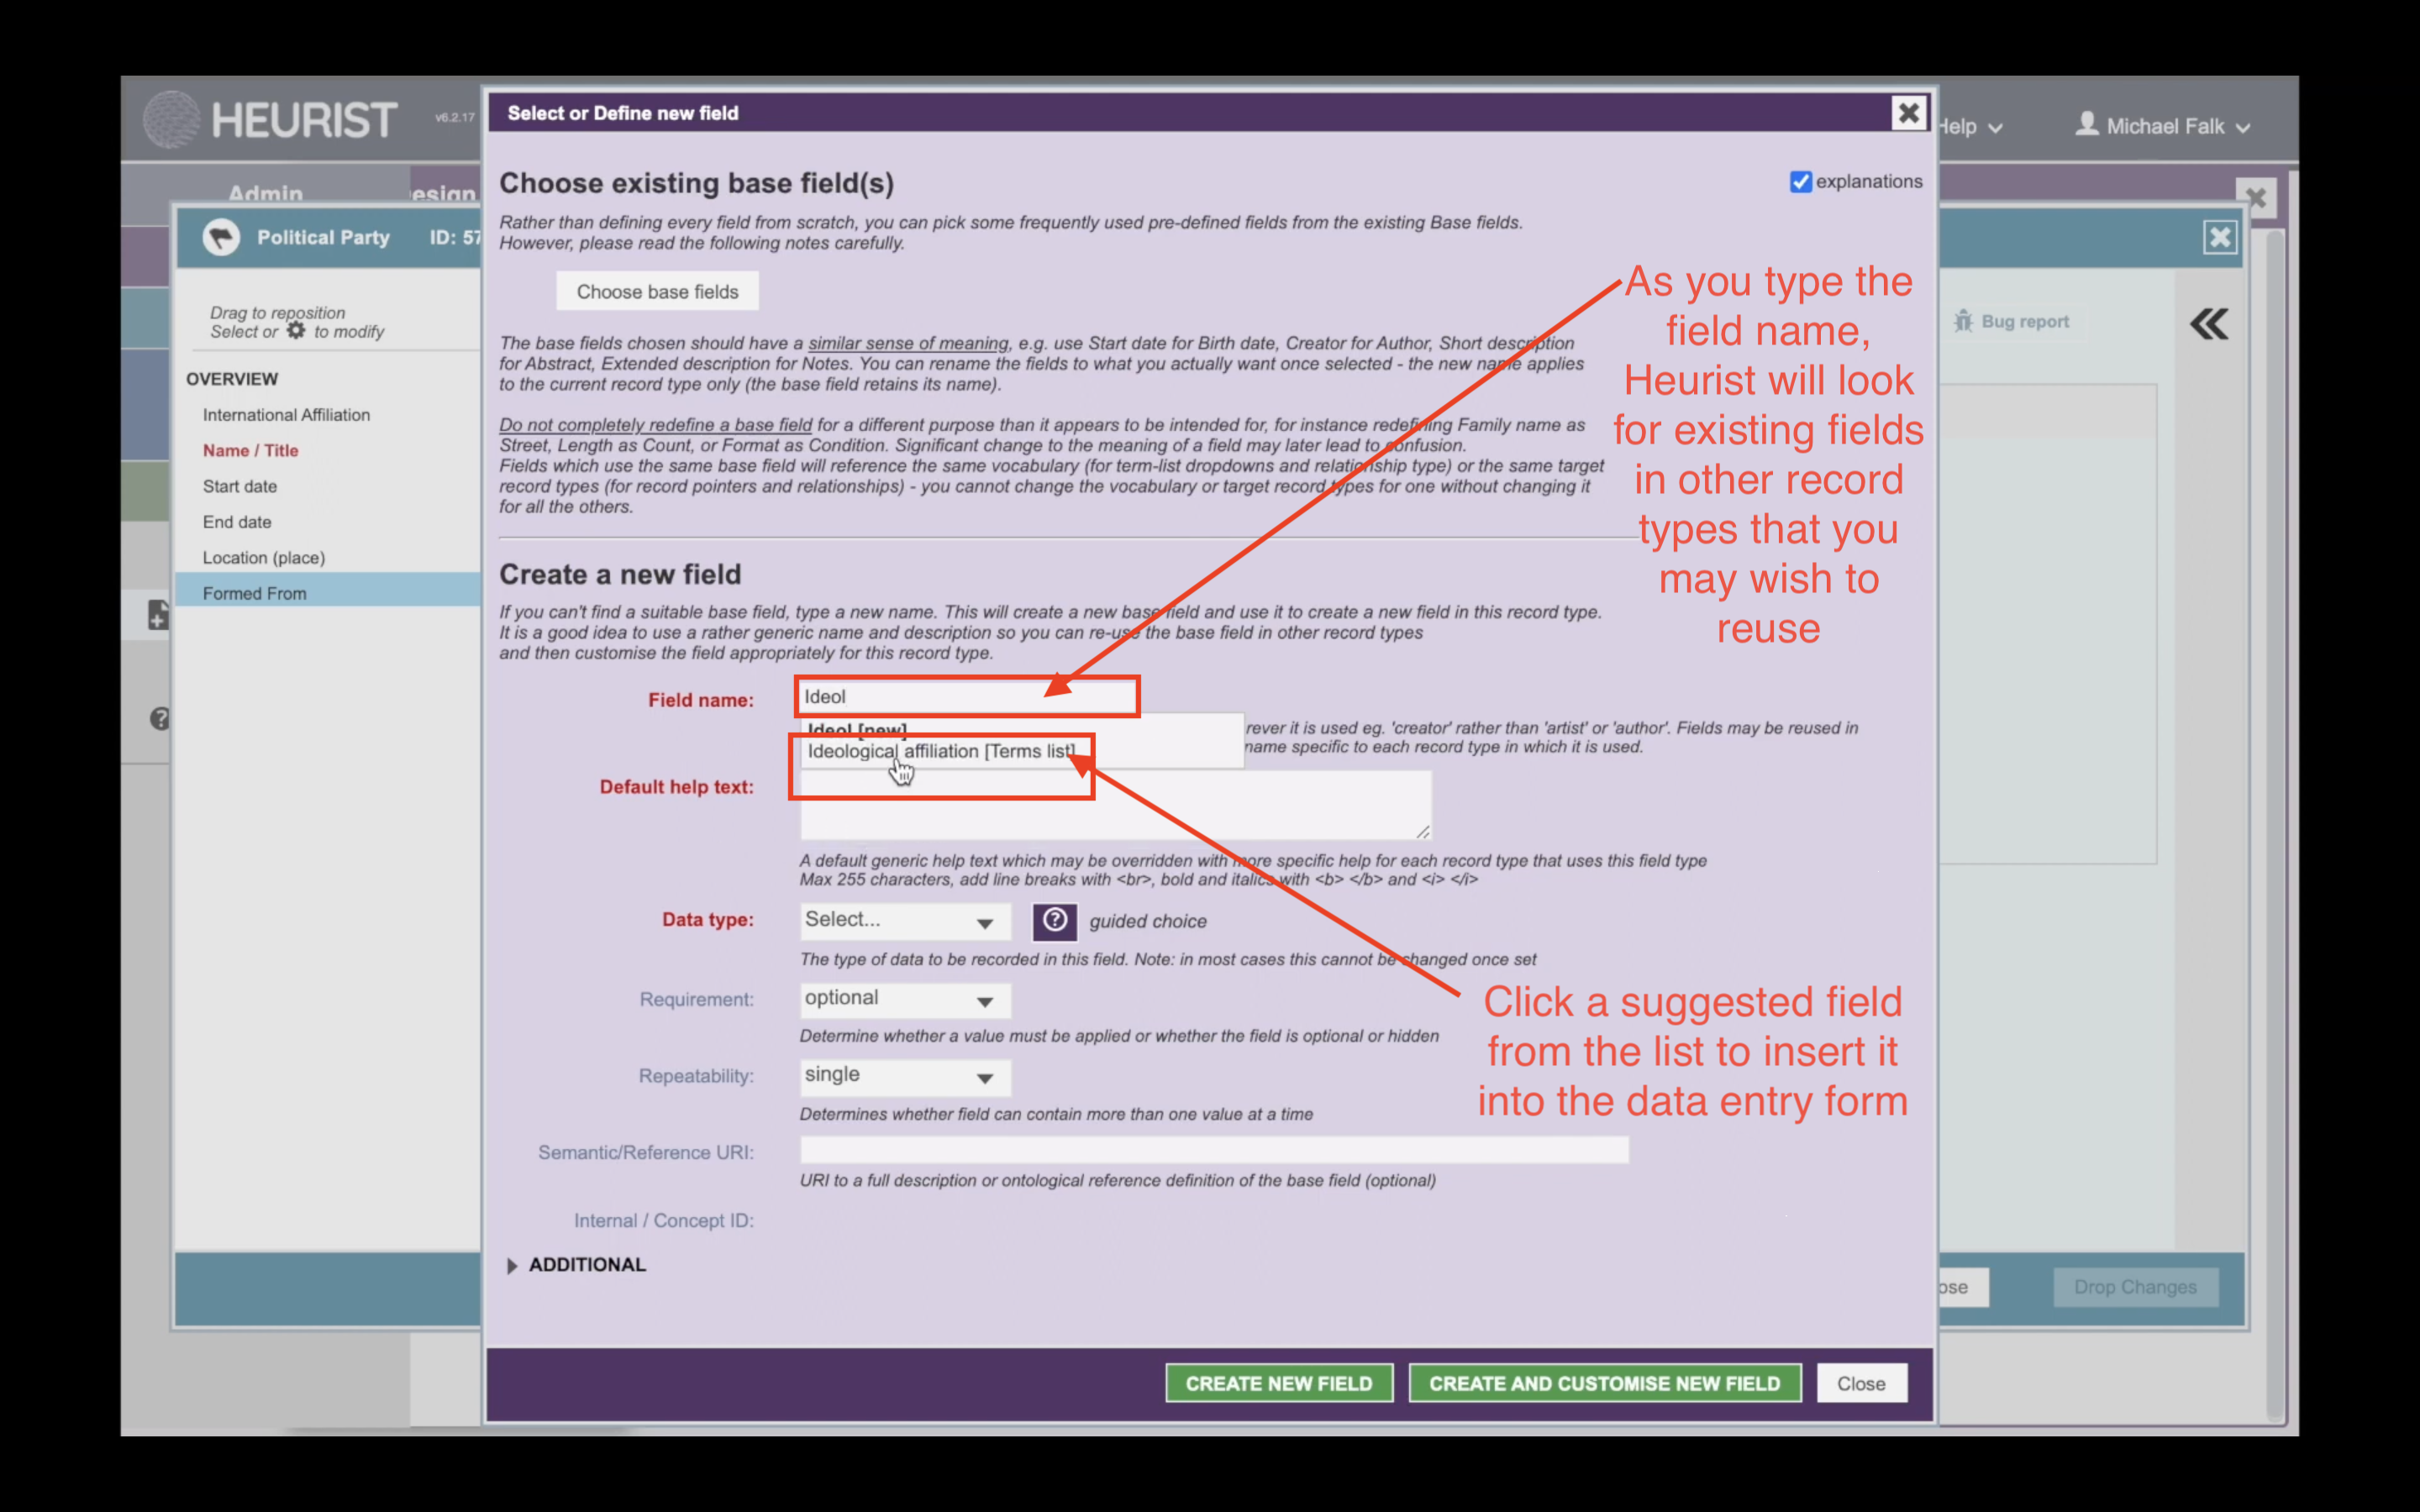
In this case, what we want to do is allow users to record the ideological affiliations of political parties. In Tutorial 2, we created an entirely new field called ‘Ideological Affiliation’ to enable us to record the ideological affiliations of Persons in the database. We also created a vocabulary of different ideologies to provide a dropdown list to users. We can easily recycle this field now. Start typing ‘ideological’ into the ‘Field Name’, and you will see a list of existing fields that you may wish to reuse in this instance. In this case, click on ‘Ideological Affiliation’ when it appears. This will immediately add the existing field to this record type, and close the ‘Insert Field’ form:
Update a Vocabulary as you go
Now that we have added the ‘ideological affiliations’ field to the ‘Political Party’ type, we can use the dropdown to start adding information about this record. In the video, I observe a problem with the dropdown: I was entering data about the ‘Bangladesh National Party’, but ‘Nationalism’ was not an available ideology in the drop down. If you find yourself in a similar situation, you can simply click the + icon to the right of the dropdown to open the ‘Add Term to Vocabulary’ screen. Here you can easily add ‘Nationalism’ or any other required term to the vocabulary that drives the dropdown list. Save each term after you add it, and when you’re done adding terms, click ‘close’.

Next Tutorial: The Populate Menu
Our Tutorials
Do you need help with something else? Contact Us, and let us know what additional tutorials you think we should provide.
