The post Dependencies in Heurist appeared first on Heurist Network.
]]>Defining entity dependencies in spreadsheet import
It may be tempting to think that a spreadsheet describes one type of entity – for example, a Person, Organisation, Interview, Work, Document, Image, Event, Structure, Sample, Context etc. But in practice this is quite rare. While the primary subject of the spreadsheet – the one represented by each row – may be quite obvious, the rows often contain secondary entities on which the primary entity depends. For example, a row describing a Person could also include the names of their parents, wife(ves) or husband(s), their place of birth, the school and university where they studied, organisation(s) to which they belonged, and so forth. A record of a theatrical Performance may include the work performed, the author(s), the edition used, the director, the theatre in which it was performed, the theatre company and perhaps a list of performers paired with the characters they played and grants and sponsorship received. For example:
FamilyName, GivenNames, FatherFam, FatherGiv, MotherFam, MotherGiv, BornAt, BirthCountry, BirthDate, School, StartSchool, EndSchool, University, StartUni, EndUni, MemberOf
Smith,Jane, Smith, Bill, Richards, Margaret, Newcastle, UK, 17/6/1968, Newcastle Grammar, 1980, 1984, UCL, 1993, 1996, Red Cross
Smith,Tom, Smith, Bill, Richards, Margaret, Newcastle, UK, 17/6/1964, Newcastle Grammar, 1976, 1980, Liverpool University, 1981, 1984, Freemasons|Rotary
These additional columns are not just attributes of the entity being imported. They are typically independent entities – another Person, a Place, and Event etc. – which have their own set of attributes. The same secondary entity is often linked to multiple primary entities and should be recorded only once in the database to avoid redundancy. The link between the primary and secondary entities may be repeated eg. a person may have lived in several places, many performances occur at a single theatre. The links may also be of a particular type and have a starting and ending date.
For all of these reasons these links will typically be represented either through record pointer fields (for simpler relationships) or through relationship records* (where detail is required about the relationship itself), with the pointer or relationship linking the primary imported record to another entity (Person for parents, partners, authors, directors and performers; Place for place of birth; Organisation for place of study; and so forth).
* Relationship records are defined by adding a relationship marker field to the primary entity, which sets up the target record type(s) and the set of relationship types which are allowed.
By linking to another record with a record pointer field or relationship record, it becomes possible not only to record several alternatives (a person may have been married more than once or studied for more than one degree), but also to record further information about each of these secondary entities eg. dates and place of marriages, courses of study followed and results. Secondary entities may also be quite conceptual, such as instances of education, occupation, religious or military service, residence etc. (such as the combination of place, dates, type, notes etc. linked uniquely to a particular person, which we call Life Events).
In order to import the primary records described by the spreadsheet rows, for example Persons, we first need to match (if the entity is already in the database) or import (if it is not) each of the entities on which the person’s description depends. By matching or importing a secondary entity we set the record ID for that entity, which can then allocated to a record pointer field in the primary entity or the target of a relationship record. Note that secondary entities can have their own dependencies, so this process can get quite involved.
Note also that references to primary and secondary entities are ONLY in relation to a particular import. The entities, once imported, do not have any markers of primary or secondary character.
Heurist offers a ‘wizard’ approach to manage the process of separating out all the secondary entities, identifying those which exist in the database, importing them and setting up links between them.
Where possible we recommend splitting off commonly/repeatedly used entities such as places, institutions and people into separate files, importing these files, and then adding the Heurist IDs as a column to the primary table with “H-ID” in the column name eg. “Birthplace H-ID” (after adding and checking the Birthplace H-ID values, you could then delete the birth place column(s)). This will cut down on the number of steps in the wizard which can be overwhelming for new users.
The post Dependencies in Heurist appeared first on Heurist Network.
]]>The post Importing Relationships for Relationship Marker fields appeared first on Heurist Network.
]]>Relationship markers are simply that – markers of where a relationship is meant to exist. They cannot, in themselves, be imported since they contain no data. What you are actually importing is a relationship record. In order to import relationship records, you need a CSV file which at a minimum contains Heurist IDs (H-IDs) for the source and target records, as well as the terms describing the relationship (they may also contain dates and other information). These terms should generally match terms in the vocabulary of a relationship marker field linking the source and target record types – we strongly recommend that all relationships in a single import file are between the same two types of record – so that the relationships will show up in that field. New terms can be added on-the-fly whilst importing, but you won’t have control of which vocabulary they end up in and they will then need moving to the appropriate vocabulary so that they show up in the relationship marker field.
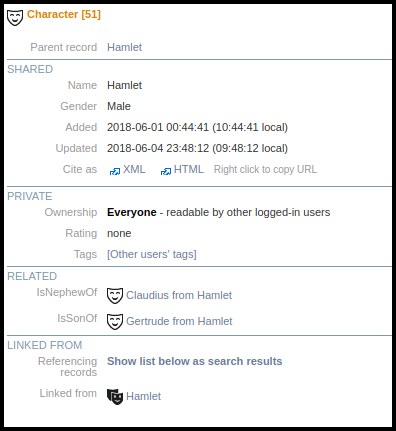
In the example shown above, we can see that Hamlet is the nephew of Claudius and the son of Gertrude.
The Heurist IDs (H-IDs) can be obtained by exporting records to CSV file(s), using the Export tab and selecting CSV file. You should also include any additional fields that will assist you to identify your records (such as Name). This will enable you to identify which H-ID belongs with which record. Once you have the H-IDs, create a CSV file which has a column for the Source H-ID and a column for the Target H-ID. You should make sure that the source and target record types fit the model you’ve defined and implemented using relationship marker field(s). The source and target record types can be the same, eg. Persons can relate to Persons with family relationship types. Person’s can relate to Employment records, in which case the Source H-ID would refer to the Person record, whilst the Target record would be an Employment record. The columns for Source H-ID and Target H-ID must have a column name which includes “H-ID” somewhere in the name so that Heurist recognises it as a Heurist ID column.
As well as Source H-ID and Target H-ID, it is necessary to include a column term which defines the relationship. These terms depend on the vocabulary used by the appropriate relationship marker. For example, “Related Persons” uses the Family vocabulary and records family relationships, such as “ParentOf”, “ChildOf”, “SpouseOf”, “CousinOf” etc. An employment field might use a different vocabulary which uses terms such as “was employee at”, “was manager at”, “owned” etc. Only these three columns are required, although, of course one can include more if desired. It is possible to add data to match other fields in the “Record relationship” record type, including Start Date and End Date for the relationship, a Short Description etc.
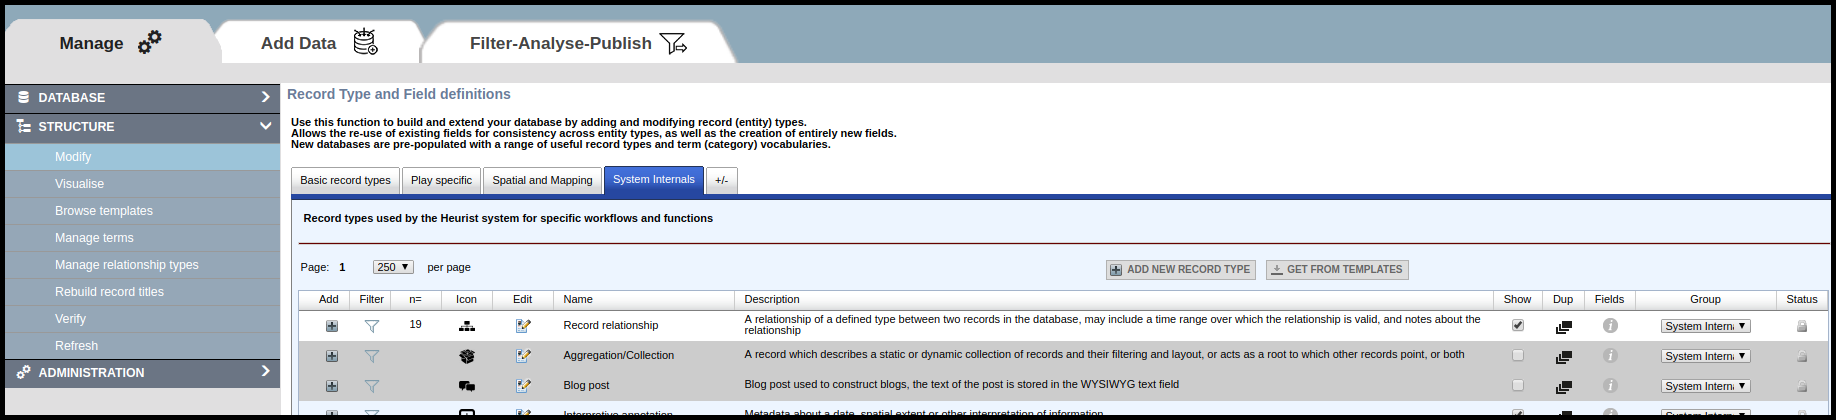
Before importing the CSV file created for the relationships, it is important to ensure that the record type “Record relationship” is active (i.e. able to be displayed – it does, of course, function regardless). You will find this record type in the tab called “System Internals” in any Heurist database. To make the record type active, click on the checkbox under “Show” (see screenshot above). This will also change the background of record type from grey to white, as shown above. This will enable “Record relationship” to be selected as the Primary record type for the CSV import.
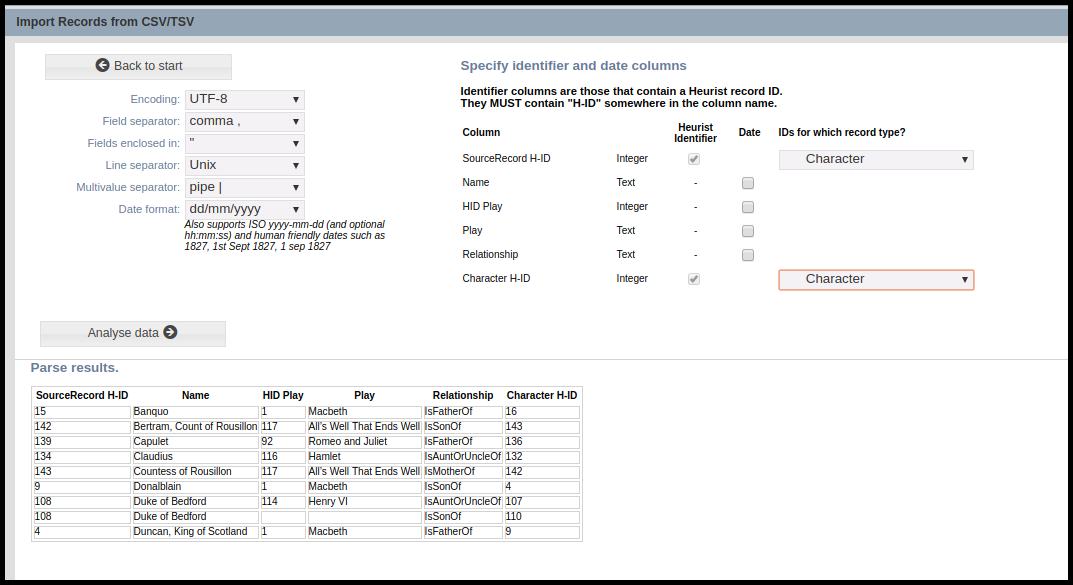
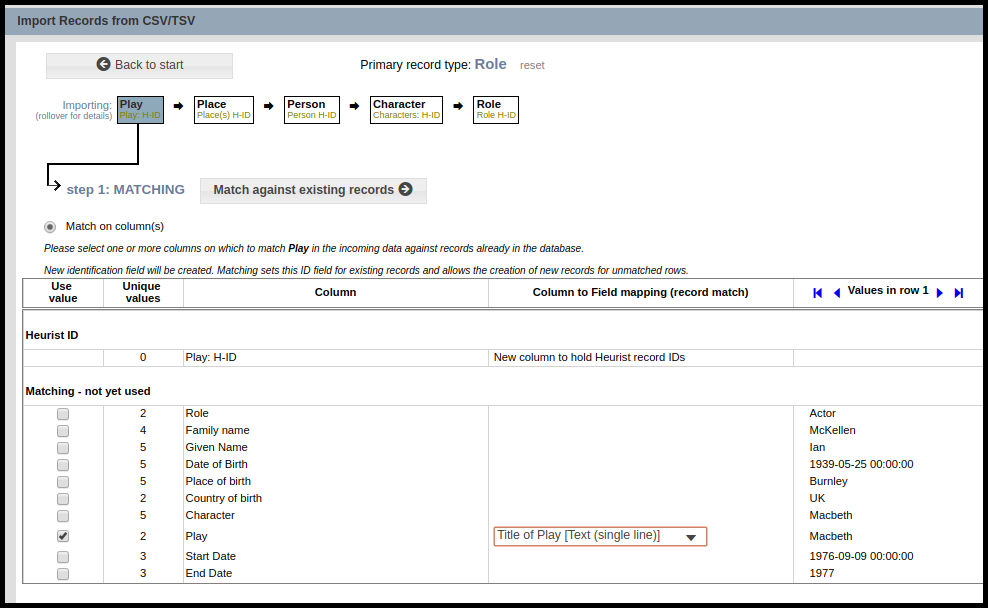
Once the CSV file is ready then select Import Delimited text (csv, tsv) in the Add Data tab. The CSV Import wizard will open in a popup window. Upload the CSV file and select Analyse data. As shown in the screenshot above, Heurist will automatically select the checkboxes next to the H-ID columns in the CSV file; you should then identify the record type associated with both the Source and Target H-IDs. In the example shown above, both H-ID columns refer to the record type “Character”. Note that additional columns of data are present in this file, although they are not needed for this import. These additional columns can be ignored.
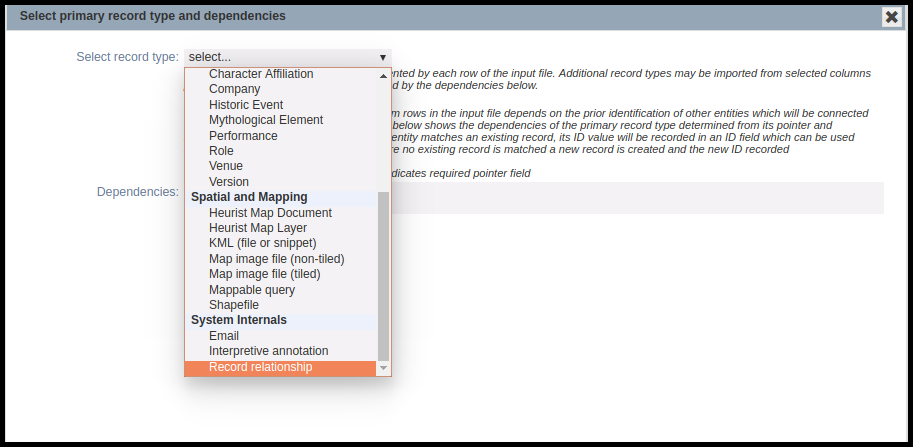
Continue to select the Primary record type. It is important the “Record relationship” record type is selected from the System Internals group (see above). Do not select the record types associated with either the source or target records. In this example, we are not importing any dependencies, therefore the dependencies can be left unchecked. It is probably best to match on the Source records, using the Source record pointer, however, any non-ambiguous match is fine. Then match the fields for import. At a minimum these need to be the Source records (as a pointer field), the Target records (as a pointer field) and the column containing the relationship vocabulary terms. Continue with the import process as for other CSV files.
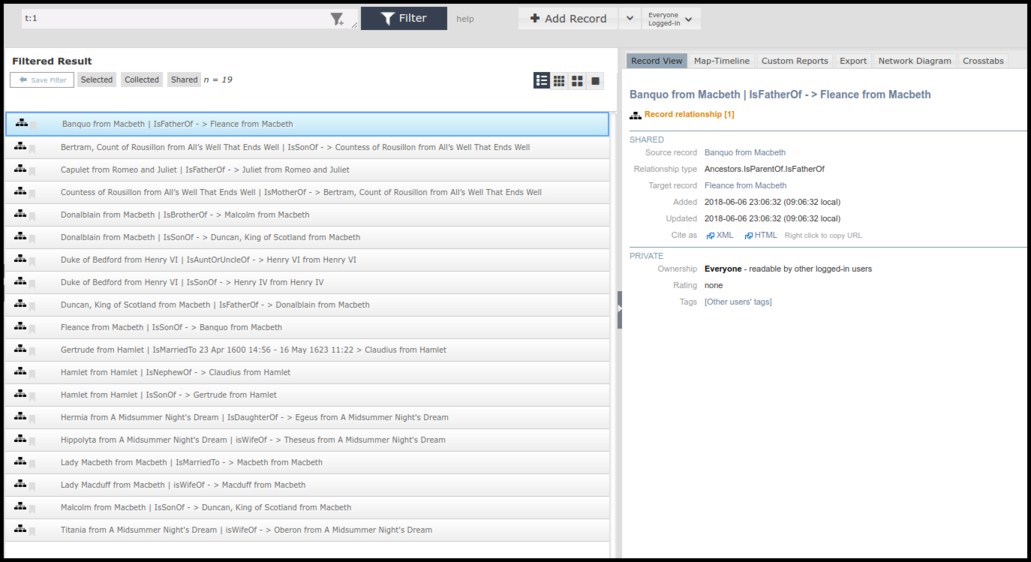
The screenshot above shows the resulting relationship records imported into the database. Note that the filter “t:1” returns all relationship records.
As stated above, Start and End dates for the relationship can also be added. These can be imported as separate fields in the CSV file. If edited manually, times can also be attached to the start and end dates.
The post Importing Relationships for Relationship Marker fields appeared first on Heurist Network.
]]>The post Using relationship marker fields for related records appeared first on Heurist Network.
]]>- They appear as a field, with a label and description, in the data entry form so that the user is reminded to enter the relationship at an appropriate point in the workflow and sees existing relationships in context;
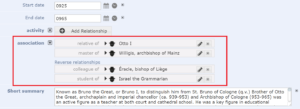
Two relationship marker fields (activity and association) embedded in a data entry form
- They constrain the relationship to point at a specific target record type or types with a specified list of relationship types. This ensures consistent data entry and allows the field to provide guidance on how to enter the data;
- They can show relationships from either end so, for example, if a relationship isSponsorOf is shown in a relationship marker of one record, the equivalent relationship marker in the related record will show isSponsoredBy (assuming the correct relationship markers have been defined and the two terms have been marked as the inverse of one-another);
- The constraints embedded in the relationship markers allow Heurist to build facetted searches, custom reports and network rules through a ‘wizard’ approach, as well as plotting more meaningful network diagrams.
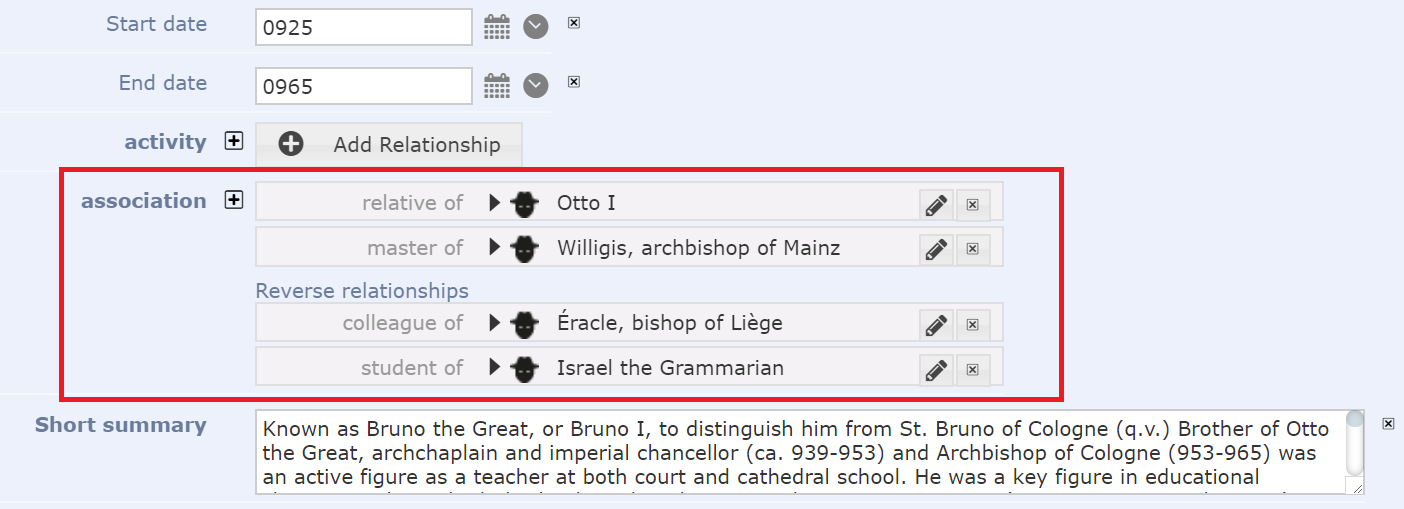
Relationship Markers build on the Record Pointer field type in that, in addition to defining target record type(s), they use a vocabulary to define the kind of relationship between the linked records, instead of just defining a link between records. There are some core vocabularies for relationship markers included with all databases – these include vocabularies for Family relationships, as well as Spatial and Temporal relationships. Users can define their own vocabularies for relationships to reflect different types of relationships within their own databases
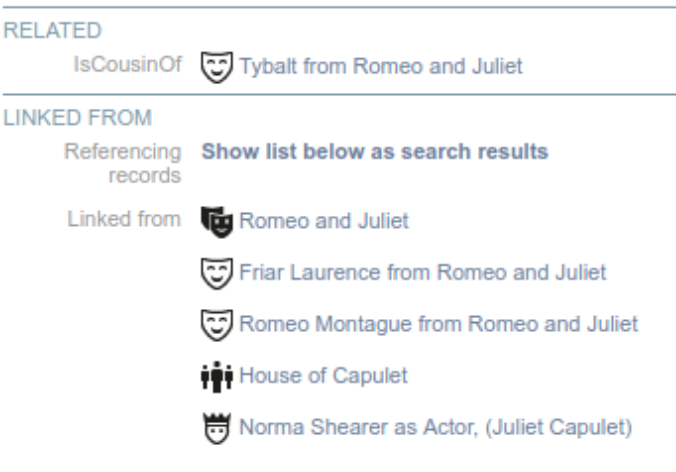
Related records are displayed in a separate section RELATED within the record view (image above). This display includes the term from the vocabulary as well as the linked record, which is highlighted in blue and can be opened by a single click. In the example shown above, the only Related Record for Juliet Capulet in the Shakespearean play, Romeo and Juliet, is the Character, Tybalt, who is her cousin. She is also linked to various other records through simple Record Pointer fields, such as the characters of Romeo and Friar Laurence, the play of “Romeo and Juliet”, the House of Capulet and an actress who played Juliet. Note that some of these pointers appear in the data for Juliet – these are pointer which point at other characters – while others only appear in the LINKED FROM section as these are pointers in other records which point AT Juliet.

The main difference is in the edit screen, where the type of relationship is included, as well as the record which is being related. In the example given above, Lady Macbeth is shown to be related in marriage to Macbeth (in the play, Macbeth).
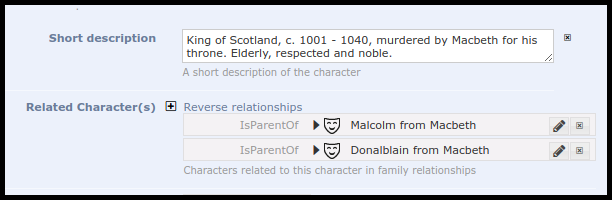
Furthermore, as well as the records to which one has defined links from the record being edited, the edit form also shows links from other records to the record one is editing. This can help to identify relationships that may not be inherently obvious in the data for that record. For example, shown above is the record for Duncan, king of Scotland in the play Macbeth. Two other characters in the play: Malcolm and Donalblain, have designated Duncan as being their parent (hasParent). Thus when we edit the record for Duncan, the reverse relationships from the records for Malcolm and Donalblain are now shown, allowing us to avoid duplication of these relationships, as well as showing the links themselves.
The post Using relationship marker fields for related records appeared first on Heurist Network.
]]>The post Simple broader term and multilingual searches appeared first on Heurist Network.
]]>Heurist’s hierarchichal term trees allow searches on broader terms which will automatically find narrower terms. For instance, in the Expert Nation database we can search for specific architectural degrees or, by choosing the broader term Architecture, we can search for all architectural degrees:

Broader-term searches also pull in narrower terms two or more steps down the tree.
Multilingual search
The same technique can be used to provide simple multilingual searches on terms which may be entered in a number of different languages. If equivalent terms in several languages are entered under a standard term (in the primary language of the database), terms can then be entered in any of the languages supported, and a search on the standard term (easily selected by scrolling up to the parent) will retrieve all records using the term in any of the supported languages.
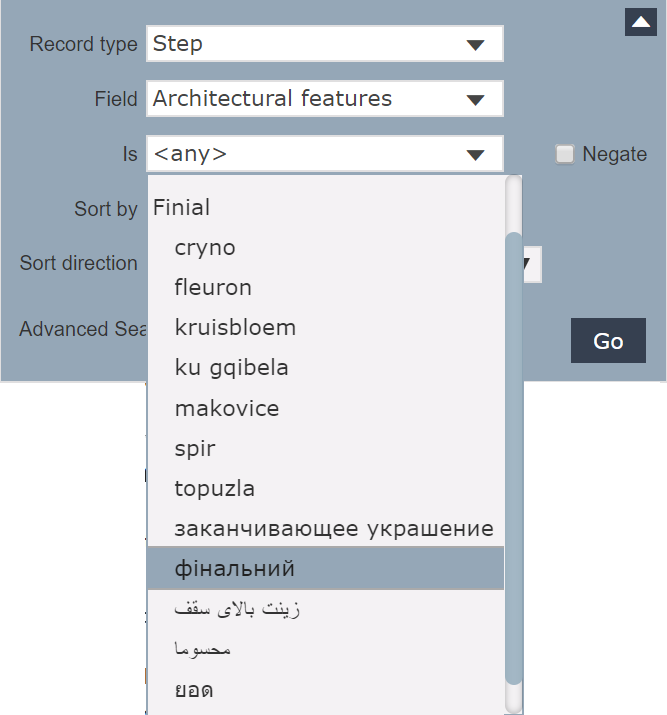
Where the languages are not immediately distinctive, terms can be entered as e.g. Cy: cryno, Fr: fleuron, Nl: kruisbloem etc. (this approach has the advantage of maintaining the terms in the same order for every standard term.
Other approaches
Heurist also has built in database structure for full multilingual equivalences of record types, fields and terms. However this function has not been fully implemented as there has not so-far been sufficient demand. In many cases, the technique described above will prove adequate.
The post Simple broader term and multilingual searches appeared first on Heurist Network.
]]>The post New mapping features appeared first on Heurist Network.
]]>- Automatic derivation of map location for non-geo-localised entities from connected Places
- Improved map marker clustering
- Improved temporal filtering
- Map selection tools
Derive Map Location
This feature displays the mapped locations of any records which are linked to Place records or selected other record types with geospatial fields. It has always been possible to map locations using Rules to pull in connected records containing coordinates, but that slightly obscure function has now been automated, and improves on the existing function by associating the coordinates directly with the records in the subset and mapping the records with their record icons rather than just a place marker.
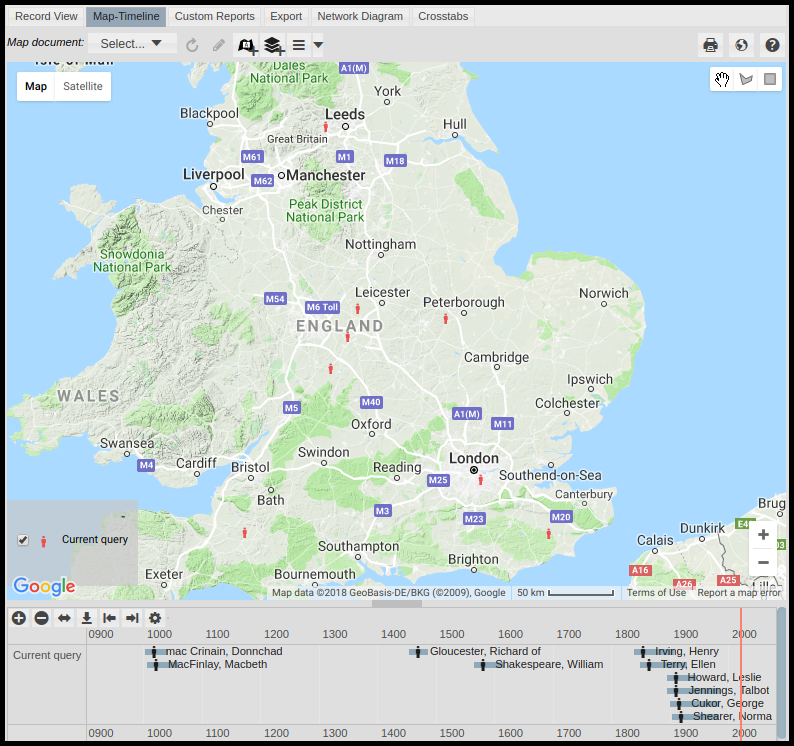
This feature is a wonderful simplification and a functionality I personally have often wished for when working in my Heurist databases. It is displayed in the image above. Person records point to Place records (e.g. for Place of Birth or Place of Death), but often do not actually have geospatial fields themselves. The screenshot above shows Person records from a database on Shakespeare’s Plays. A Place of Birth (and occasionally a Place of Death) is recorded for each of these Person records.
Thus, although these Person records do not actually contain a geospatial field (but rather pointer fields to Place records), the Derive Map Location function allows these Person records to be displayed on the map, as well as the timeline. Clicking on any of the person icons will select the associated record and open a popup of the record details (see screenshot below). Note that this function is enabled by default for all new databases, but must be switched on for existing databases.

This is extremely useful for records where optimal database design means that the geospatial information is in a linked record (this is often the case, since many records will link to a smaller set of Places, and the coordinates of those places should not be duplicated in many individual records). A good example is the Occupation eventlet in a database such as Expert Nation (expertnation.org) which records a period of employment for an individual with dates and location specified by Place (since many people will have worked at the same place, it causes unnecessary and undesirable redundancy to record the coordinates of every instance of employment). The new function allows the employment instances themselves to be mapped, so that the map can be filtered by the timeline, and clicking on the map objects will pop up details of the employment instance rather than the place.
Note that this function only works by default for records linked specifically to the core Heurist record type, Place. However, you can add additional record types which will be considered as Places for mapping purposes (ie. whose coordinates become available for mapping of records which connect to them). This is set in the Manage tab under Properties:
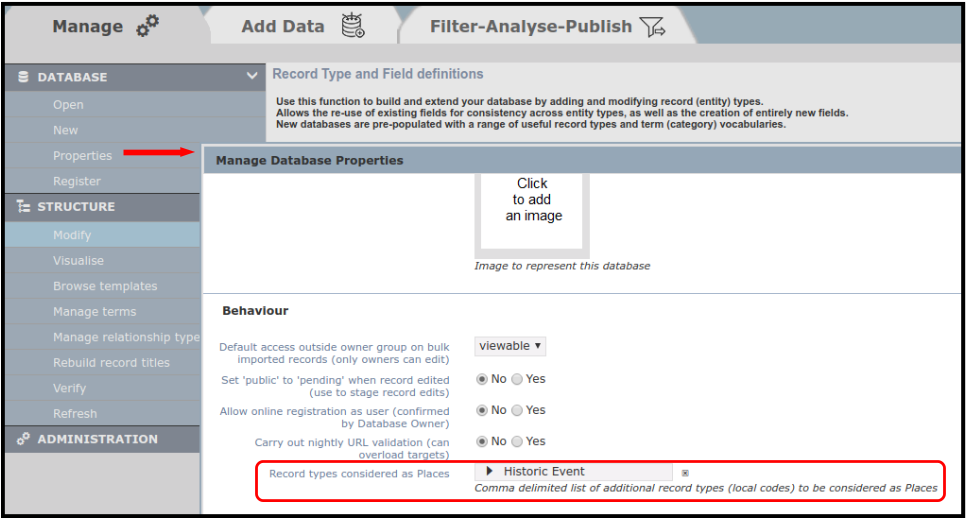
Other record types can be set as Places to be displayed on the map.
Map marker clustering
This feature has long been available in Heurist, but was OFF by default (it can be turned on under Preferences). It is now ON by default for new databases, and has been improved through better handling of multiple records at an identical location (meaning that the cluster cannot be zoomed in further to separate the icons).
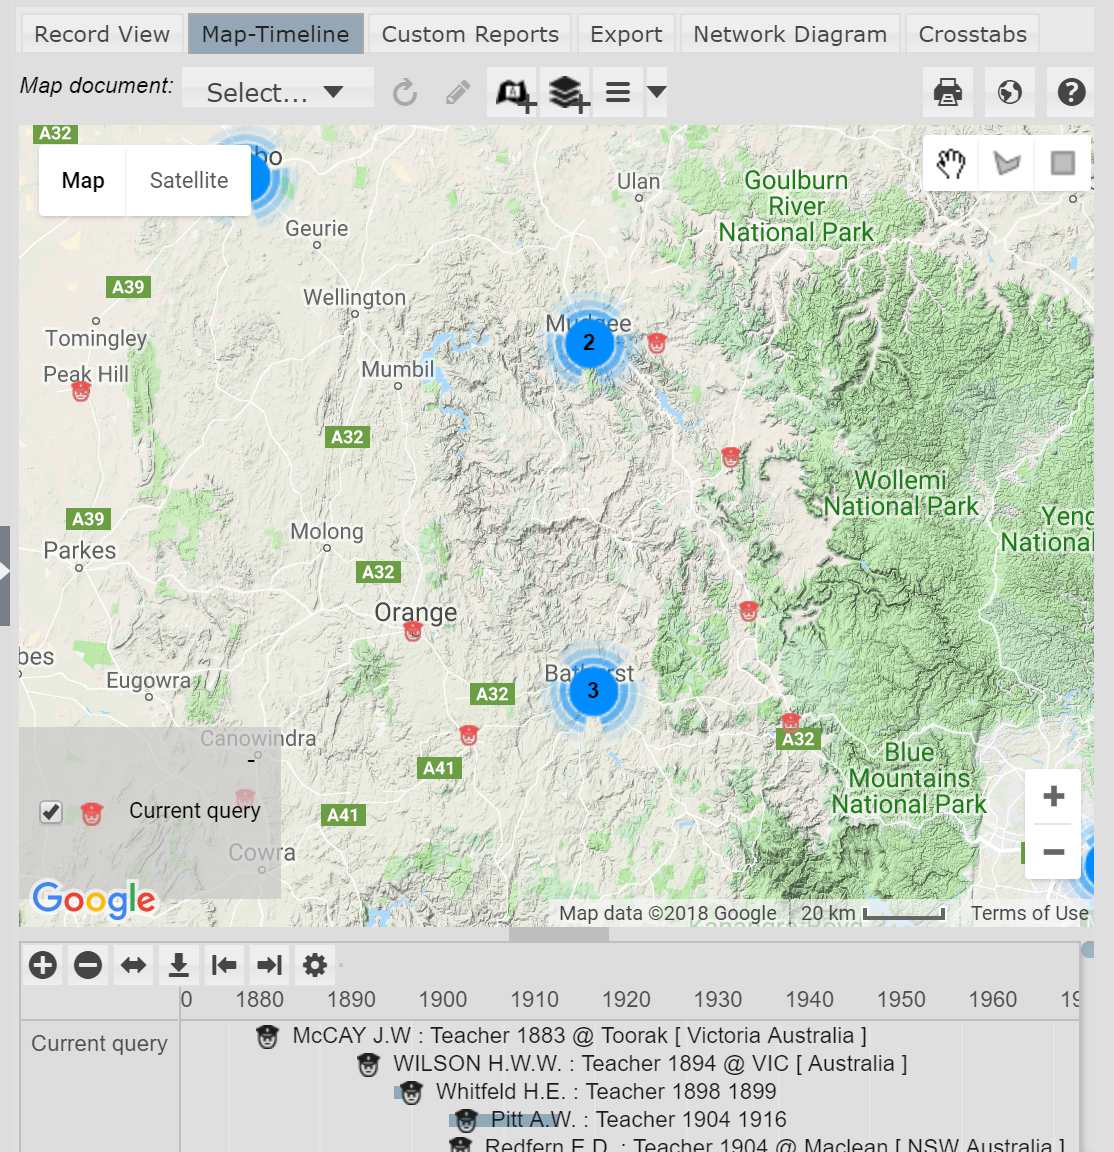
Where several records appear in close proximity on the map display, they are clustered and replaced with a number representing the number of records within the cluster. This provides a clearer and more attractive map and more information than a dense cluster of overlapping icons. In the map below we see the distribution of instances of employment as teachers for Australian university staff and students involved in WWI – we immediately grasp the nature of the distribution:

Expert Nation: map of instances of employment as teachers
Clicking on one of these clusters immediately zooms the map to extent of the cluster so that it separates out the individual icons (it may then show smaller clusters within the extent). If all the records in a cluster are at exactly the same location, instead of zooming to the cluster – which would not server to separate the icons – the information popup is displayed, with a list of all the records at that location; clicking on one of these displays the information for that record in the popup.
This is a great feature and saves heaps of time otherwise spent zooming in and out trying to see which records are where. In the map below, of instances of employment as teachers, I have clicked repeatedly on clusters to zoom in to an area – some clusters are still displayed because there are several instances at specific schools:
Expert Nation: zoomed in map of instances of employment as teachers
I love this feature and think it well worth enabling via the Preferences dialogue box, which is why we have now defaulted it to be ON. It is a really useful feature for any records which have mapped locations, and it is a great complement to the other two new features, especially the “derive map location” feature.
Map select tools
The selection tools can be seen in the top right of the screenshots above. These tools allow one to select records on the map in different ways. Most notably, one can now select records interactively on the map using a rectangle or self-defined polygon. The latter is really useful for investigating clusters of records, as identified by the Map clustering tool, described above. Once the polygon is defined, the map automatically zooms into and selects those records within the polygon. The first record, determined alphabetically, has its information displayed in a popup, as shown above, and in the bottom left corner of the popup is a dropdown menu showing all the selected records, allowing one to quickly navigate to any of the records in the selected set.
Filter by timeline
This feature has been re-implemented and switched on by default for new databases. It interactively filters the map display to display only those records within the current timeline display; the map display updates immediately as the timeline is zoomed or scrolled. The two images shown below shows how the display on the map changes as one scrolls along the timeline.
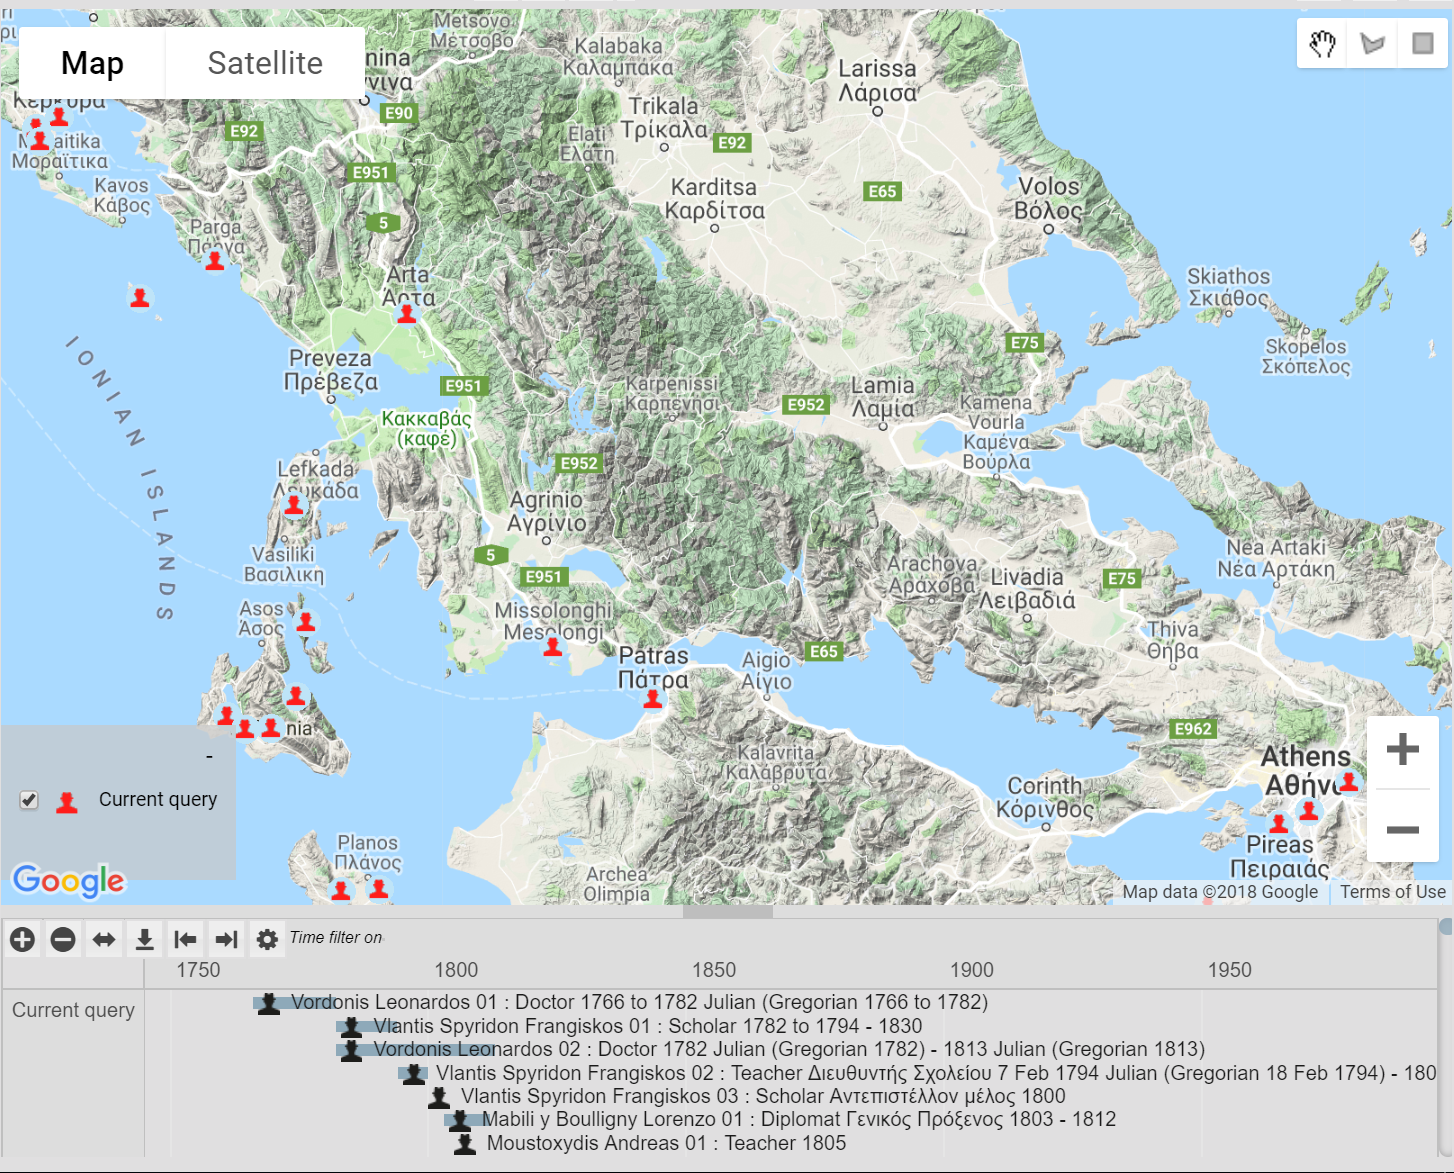
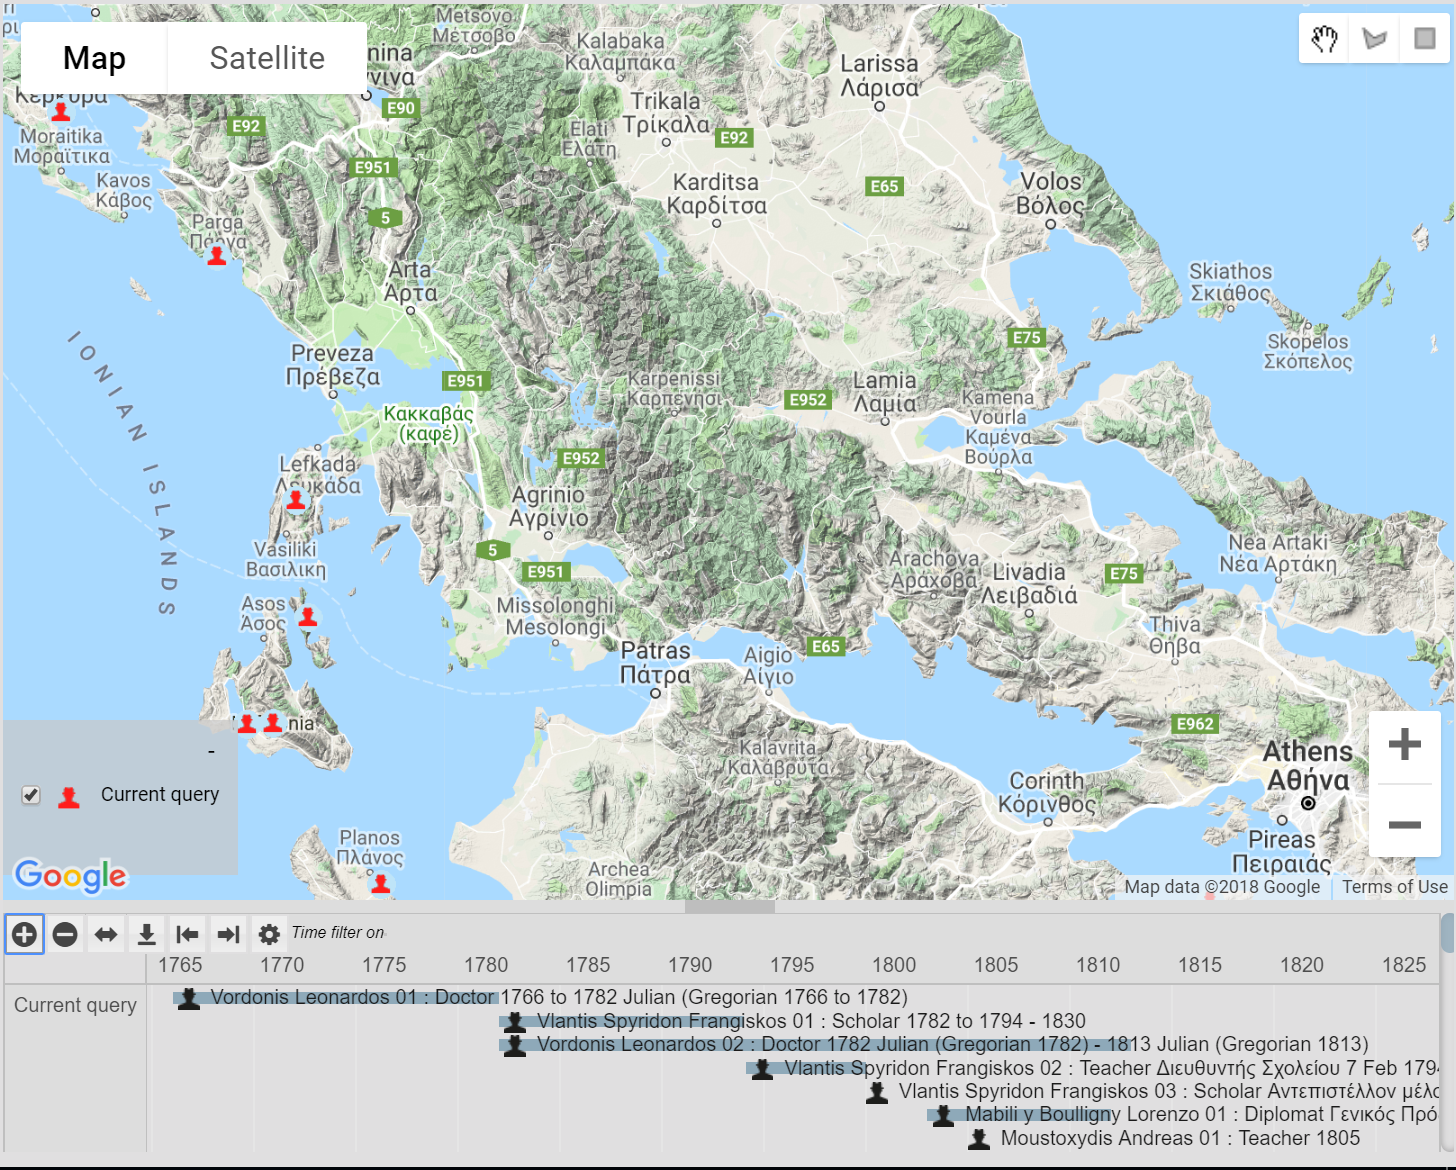
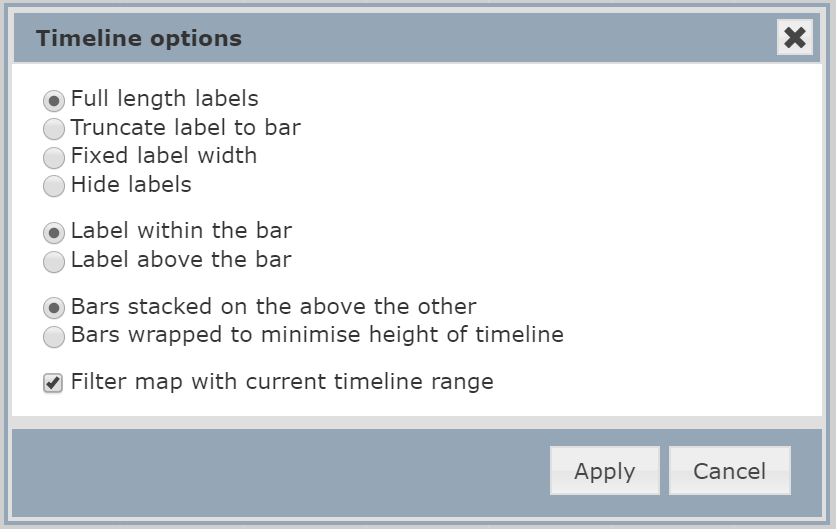
This feature is now activated directly through a checbox on the timeline options dialogue (below), opened by the gearwheel symbol above the timeline. Other options cover how records and their labels are displayed on the timeline. The “Filter map with current timeline range” option has great potential for showing changes through time, especially for map-timeline feeds to websites.
These new features complement each other very well and can work together to improve one’s ability to interact with the map and timeline. For example, one can show the changing distribution through space and time of a particular record type, such as a Person, a person’s life events such as employment or military service, or a Museum Object, even though those records do not themselves have geospatial fields, their location(s) being represented through pointers to Place records. The map is also made more legible by clustering, which now handles clusters of records which cannot be spatially differentiated (ie. they all occur at exactly the same Place).
The post New mapping features appeared first on Heurist Network.
]]>The post Using UTM Coordinates in Heurist appeared first on Heurist Network.
]]>Heurist records coordinates in digital degrees (longitude and latitude), since they provide a unequivocal worldwide coordinate system and are the base for most web mapping systems, Google Earth and GPS navigation. Following a request from a user, our developers have now implemented the ability to read and convert UTM (Universal Transverse Mercator) coordinates – the grid coordinates on topographic maps – in both the location digitiser (within the record editor), as well as the CSV import (for bulk uploads). Lat/long and UTM are the two coordinate systems in which data are likely to be collected; projections other than UTM are generally only used for map display.

UTM divides the globe into 60 zones (each 6 degrees of longitude wide) divided at the equator between the two hemispheres. Latitude bands, which segment the UTM zones and assign a letter code (A to M in the Southern Hemisphere and N to Z in the Northern Hemisphere) are sometimes also used with UTM coordinates, but these bands actually belong to a military grid reference system and are not required for positioning within the UTM coordinate system. All that is required for a UTM location is the Easting and Northing (measured in metres from the origin of each zone) and the zone number and the hemisphere in which the location is situated. Thus a sample set of UTM coordinates looks like this: 332494 6248931 56 S; which shows the number of metres East and North of the origin of zone 56 in the southern hemisphere.
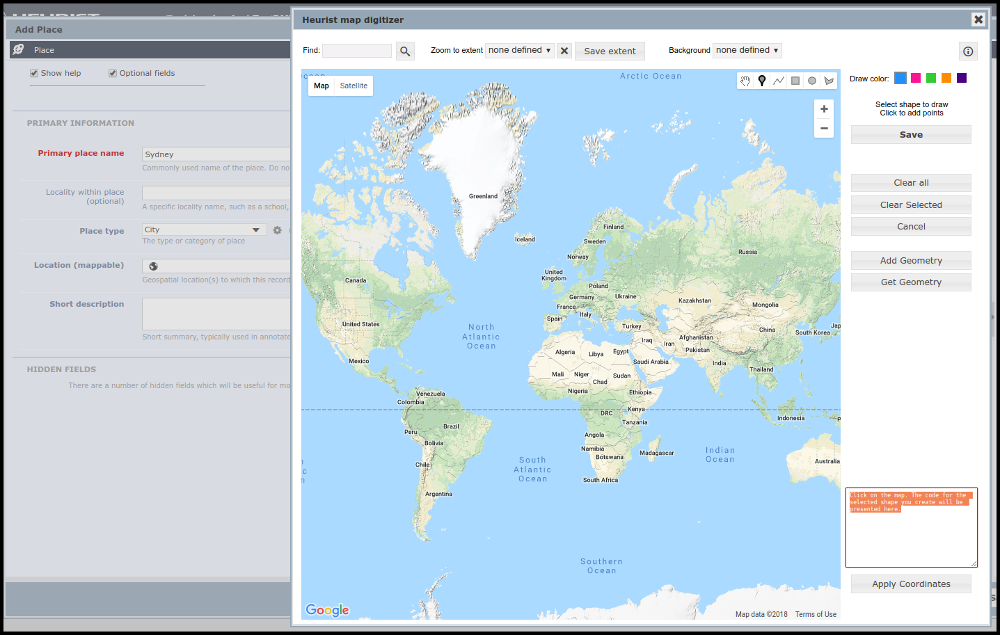
Using the field “Location (mappable)” (or any other field defined as a geographic object type) in Heurist allows locations to be marked according to their geospatial position, either through the mapping digitiser interface (shown above), or by a CSV import. This field is included by default in record types such as “Place”, but can also be included in other record types as needed. To enter coordinates manually, type the coordinates into the box in the lower left of the digitiser screen, shown here highlighted in orange. Type over the text which provides prompts for those wishing to digitise directly onto the map. You can enter either latitude and longitude coordinates in digital degrees; or an Easting and a Northing as UTM coordinates.
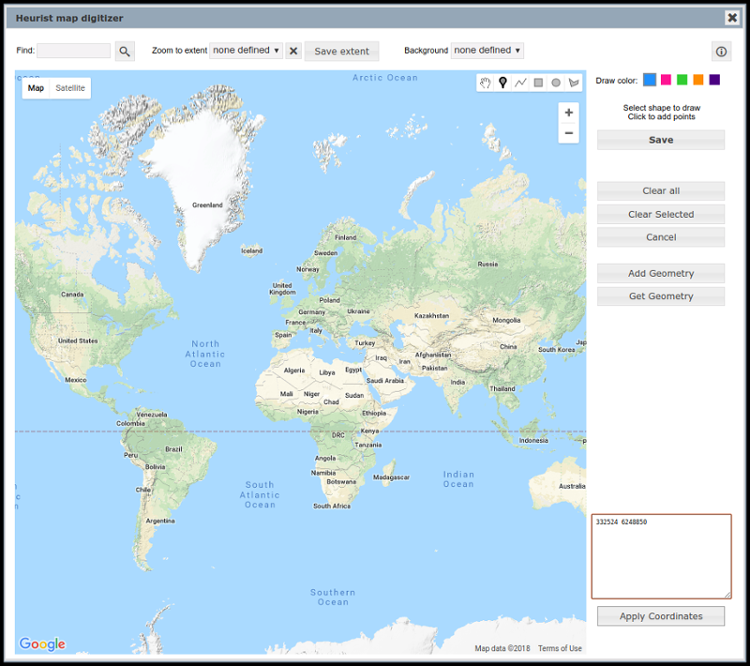
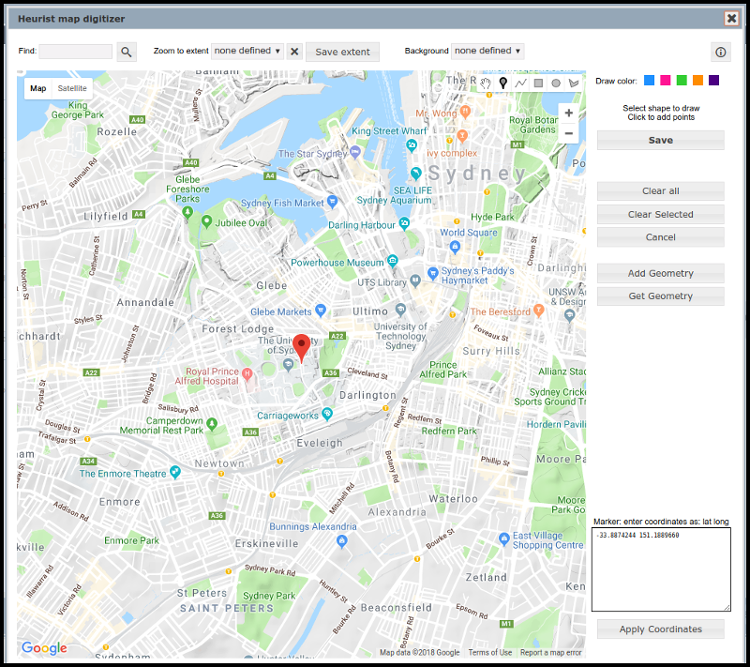
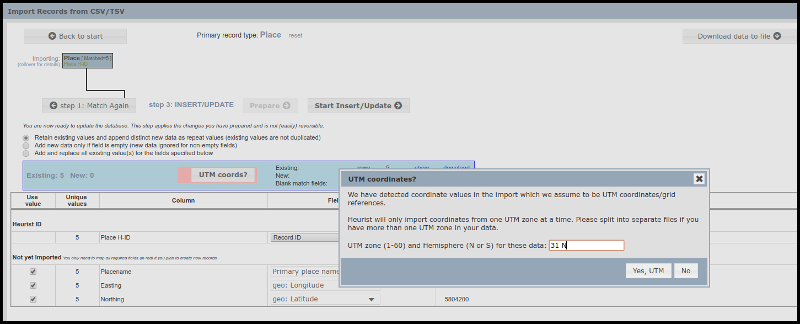
Once you have entered coordinates, click on the Apply Coordinates button. Heurist will automatically detect the UTM coordinates and ask for the zone and hemisphere, as shown in the image at the top of this page. The location will then be marked in the correct place within Heurist’s map digitiser interface, as shown below, and the coordinates converted to digital degrees.
A very similar process will occur with a CSV import using UTM coordinates. Import into a record type containing the “Location (mappable)” field, such as Place, and then map the Easting onto the Geo:longitude field and the Northing onto the Geo:latitude field (as shown in the background below). Heurist will automatically recognise the UTM coordinates and, once you click on the “UTM Coords?” button (shown outlined in pink in the image below), will prompt for the zone and hemisphere (you can only import coordinates from one zone at a time – break up the file into one zone segments if multiple zones are present). We have chosen to restrict import to one zone at a time, not for any technical reason, but to simplify the specification of locations (since most projects using grid references will fall within a single zone).
The post Using UTM Coordinates in Heurist appeared first on Heurist Network.
]]>The post New child record function – better support for exclusive linked records appeared first on Heurist Network.
]]>The latest update of Heurist allows a record pointer field to be designated as a child record pointer simply by checking a box when creating (or modifying) the field. Any record pointer field so-marked will create a new record which is inherently identified as a child of the current record. The parent is shown when editing the record (as shown above) and fields from the parent are automatically available for use in the constructed record title. Once a child record has been created, it cannot be accidentally changed to a new parent.
Child record pointers allow one to define records which are inherently part of, or owned by another record. This is useful for recording components, such as scenes and motifs in art panels, events in a person’s life, or variant subsets of attributes describing an artefact. It provides a cleaner generic method for modeling these structures compared to existing methods used in some archaeological and prosopographic databases.
When to use
The main question to ask before defining a child record is the following: Can this related record exist on its own, without the parent record? If the answer is yes, then the related record is Not a child record. The child record has to be dependent on the parent record, recording further information about/relating specifically to the parent record. An example of this would be a life event, such as the coronation of a king. In the example below, the coronation of King Richard III (an historic event linked to the Shakespearean play, Richard III and a life event of Richard of Gloucester) is shown. Any king or queen can have a coronation, and many in England were crowned at Westminster Abbey, however, only Richard of Gloucester was crowned on 6 July, 1483, at Westminster Abbey in London. That combination of who, where and when is unique and relates purely to King Richard III. Thus the coronation as a life event is a child record of Richard of Gloucester. Many other people can, of course, be linked to this event as participants (or have life events which specify participation in this event).

You can see from the image above that the record of Richard III’s coronation not only lists the parent record in the title: “Gloucester, Richard of : Coronation 6 July 1483 @ London” along with the date and place of the event, but also has a link to the Parent record: “Gloucester, Richard of” in the first line of the record display. This field is generated automatically when the child record is created. The parent record also appears in the Linked From area for linked records at the bottom of the display.

Setting child record pointers
To create child records, choose “Record Pointer” as the field type and then check the box next to the text “Create new records as children” in the edit screen of the pointer field (see above). This will add “(child)” underneath the words “Record pointer” in the Data type listing for the field. When entering data, the edit screen will show ![]() instead of the usual
instead of the usual ![]() to add a Pointer record. You have a choice of adding a new record, which becomes the child record, or selecting an existing record, which will make the existing record a child record (this might be needed if child records have been imported in bulk). It is most likely, and highly recommended, that you create new records to be the child records, and we make sure you can’t allocate existing records by accident. You will then be given the usual add data screen, with an additional required (but already populated, and non-editable) field at the top of the screen showing the parent record (see first image).
to add a Pointer record. You have a choice of adding a new record, which becomes the child record, or selecting an existing record, which will make the existing record a child record (this might be needed if child records have been imported in bulk). It is most likely, and highly recommended, that you create new records to be the child records, and we make sure you can’t allocate existing records by accident. You will then be given the usual add data screen, with an additional required (but already populated, and non-editable) field at the top of the screen showing the parent record (see first image).
The post New child record function – better support for exclusive linked records appeared first on Heurist Network.
]]>The post New data entry form speeds access and provides new functions appeared first on Heurist Network.
]]>The edit screen now pops up on top of the filter results by default rather than opening a new tab (which is still available). The main data section remains largely unchanged, so the form will be completely familiar, although improvements have been made to the rendering of some field types (for example, the record pointer field shows an icon for the type of record which is referenced).
Related records display
One of the most useful new features is the immediate display in the righthand panel of all records which are linked to the current record. This display includes those that reference the current record eg. works referencing their creator/author(s), and is particularly useful in databases which have strong hierarchies or networks of connection. For example, this will show a person and their life events and/or relations and/or publications, a historical event and its actors and location, or linked entities in an archaeological excavation (where larger contexts own smaller contexts, features and finds). These linked records can be viewed in more detail and edited directly via the pencil icon, and in turn show all linked records.
Child record pointers
The new data entry form also provides support for the new child record function (selectable as an option in the definition of a record pointer field) whereby a record created by a so-marked pointer field becomes a child of the current record and automatically recognises its parent. This is of particular use for cases such as life events of a person, scenes and motifs within an art panel, components of a structure or detailed analyses of an artefact or sample; there is no longer a need to add a pointer back to the parent.
Serial workflow improvements
We’ve improved the workflow for addition of records in a series. ![]() saves the current record and immediately creates a new record of the same type. The Duplicate button copies the current record to a new record, which can then be edited, facilitating the entry of many similar records. Similarly, when editing an existing record, Previous and Next buttons (with a handy record count, so that one knows where one is in the set of records) allow one to step through editing any filtered subset of records sequentially.
saves the current record and immediately creates a new record of the same type. The Duplicate button copies the current record to a new record, which can then be edited, facilitating the entry of many similar records. Similarly, when editing an existing record, Previous and Next buttons (with a handy record count, so that one knows where one is in the set of records) allow one to step through editing any filtered subset of records sequentially.
Display options and record structure changes
At the top of the screen, you can see the type of record you are editing (in this case a Play), saved records will also show the ID number and constructed title of the record. Immediately below the title line are two check boxes and the tiny gear wheel symbol ![]() . The check boxes allow one to select whether or not to reveal the Help text below each record and whether or not to show Optional fields. The gear wheel symbol allows one to edit the structure of the record type (the set of fields, their labeling, their order, requirements etc.).
. The check boxes allow one to select whether or not to reveal the Help text below each record and whether or not to show Optional fields. The gear wheel symbol allows one to edit the structure of the record type (the set of fields, their labeling, their order, requirements etc.).
The gear wheel is used consistently as a symbol for modifying structure – a blue version is used next to dropdown terms lists (such as Type of Play or Themes in the example above) to allow one to add terms, or even restructure the dropdown options, whilst entering records. This solves that annoying problem of wanting to select a value, only to realise that the category you want is not currently in the list!
Changing record type
If you decide that you need to change to a different record type, eg. because you hit Add record without selecting the correct type, or because you have variants and realise you are in the wrong variant, an option in the top right of the screen (under the Heading “Admin”) allows you to do so. The type of record (in this example, a Play) appears as a dropdown from where one can select any of the other record types in the database – all data values are preserved when the record type is changed.
Righthand panel
The righthand panel of the edit screen also allows one to add bookmarks (private information attached to a record), tags, see (and edit) linked records at a glance, and has a scratchpad for cutting and pasting information, for quick notes or annotations as a memo to anyone editing the record. Thus, if you want a colleague or student to edit a particular record in a particular way, you can add a note on the record itself, so that when they are looking at that record in edit mode, they can see the note. The scratchpad data is only accessible within the edit screen, it is not designed to be accessible as part of the record.
Use the pencil icon to edit the bookmark (private) information, which allows you to set a password reminder, rate the record with a number of stars or add personal notes.
To edit other information, look for the pencil icon:![]() which allows one to edit related records (such as the playwright William Shakespeare). This allows one to quickly add or change something in a related record, without having to conduct a separate search for that record.
which allows one to edit related records (such as the playwright William Shakespeare). This allows one to quickly add or change something in a related record, without having to conduct a separate search for that record.
Tags can be set at a personal level (only for your login) or within any of the workgroups within the database to which you belong; i.e. you can set tags that can be seen by other users in one of the workgroups, when they are logged in to the database.
It is the goal of the Heurist team to continually improve your experience with your database, so please don’t hesitate to let us know if anything doesn’t run smoothly for you or there is some particular feature that you need – chances are that it exists already and we just need to show you how to find it!
The post New data entry form speeds access and provides new functions appeared first on Heurist Network.
]]>The post Facet Search appeared first on Heurist Network.
]]>Heurist has the unique ability not only to run these sort of filters but to allow filtering based on the characteristics of other records linked through several relationship steps. For example, in a theatre performance database you could find all theatres which hosted plays which featured actor(s) born in Stratford. This sort of multi-level query would normally require the writing of obscure SPARQL queries in a triple store or multiple levels of SQL queries in a relational database; in Heurist it can be set up in a couple of minutes by clicking through a simple selection wizard.
While we’ve had facet searches for some years, work on the Beyond 1914 and Expert Nation projects in particular has led us to make facet searches much more customisable and instantly embeddable into third party websites such as WordPress. The result can be seen in the customisation of searches on the Beyond 1914, Expert Nation and Digital Harlem websites featured in our Projects page; the code required to embed a search in a web page is immediately available by right-clicking on any saved search (see below).

Adding a Facet Search
You will find facet searches on the left side of the main Filter-Analyse-Publish screen (see screenshot above). You can add filters and searches under any of the headings on the left, such as “My Filters” (as shown above), or within the workgroups below. Those saved under “My Filters” will only be visible to you, whereas those saved under the respective workgroup will be visible to all members of that workgroup. In order to add a new Facet Search, mouse over the area where you want it to to be listed and right click on the 3 parallel white lines which appear on the right. Right clicking will drop down a menu as above. Select the “New Faceted” option with the ![]() icon. This will open a popup screen which will ask you to select the entity (record) type on which you want the search to be based. A default name is given to the search, but this can be altered as necessary for clarity. You also have the option of selecting which workgroup you would like the search to be saved under. “Advanced” options allow you to set a Preliminary filter and Expansion rules; and if the search is to be used in a website, then the “Public interface” heading allows one to set a title for the search in the user interface, as well as decide (via a checkbox) whether or not to display the full set of records before the facet selection occurs. This can be useful if you wish people to interactively narrow down their focus on the information on a website.
icon. This will open a popup screen which will ask you to select the entity (record) type on which you want the search to be based. A default name is given to the search, but this can be altered as necessary for clarity. You also have the option of selecting which workgroup you would like the search to be saved under. “Advanced” options allow you to set a Preliminary filter and Expansion rules; and if the search is to be used in a website, then the “Public interface” heading allows one to set a title for the search in the user interface, as well as decide (via a checkbox) whether or not to display the full set of records before the facet selection occurs. This can be useful if you wish people to interactively narrow down their focus on the information on a website.
Selecting fields
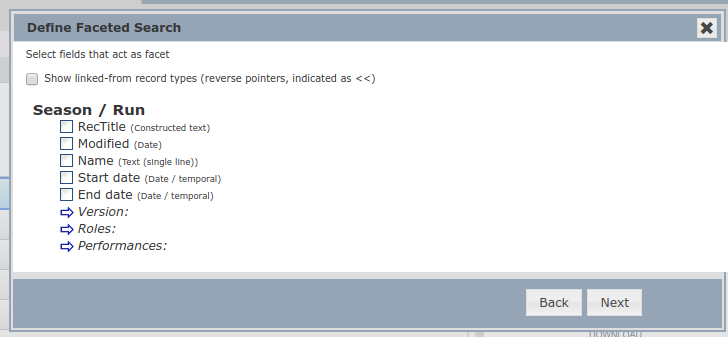
As one starts to define the facet search, the next screen offers the option of including linked-from record types – with reverse pointers, indicated by << – as well as the records that are pointed to, which are shown with a blue arrow. In some circumstances it can be useful to expand the search options in both directions, showing records that point to one’s base entity, as well as records that the base entity points to. If these bi-directional relationships are desired to be included in the search then check the box next to “Show linked-from record types”. Clicking on the blue arrow next to records that are pointed to will drop down a list of their fields for inclusion in the search parameters, with their pointer fields also displayed as blue arrows that can be selected, etc. It is possible to build a deep, nested tree of fields for inclusion in the search. The act of defining these searches can inform research questions that were previously not considered, as one starts to explore the relationships within one’s data.
Setting Display Options
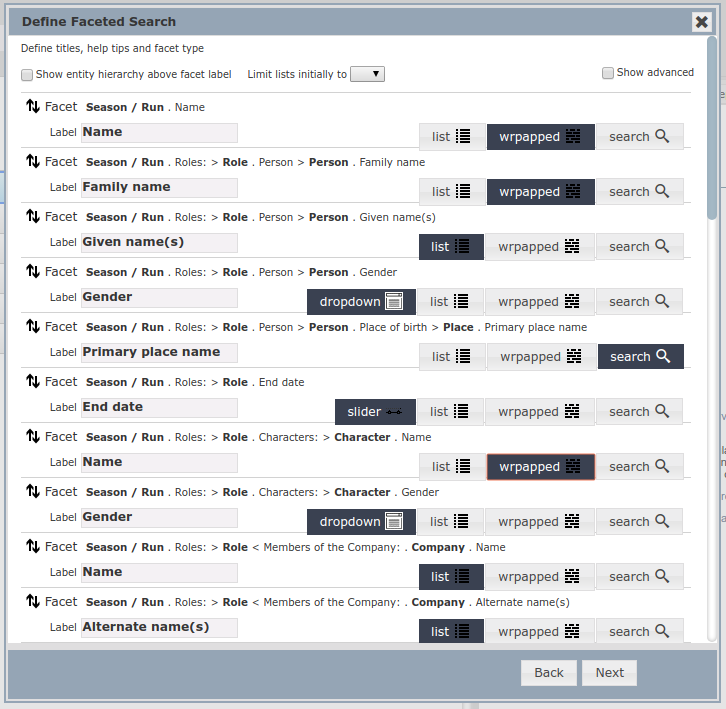
Once one has selected fields, one can choose how the fields will be displayed in the search (see above) – as a list, as wrapped text, as a search where the user enters text, as a dropdown list or as a slider (the latter is used for numbers and dates). One can change the order of the fields to affect the display of the facet search. This allows one to guide users through their search by putting the more generic fields at the top and then more specific ones lower down, or encourage users to focus in particular areas by putting those fields first. The type of search will vary according to the nature of both the data and the way that the search will be used. For example, one might wish to allow people to enter text when searching on Family Name in a database of historic soldiers, but one might give them a list of the names of Companies of Players in a theatre performance database. Dropdowns are primarily useful if they are short. For fields where the list of dropdown terms is very long a list or wrapped text may be more appropriate. The final screen in the facet search is a preview, allowing one to see what the final search will look like. One can then use the Back and Next buttons to go backwards and forwards tweaking the search display until it matches your expectations. Once the faceted search is saved, right-clicking it and choosing Embed: ![]() from the dropdown menu will provide you with both a URL and the code to embed the search in a webpage.
from the dropdown menu will provide you with both a URL and the code to embed the search in a webpage.
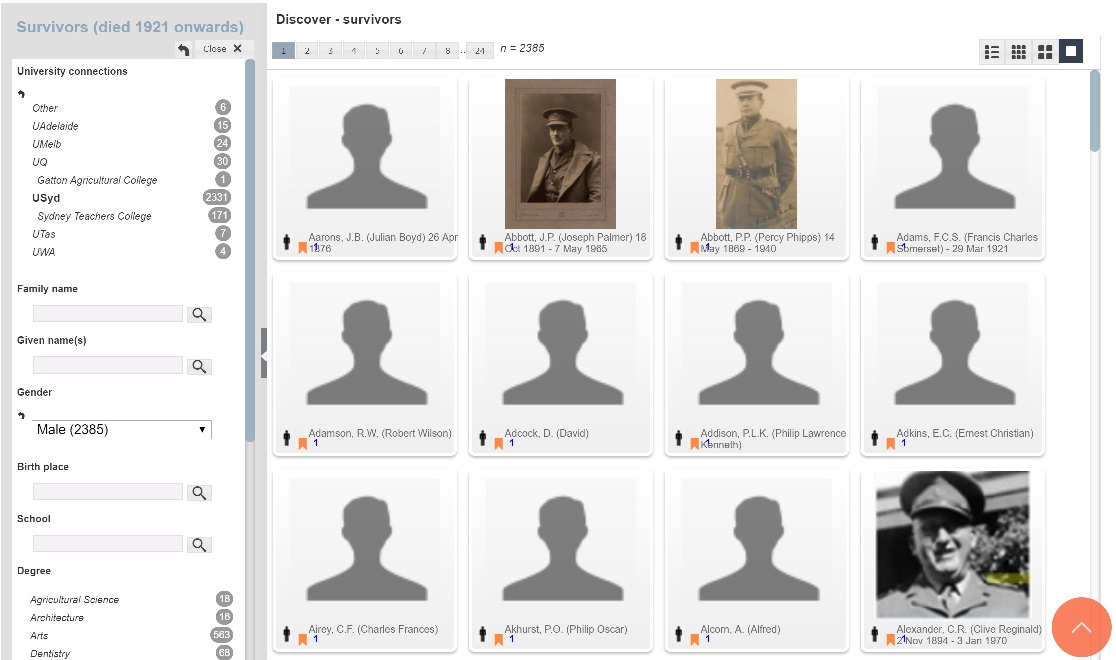
Heurist facet search embedded in the ExpertNation WordPress website
The post Facet Search appeared first on Heurist Network.
]]>Hi all!
My name is Claire. Some of you may have already met me online, but for those who haven’t, here is a bit about me: I have recently joined the Heurist team to assist Ian, mainly with helping people using Heurist, plus a little bit of documentation and bug-catching; and down the track, (watch this space!) Heurist training materials.
I first met Ian at the Archaeological Computing Laboratory back in 1993, when I visited Australia having completed my MA in Archaeology at the University of Cape Town in South Africa, using the GIS, known in those days as Arc/Info, to analyse intra-site spatial patterning at the Late Stone Age site of Dunefield Midden in the Western Cape. Having kept in intermittent contact through the years at conferences such as CAA and UISPP, it was only natural that in 2009, when I was hired to look after the spatial and other data for a World Heritage Site nomination project in Bahrain (“Pearling, Testimony of an Island Economy”, granted World Heritage status in 2012), I turned to Ian for advice and he recommended Heurist.
GIS work leads one to databases as a natural extension, so I had mucked around with various databases before, including relational ones, but what immediately appealed about Heurist was its ability to deal with both time and space, making it uniquely suited for cultural heritage. Heurist was a wonderful assistance to the World Heritage project, earning lavish praise from the ICOMOS assessor. I also used Heurist for my PhD project (at the University of Sydney) on the lithics of Bahrain, which incidentally entailed creating a database of all the known archaeological sites in Bahrain (670 sites, by the time I finished my PhD in 2016). We were also creating a National Sites Database for Bahrain using Heurist, work that was sadly abruptly ended by the Arab Spring of 2011.
I have been an enthusiastic advocate of Heurist ever since I first encountered it, especially for those working in the realms of archaeology and cultural heritage (where I can speak with some experience that it is far and away the best knowledge management system around). However, I clearly remember my early days of using Heurist, where despite having had some experience with databases, I struggled to wrap my head around what was an entity, which were attributes and how best to structure my data, given my particular dataset. In fact, I believe that one of Heurist’s strengths is that because it doesn’t warp your processes to fit its own structure, like many other systems out there do, using Heurist leads one to a deeper understanding of one’s own dataset than any other system I know. Once one has mastered the basic concepts and seen how they work with one’s own data, one really understands what data one has, what one can do with it and new research questions grow naturally as one works with the data – an ideal methodology, really.
I am now hoping to use the skills that I’ve acquired to help others and to make learning how to use Heurist effectively as easy as possible. Heurist has such an enormous depth of capability that it is often not immediately obvious to people encountering it for the first time. Heurist is incredibly tolerant and resilient, allowing one to adjust the structure of one’s database as you go, even once one has entered data, making it a perfect environment to explore and experiment whilst learning; however, as with anything else, understanding what are often several ways of doing things and techniques for getting the best out of one’s data can save enormous amounts of time, so I will be helping the rest of the Heurist team to develop ways to share knowledge of those aspects with other users.
I have been based in Brisbane, Australia, since 1998 (aside from a sojourn in Saudi Arabia and Bahrain between 2006 and 2011), so if you’re in Australia or NZ we may meet up in person at some stage too!
The post Claire Reeler joins the Heurist Team appeared first on Heurist Network.
]]>